Chapter 6: Payer Setup
Overview
Payer Setup is where you configure all insurance companies (payers) that your agency accepts, including Medicare, Medicaid, and private insurance. This chapter covers:
- Understanding payers and their role in billing
- Adding and managing payers
- Configuring Medicare HIPPS rates
- Setting up payer-specific billing rules
- Managing payer contacts and submission details
Who Should Read This Chapter:
- Agency Administrators
- Billing Managers
- Intake Coordinators (to verify insurance eligibility)
Prerequisites:
- Completed agency settings (Chapter 4)
- Understanding of home health billing concepts (PDGM, HIPPS codes)
6.1 What is a Payer?
A Payer is an insurance company or government program that reimburses your agency for home health services provided to patients.
6.1.1 Types of Payers
Medicare
- Description: Federal health insurance program for individuals 65+ and certain disabled persons
- Payment Model: Patient-Driven Groupings Model (PDGM)
- HIPPS Codes: 5-character codes determine payment per 30-day period
- Claim Type: UB-04 (CMS-1500 for some physicians)
Medicaid
- Description: State and federal program for low-income individuals
- Payment Model: Varies by state (fee-for-service, managed care)
- Claim Type: UB-04
Private Insurance
- Description: Commercial insurance companies (e.g., Blue Cross Blue Shield, Aetna, UnitedHealthcare)
- Payment Model: Fee-for-service, per-visit, or contracted rates
- Claim Type: UB-04 or proprietary electronic claims
Managed Care Organizations (MCOs)
- Description: Health plans that contract with providers to deliver care at reduced costs
- Examples: Medicare Advantage, Medicaid Managed Care
- Payment Model: Contracted rates, capitation, or per-episode
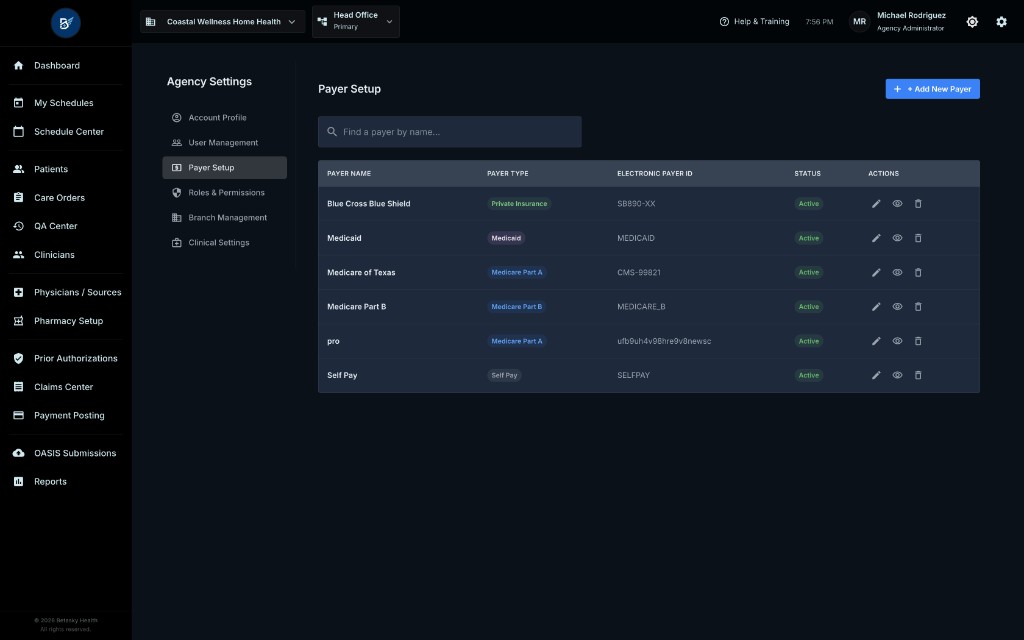
6.2 Accessing Payer Setup
Navigation Path
- From the Dashboard: Click Settings (gear icon) in the top-right header bar
- Select "Payer Setup" from the dropdown menu
- The Payer Management page will open
What You'll See:
- List of all configured payers
- Payer Name, Type (Medicare, Medicaid, Private), and Status (Active/Inactive)
- Add New Payer button in the top-right corner
- Search and filter options
6.3 Adding a New Payer
6.3.1 Click "Add New Payer"
- In the Payer Management page, click the Add New Payer button
- The Add Payer modal will open
6.3.2 Required Payer Information
Payer Name
- Purpose: Official name of the insurance company or program
- Format: Text (up to 255 characters)
- Examples:
- "Medicare - [Your MAC Name]" (e.g., "Medicare - Palmetto GBA")
- "Medicaid - [State]" (e.g., "Medicaid - Texas")
- "Blue Cross Blue Shield of Texas"
- "UnitedHealthcare"
Best Practices:
- Use the payer's official legal name
- Include state or region if the payer operates regionally
- Avoid abbreviations unless they're standard (e.g., "BCBS" for Blue Cross Blue Shield)
Payer Type
- Purpose: Categorizes the payer for billing and reporting
- Options:
- Medicare - Federal Medicare program
- Medicaid - State Medicaid program
- Private Insurance - Commercial insurance companies
- Managed Care - MCOs, Medicare Advantage, etc.
- Other - Workers' comp, VA, or other non-traditional payers
Payer ID
- Purpose: Unique identifier assigned to the payer
- Format: Alphanumeric (5-10 characters)
- Examples:
- Medicare: Varies by MAC (e.g.,
00510for Palmetto GBA) - Medicaid: Varies by state
- Private: Payer-assigned ID or national plan ID
- Medicare: Varies by MAC (e.g.,
- Where to Find: Provided by the payer or obtained during enrollment
Status
- Active: Payer is currently accepted and can be assigned to new patients
- Inactive: Payer is no longer accepted (but historical claims remain accessible)
6.4 Payer Contact Information
6.4.1 Primary Contact
Address
Complete address for claims submission or correspondence:
- Street Address
- City
- State
- ZIP Code
Phone Number
- Purpose: Main contact number for billing inquiries, claim status checks, and authorizations
- Format: (###) ###-####
- Purpose: Email for electronic correspondence (e.g., remittance advice, claim inquiries)
- Format: Valid email address
Website
- Purpose: Payer's portal for eligibility checks, claim submission, and provider resources
- Example:
https://www.cms.gov/(for Medicare)
6.4.2 Claims Submission Details
Claims Submission Address
- Purpose: Where to mail paper claims (if applicable)
- Note: Most claims are submitted electronically via clearinghouse
Clearinghouse Information
- Purpose: Third-party intermediary for electronic claim submission
- Examples: Change Healthcare, Availity, Waystar
- Setup: Configured in your billing module (not in Payer Setup)
Electronic Payer ID
- Purpose: Payer identifier used by the clearinghouse for electronic claims
- Format: Varies by clearinghouse
- Example:
13551(Medicare's national payer ID)
6.5 Medicare HIPPS Rates
HIPPS stands for Health Insurance Prospective Payment System. Under the Patient-Driven Groupings Model (PDGM), Medicare pays home health agencies based on 5-character HIPPS codes that reflect patient characteristics and resource needs.
6.5.1 Understanding HIPPS Codes
A HIPPS code is structured as follows:
| Position | Component | Meaning |
|---|---|---|
| 1 | Admission Source | 1 = Community, 2 = Institutional |
| 2 | Clinical Grouping | A-L = 12 different clinical categories based on primary diagnosis |
| 3 | Functional Impairment | A-C = Low, Medium, High functional impairment |
| 4 | Comorbidity | 1-3 = None, Low, High comorbidity adjustment |
| 5 | Timing | 1 = Early (days 1-30), 2 = Late (days 31-60) |
Example:
- 1AA11 = Community admission, Behavioral/Neurological, Low function, No comorbidity, Early period
- 2CB32 = Institutional admission, Musculoskeletal, High function, High comorbidity, Late period
6.5.2 Configuring HIPPS Rates
Medicare reimburses home health agencies based on the applicable HIPPS code. These rates are updated annually by CMS and vary by geographic region (wage-adjusted).
To Configure HIPPS Rates:
- In the Payer Management page, click on Medicare to view details
- Navigate to the HIPPS Rates tab
- You will see a table listing all HIPPS codes (there are 432 possible combinations, but only a subset are commonly used)
For Each HIPPS Code:
- Code: The 5-character HIPPS code (e.g.,
1AA11) - Description: Brief explanation of what the code represents
- Rate: Payment amount (in USD) for a 30-day period
- Effective Date: When this rate became active
- End Date: When this rate expires (if applicable)
6.5.3 Updating HIPPS Rates
HIPPS rates are typically updated by Betasky staff when CMS releases new rates (usually annually in January).
If You Need to Update Manually:
- Click the Edit icon next to the HIPPS code
- Enter the new Rate and Effective Date
- Click Save
Important:
- Always use the rates provided by CMS for your region
- Incorrect rates will result in underpayment or overpayment (and potential audits)
- Rates are wage-adjusted based on your agency's geographic location
Where to Find Official HIPPS Rates:
- CMS PDGM webpage: https://www.cms.gov/Medicare/Medicare-Fee-for-Service-Payment/HomeHealthPPS
- Your Medicare Administrative Contractor (MAC) website
6.5.4 HIPPS Code Assignment
Automatic Assignment:
- The system automatically calculates the HIPPS code based on:
- OASIS assessment data (functional scores, comorbidity)
- Primary diagnosis (determines clinical grouping)
- Admission source (community vs institutional)
- Period timing (early vs late)
Manual Override:
- Agency Administrators can manually adjust the HIPPS code on a claim if needed
- Use this feature with caution (only for corrections, not to inflate billing)
6.6 Payer-Specific Billing Rules
6.6.1 Authorization Requirements
Some payers require prior authorization before services begin.
To Configure:
- In the payer detail page, navigate to Billing Rules
- Enable Requires Prior Authorization
- Set the Authorization Duration (e.g., 30 days, 60 days, entire episode)
Effect:
- When a patient is assigned this payer, the system will prompt for an authorization number during intake
- Prior Authorization Center (Chapter 27) will track authorization expirations
6.6.2 Visit Limits
Per-Day Limits:
- Maximum number of visits allowed per day (e.g., Medicare allows multiple visits if medically necessary)
Per-Episode Limits:
- Total visits allowed in a 60-day episode (common for private payers)
To Configure:
- Set Max Visits Per Day and Max Visits Per Episode in the Billing Rules section
- The system will warn schedulers if limits are exceeded
6.6.3 Co-Pay and Deductible
Co-Pay:
- Fixed amount the patient pays per visit (e.g., $20 per visit)
Deductible:
- Annual or per-episode deductible the patient must meet before insurance pays
To Configure:
- Enter the Co-Pay Amount (if applicable)
- Enter the Annual Deductible (if applicable)
- The system will display this information in patient financial records
6.7 Managing Existing Payers
6.7.1 Editing Payer Information
- In the Payer Management page, click on the payer you want to edit
- Update any fields (contact info, billing rules, HIPPS rates)
- Click Save Changes
6.7.2 Deactivating a Payer
When to Deactivate:
- Your agency no longer accepts a particular insurance
- A payer has gone out of business or merged with another
How to Deactivate:
- Click the Deactivate button next to the payer
- Set the Inactive Date (date you stopped accepting this payer)
- Confirm the action
Effect:
- The payer no longer appears in the dropdown for new patients
- Existing patients with this payer retain their insurance assignment (for historical records)
- Claims can still be generated for past service dates
6.7.3 Reactivating a Payer
If you resume accepting a previously inactive payer:
- Click the Reactivate button
- Update any outdated information (rates, contacts)
- Click Save
6.8 Troubleshooting Common Issues
Issue 1: "HIPPS Rate Not Found"
Problem: When generating a claim, the system cannot find the HIPPS rate
Solution:
- Ensure the HIPPS code is configured in the Medicare payer setup
- Check that the Effective Date of the rate covers the claim's service date
- Update HIPPS rates if CMS has released new rates
Issue 2: "Payer ID Already Exists"
Error Message: "A payer with this ID already exists"
Solution:
- Each payer ID must be unique in the system
- Check if the payer is already configured (possibly under a different name)
- Use a modified payer ID if necessary (e.g.,
00510-TXfor Texas-specific Medicare)
Issue 3: "Authorization Required but Not Provided"
Error Message: "This payer requires prior authorization"
Solution:
- Ensure the authorization number is entered during patient intake (Chapter 14)
- Check the Prior Authorization Center (Chapter 27) for pending or expired authorizations
- Contact the payer to obtain authorization before scheduling visits
Issue 4: "Visit Limit Exceeded"
Warning: "This patient has reached the maximum visits allowed"
Solution:
- Review the payer's visit limits in the billing rules
- Contact the payer to request additional visits (if medically necessary)
- Document medical necessity in the clinical notes