Chapter 8: User Management
Overview
User Management is where Agency Administrators add, edit, and manage all staff members who will use the Betasky system. This chapter covers:
- Adding new users to your agency
- Assigning roles and permissions
- Managing multi-branch user access
- Configuring per-branch custom permissions
- User status management (Active, Inactive, Pending)
- Subscription user limits
Who Should Read This Chapter:
- Agency Administrators
- Super Administrators
- HR managers responsible for onboarding staff
Prerequisites:
- Understanding of user roles and permissions (Chapter 3)
- Completed agency settings (Chapter 4)
- Branch setup (Chapter 5) if your agency has multiple locations
8.1 Accessing User Management
Navigation Path
- From the Dashboard: Click the Settings icon (gear icon) in the top-right header bar
- Select "User Management" from the dropdown menu
- The User Management page will open
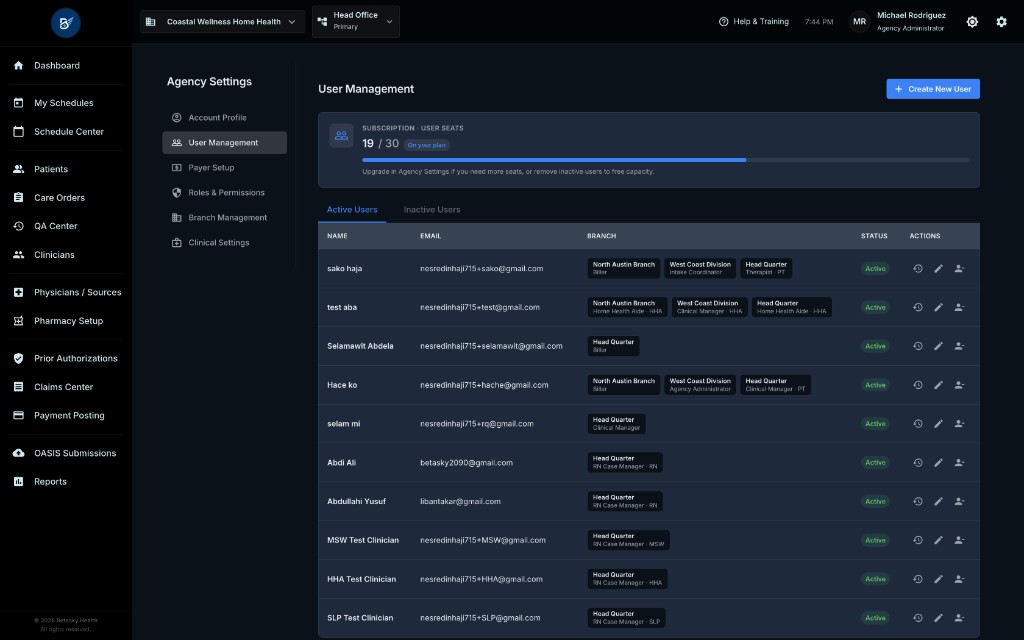
What You'll See:
- List of all users in your agency
- Each user shows: Name, Email, Role, Branch, Status, Last Login
- Add New User button in the top-right corner
- Search, filter, and sorting options
8.2 Understanding User Seat Limits
Your agency's subscription tier determines how many users you can add.
8.2.1 User Limits by Subscription Tier
| Subscription Tier | User Limit | Notes |
|---|---|---|
| Sandbox | Unlimited | For testing purposes only |
| Test | 5 users | Development accounts |
| Growth | 20 users | Small to medium agencies |
| Pro | 50 users | Mid-sized agencies |
| Enterprise | Unlimited | Large multi-branch agencies |
8.2.2 User Seat Capacity Warning
When Near Limit:
- System displays a warning: "You have used X of Y user seats"
- Administrators receive a notification when 90% capacity is reached
At Capacity:
- Error message: "User seat capacity reached. Please upgrade your subscription or deactivate inactive users."
- Add New User button is disabled
- Existing users can still log in and work normally
Solution:
- Upgrade your subscription (contact Betasky Sales)
- Deactivate users who no longer work at your agency
- Set former employees to "INACTIVE" status (they still count toward the limit but cannot log in)
8.3 Adding a New User
Adding a user is a multi-step process that checks for existing users and validates information before granting access.
8.3.1 Step 1: Email Verification
The system first checks if the email address is already in use.
To Begin:
- Click the Add New User button (top-right corner)
- The Add User modal opens at Step 1: Email Verification
Enter Email Address:
- Field: Email
- Format: Valid email address (e.g.,
john.doe@example.com) - Validation:
- Must be a valid email format
- System checks if this email already exists in the database
Three Possible Outcomes:
Outcome A: Email Not Found (New User)
- ✅ Message: "Email is available"
- Click Continue to proceed to Step 2
- You will enter all user details from scratch
Outcome B: User Exists, Already Has Access to Your Agency
- ⚠️ Warning: "This user already has access to your agency"
- The modal displays the user's current role and branch
- Action Required: Click Close or Cancel
- You cannot add the same user twice (edit the existing user instead)
Outcome C: User Exists in System, But Not in Your Agency
- ℹ️ Info: "User found in the system. Existing profile will be loaded."
- The system pre-fills the user's details (name, phone, discipline, license) from their existing profile
- Click Continue to proceed to Step 2
- Benefit: Speeds up onboarding for users who already work for another agency or were previously invited
Example:
- Jane Smith worked for "North Austin Home Health"
- She now joins your agency "West Coast Home Care"
- When you enter her email, the system finds her profile
- Her name, phone, and license details auto-fill (you only need to assign her role)
8.3.2 Step 2: User Details
After email verification, you enter (or confirm) the user's personal and professional information.
Personal Information
First Name
- Required: Yes
- Format: Text (up to 100 characters)
- Example: "John"
Last Name
- Required: Yes
- Format: Text (up to 100 characters)
- Example: "Doe"
Phone Number
- Required: No (but recommended for clinicians)
- Format: (###) ###-#### (automatically formatted as you type)
- Example:
(512) 555-1234 - Purpose: Used for communications, scheduling alerts, and contact purposes
Professional Information (Optional for Non-Clinical Users)
Discipline
- Required: For clinical staff (RN, LPN, PT, OT, SLP, HHA, MSW)
- Format: Dropdown selection
- Options:
- RN - Registered Nurse
- LPN / LVN - Licensed Practical Nurse / Licensed Vocational Nurse
- PT - Physical Therapist
- PTA - Physical Therapist Assistant
- OT - Occupational Therapist
- COTA - Certified Occupational Therapy Assistant
- SLP - Speech-Language Pathologist
- MSW - Medical Social Worker
- HHA - Home Health Aide
- (None) - For non-clinical staff (administrators, schedulers, billers)
Important:
- Discipline is required for users who will provide patient care or complete visits
- Non-clinical staff (Agency Administrators, Intake Coordinators, Billers) can leave this blank
License Number
- Required: For licensed clinicians only
- Format: Alphanumeric (varies by state and discipline)
- Examples:
- Texas RN:
RN123456 - California PT:
PT987654
- Texas RN:
- Purpose: Tracked for compliance; required for Medicare/Medicaid billing
License Expiration Date
- Required: If License Number is provided
- Format: Date picker (MM/DD/YYYY)
- Purpose: System alerts administrators when licenses are expiring (90 days, 60 days, 30 days)
Best Practice:
- Keep license information current
- Set up alerts in the Compliance Tasks module (Chapter 32) to track expirations
8.3.3 Step 3: Role & Branch Assignment
After entering user details, you assign the user's role and branch(es).
Primary Branch
- Purpose: The branch the user is primarily assigned to
- Format: Dropdown selection
- Options:
- Head Office (default if single-branch agency)
- All active branches (if multi-branch agency)
Single-Branch Agencies:
- If your agency has only one branch, this field auto-selects "Head Office"
- The user has access to all patients and data within that branch
Multi-Branch Agencies:
- The user will have access to this branch by default
- You can grant access to additional branches in the next section
Role
- Purpose: Defines the user's permissions (what they can do in the system)
- Format: Dropdown selection
- Options: All Agency Roles (see Chapter 3 for details):
- Agency Administrator
- Clinical Manager
- Scheduler
- Biller
- Intake Coordinator
- RN Case Manager
- LPN / LVN
- Therapist (PT / OT / SLP)
- Home Health Aide
- Custom Roles (if your subscription includes Custom Role Builder)
Important:
- Platform Roles (Super Administrator, Sales & Onboarding, Support Engineer) cannot be assigned by Agency Administrators
- Platform roles are internal Betasky staff roles managed separately
User Status
- Purpose: Controls whether the user can log in
- Format: Dropdown selection
- Options:
- ACTIVE - User can log in and work (default for new users)
- INACTIVE - User cannot log in (for former employees or suspended accounts)
- PENDING - User has been invited but has not completed setup (reserved for future invitation workflows)
Recommendation:
- Always set new users to ACTIVE unless you're pre-creating accounts for future employees
8.3.4 Multi-Branch Access (Optional)
If your agency has multiple branches and the user needs access to more than one, you can configure multi-branch assignments.
When to Use:
- Clinical Managers who oversee multiple locations
- Traveling clinicians who work at different branches
- Agency Administrators (who typically need access to all branches)
- Schedulers coordinating visits across multiple regions
How to Add Additional Branches:
- In the Add User modal, scroll to the Branch Access section
- Click Add Branch
- A new row appears with the following fields:
- Branch: Dropdown to select the branch
- Role at This Branch: Dropdown to select the user's role at this specific branch
- Discipline at This Branch: (Optional) Override the primary discipline for this branch
Example:
| Branch | Role | Discipline |
|---|---|---|
| North Austin Branch | Clinical Manager | RN |
| West Coast Division | Scheduler | (None) |
In this example, the user is a Clinical Manager (with nursing responsibilities) in North Austin but only a Scheduler in the West Coast Division.
Removing a Branch:
- Click the Delete icon (trash can) next to the branch row
- The user will lose access to that branch
8.3.5 Custom Permissions (Pro, Test, Enterprise Only)
If your subscription includes the Custom Role Builder feature, you can assign per-branch custom permissions to further refine access control.
What Are Custom Permissions?
- Granular permissions beyond the standard role (e.g.,
CREATE_PATIENT,APPROVE_DOCUMENT,GENERATE_CLAIM) - Can be added or removed on a per-branch basis
- Useful for unique staffing scenarios or temporary elevated access
To Add Custom Permissions:
-
In the Branch Access section, click Customize Permissions next to a branch
-
An accordion menu expands, showing all available permissions grouped by category:
- Patient Management (e.g., CREATE_PATIENT, UPDATE_PATIENT, DELETE_PATIENT)
- Clinical Documentation (e.g., CREATE_VISIT, APPROVE_OASIS, UPDATE_CARE_ORDER)
- Billing & Claims (e.g., GENERATE_CLAIM, APPROVE_CLAIM, POST_PAYMENT)
- Administration (e.g., MANAGE_USERS, MANAGE_BRANCHES, VIEW_AUDIT_LOG)
- Reports (e.g., VIEW_REPORTS, EXPORT_DATA)
-
Check or uncheck specific permissions to add or remove them
-
These custom permissions are additive (they add to the role's base permissions)
Example Scenario:
- User: Sarah, an RN Case Manager at the North Austin Branch
- Standard Role Permissions: Can create visits, document care, complete OASIS
- Custom Permission Added:
APPROVE_OASIS(normally only Clinical Managers can approve) - Result: Sarah can now approve OASIS assessments at the North Austin Branch, but not at other branches
Important Notes:
- Custom permissions are only available in Pro, Test, and Enterprise subscriptions
- If your subscription does not include Custom Role Builder, this section will not appear
- Custom permissions override role restrictions (use with caution)
8.3.6 Saving the New User
After entering all information:
- Click Save or Create User at the bottom of the modal
- The system validates all fields:
- ✅ All required fields are filled
- ✅ Email is unique within your agency
- ✅ License expiration date is in the future (if provided)
- ✅ At least one branch and role are assigned
- If validation passes, the user is created
- A Success toast notification appears: "User created successfully"
- The new user appears in the User Management list
What Happens Next:
- The user receives an email with their login credentials (if email invitation is enabled)
- They can immediately log in to the system (if status is ACTIVE)
- Their name appears in dropdowns for scheduling, patient assignment, and documentation
8.4 Editing an Existing User
To update a user's information, role, or branch assignments:
8.4.1 Open the Edit Modal
- In the User Management page, locate the user you want to edit
- Click the Edit icon (pencil icon) next to the user's name
- The Edit User modal opens with pre-filled information
What You Can Edit:
- Personal information (name, phone)
- Professional details (discipline, license number, expiration date)
- Role and branch assignments
- User status (Active, Inactive)
- Custom permissions (per branch)
What You Cannot Edit:
- Email address (email is the unique identifier)
- User ID (internal system identifier)
8.4.2 Edit Mode Tabs
The Edit User modal has two tabs:
Tab 1: User Details
- Update name, phone, discipline, license information
- Change primary role and branch
- Update user status
Tab 2: Branch & Permissions
- Manage multi-branch access
- Configure per-branch roles and disciplines
- Set custom permissions for each branch (if available)
To Switch Tabs:
- Click the User Details or Branch & Permissions tab at the top of the modal
8.4.3 Updating Branch Access
In the Branch & Permissions tab, you can:
Add a New Branch:
- Click Add Branch
- Select the branch from the dropdown
- Assign a role for this branch
- (Optional) Set a discipline and custom permissions
- Click Save
Edit an Existing Branch Assignment:
- Locate the branch in the list
- Click the Edit icon next to the branch
- Update the role, discipline, or custom permissions
- Click Save
Remove Branch Access:
- Locate the branch in the list
- Click the Delete icon (trash can)
- Confirm the action
- The user will no longer have access to this branch
Important:
- Users must have at least one branch assignment
- You cannot remove the user's last branch (deactivate the user instead)
8.4.4 Managing Per-Branch Custom Permissions
For each branch the user has access to, you can configure custom permissions.
To Customize Permissions for a Branch:
- In the Branch & Permissions tab, find the branch
- Click Customize Permissions (or expand the branch accordion)
- A list of permission categories appears (e.g., Patient Management, Clinical Documentation, Billing)
- Click on a category to expand it
- Check or uncheck individual permissions
- The changes are saved automatically when you click Save in the modal
Example:
Branch: North Austin Branch
Role: RN Case Manager
Custom Permissions Added:
- ✅
APPROVE_OASIS(can approve OASIS assessments) - ✅
GENERATE_CLAIM(can generate claims)
Custom Permissions Removed:
- ❌
DELETE_PATIENT(cannot delete patients even though some Case Managers can)
Result:
- This user has elevated approval rights but restricted deletion rights at this specific branch
8.4.5 Saving Your Changes
After editing:
- Click Save Changes at the bottom of the modal
- The system validates all fields
- If validation passes, the user is updated
- A Success toast notification appears: "User updated successfully"
8.5 Deactivating or Reactivating a User
8.5.1 When to Deactivate a User
Deactivate a user when:
- An employee leaves the agency (termination, resignation, retirement)
- A user account is suspended for policy violations
- A temporary employee's contract ends
- You want to preserve historical data but revoke access
Effect of Deactivation:
- User cannot log in
- User still counts toward your subscription's user seat limit (unless permanently deleted)
- Historical data (visits, documentation) remains accessible with the user's name attached
8.5.2 How to Deactivate
Option A: From User Management List
- Locate the user in the User Management page
- Click the Deactivate button (or status toggle)
- Confirm the action
Option B: From Edit User Modal
- Open the user in edit mode
- Change Status from ACTIVE to INACTIVE
- Click Save Changes
8.5.3 How to Reactivate
If you need to restore access to a previously deactivated user:
- In the User Management page, filter by Inactive users
- Locate the user
- Click Reactivate (or edit and change status to ACTIVE)
- The user can immediately log in again
8.6 User List Features
8.6.1 Search and Filter
Search Bar:
- Search by name, email, or role
- Real-time filtering as you type
Filter Options:
- Status: Active, Inactive, Pending
- Role: Filter by specific role (e.g., show only RN Case Managers)
- Branch: Filter by branch (multi-branch agencies only)
- Discipline: Filter by clinical discipline
8.6.2 Sorting
Click on column headers to sort by:
- Name (A-Z, Z-A)
- Role
- Branch
- Last Login (most recent, oldest)
- Status
8.6.3 Bulk Actions (Future Feature)
The system is designed to support bulk actions in future updates:
- Export user list to CSV
- Bulk role reassignment
- Bulk deactivation (e.g., at the end of a contract cycle)
8.7 User Login and Onboarding
8.7.1 How Users Receive Access
Option A: Email Invitation (If Enabled)
- After an administrator creates their account, the user receives an email with:
- Login instructions
- Temporary password (or link to set password)
- System URL:
https://app.betaskyhealth.com/
Option B: Manual Credential Sharing
- Administrator shares login credentials directly with the user (via phone, in-person, etc.)
8.7.2 First Login
When a user logs in for the first time:
- They may be prompted to change their password (if using a temporary password)
- They see a brief onboarding tour (optional, can be skipped)
- They land on the Dashboard with access scoped to their role and branch
8.7.3 User Profile Settings
Users can update their own:
- Profile picture
- Phone number
- Password
- Notification preferences
Users cannot change:
- Their role
- Their branch assignments
- Their permissions (only administrators can modify these)
8.8 Troubleshooting Common Issues
Issue 1: "User Seat Capacity Reached"
Error Message: "Cannot add more users. Your plan allows a maximum of X users."
Solution:
- Option A: Deactivate users who no longer work at your agency
- Option B: Upgrade your subscription:
- Contact Betasky Sales:
sales@betaskyhealth.com - Request a tier upgrade (e.g., Growth → Pro)
- Contact Betasky Sales:
- Temporary Workaround: Set inactive users to INACTIVE status (they still count toward the limit but cannot log in)
Issue 2: "Email Already Exists"
Error Message: "This email is already in use"
Solution:
- If the user already works for your agency: Edit the existing user instead of creating a new one
- If the user worked for another agency: The system should detect this and pre-fill their details (see Section 8.3.1, Outcome C)
- If you believe this is an error: Contact Betasky Support to investigate
Issue 3: "Cannot Remove Last Branch"
Error Message: "User must have at least one branch assignment"
Solution:
- Users must always have access to at least one branch
- If you want to remove all access, deactivate the user instead
Issue 4: "License Expiration Warning"
Warning: "This user's license expires in X days"
Solution:
- Contact the user to renew their license
- Update the License Expiration Date in the user profile once renewed
- Set up Compliance Tasks (Chapter 32) to automate license tracking
Issue 5: "Custom Permissions Not Available"
Problem: The "Customize Permissions" option doesn't appear
Solution:
- Custom permissions are only available in Pro, Test, and Enterprise subscriptions
- If you need this feature, upgrade your subscription
- Contact Betasky Sales to discuss your needs
Issue 6: "User Cannot See Patients/Data"
Problem: A user logs in but sees no patients or data
Solution:
- Check Branch Assignment: Ensure the user is assigned to the correct branch
- Check Role Permissions: Verify the user's role has the necessary permissions (e.g.,
VIEW_PATIENT) - Check Branch Selector: Ask the user to check the Branch Selector in the header bar and switch to the correct branch
- Verify Status: Ensure the user status is ACTIVE (not INACTIVE or PENDING)
8.9 Best Practices
✅ Do This:
-
Use Descriptive User Profiles:
- Enter full names (avoid nicknames or abbreviations)
- Include phone numbers for all clinical staff
- Keep license information current
-
Assign Roles Carefully:
- Use the principle of least privilege (give users only the access they need)
- Review roles quarterly to ensure they still match job responsibilities
-
Track License Expirations:
- Enter license numbers and expiration dates for all clinicians
- Set up automated alerts (Compliance Tasks module)
- Review expiring licenses monthly
-
Deactivate Former Employees Immediately:
- When an employee leaves, deactivate their account the same day
- This protects patient data and ensures compliance
-
Use Multi-Branch Access Strategically:
- Only grant multi-branch access to users who truly need it
- Managers and administrators typically need it; field staff usually don't
-
Leverage Custom Permissions (If Available):
- Use custom permissions to handle unique scenarios (e.g., temporary elevated access for training)
- Document why custom permissions were granted (for audit purposes)
-
Train New Users:
- Provide a guided tour of the system after their first login
- Share this user manual with new staff
- Assign a mentor or supervisor for the first week
❌ Avoid This:
-
Don't Share Login Credentials:
- Each staff member should have their own account
- Sharing logins violates compliance and creates audit issues
-
Don't Leave Licenses Blank:
- Even if not immediately required, enter license information for all clinicians
- Missing licenses can block billing and cause claim denials
-
Don't Over-Assign Permissions:
- Not every user needs administrator access
- Excessive permissions create security risks and data integrity issues
-
Don't Forget to Deactivate:
- Inactive accounts are a security vulnerability
- Deactivate users promptly when they leave
-
Don't Ignore User Seat Limits:
- Monitor your user count regularly
- Plan ahead for seasonal staffing increases (e.g., hiring surge in Q1)
-
Don't Create "Generic" Accounts:
- Avoid shared accounts like "scheduler@agency.com" or "nurse1"
- Every user should have a unique, identifiable account