Chapter 15: Care Orders (Plan of Care)
Overview
Care Orders is where you manage each patient's Plan of Care (POC). The Plan of Care tells the physician, clinicians, and Medicare what services the patient will receive during their episode of care.
What You'll Learn:
- How to view all care orders
- Understanding care order status (Active, Pending Assessment, Pending Physician Signature)
- How to view an individual patient's care order
- What the "Authorized Visits" table shows
- How to use the Actions menu (Create Orders, Recertification, Discharge, Transfer, Death)
- How to view visit schedules and documents
Who Should Read This Chapter:
- Agency Administrators
- Clinical Managers
- Case Managers (RN Case Managers)
- Intake Coordinators
Prerequisites:
- Patient has been admitted (Chapter 14)
- Understanding of Medicare home health episodes (60-day periods)
15.1 Accessing Care Orders
Where to Find Care Orders
- Look at the left sidebar
- Click on "Care Orders"
- The Care Orders page opens
15.2 The Care Orders List Page
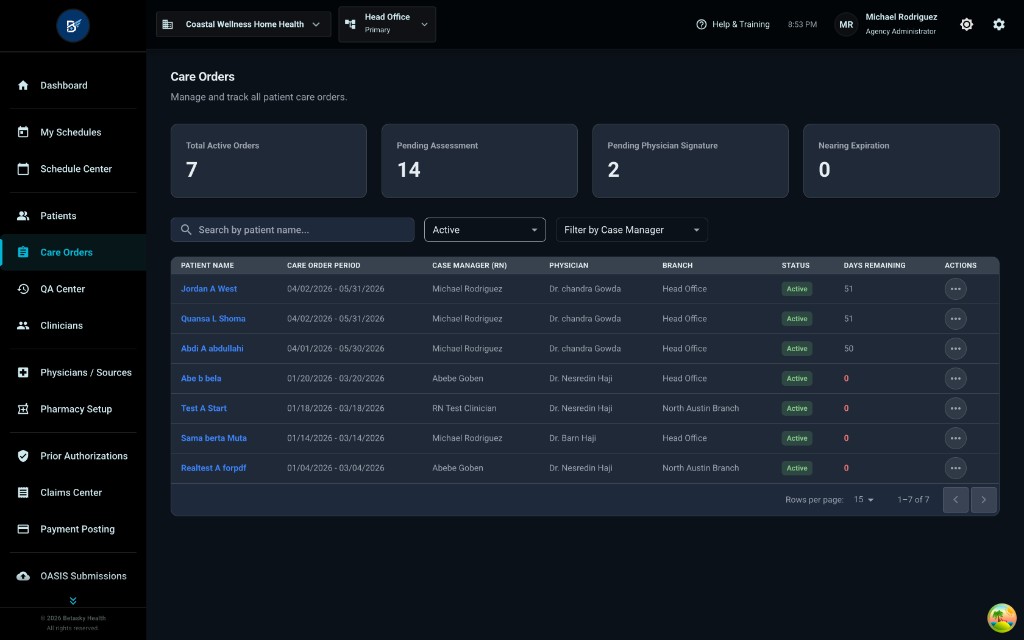
When you open Care Orders, you see this main page.
Page Header:
- Title: "Care Orders"
- Subtitle: "Manage and track all patient care orders."
Dashboard Cards (4 Boxes at the Top)
These four boxes show quick statistics about your care orders:
-
Total Active Orders: 7
- Shows how many care orders are currently active (patients in active care)
-
Pending Assessment: 14
- Shows how many care orders are waiting for an assessment to be completed
- This means the OASIS Start of Care or Recertification hasn't been done yet
-
Pending Physician Signature: 2
- Shows how many care orders are waiting for the physician to sign
- The Plan of Care has been created but the doctor hasn't signed it yet
-
Nearing Expiration: 0
- Shows how many care orders are about to expire (episode ending soon)
- When this number is greater than 0, those patients need recertification
Search and Filters
Below the dashboard cards, you'll see:
Search Box:
- "Search by patient name..."
- Type a patient's name to find their care order quickly
Filter Dropdowns:
-
Status Filter (left dropdown)
- Shows: "Active" (in the screenshot)
- Click to filter by different statuses:
- Active
- Pending Assessment
- Pending Physician Signature
- Cancelled
- etc.
-
Case Manager Filter (right dropdown)
- "Filter by Case Manager"
- Click to filter by which case manager is assigned to the care order
Care Orders Table
The table shows all care orders with these columns:
| Column | What It Shows |
|---|---|
| PATIENT NAME | Patient's name (in blue - clickable) |
| CARE ORDER PERIOD | Episode dates (e.g., "04/02/2026 - 05/31/2026") |
| CASE MANAGER (RN) | The RN case manager assigned to this patient |
| PHYSICIAN | The ordering physician |
| BRANCH | Which branch this patient belongs to |
| STATUS | Green "Active" badge or other status |
| DAYS REMAINING | How many days left in the current episode |
| ACTIONS | Three-dot menu (•••) |
Example Rows Shown:
- Jordan A West - 04/02/2026 - 05/31/2026 - Michael Rodriguez - Dr. chandra Gowda - Head Office - Active - 51 days
- Quansa L Shoma - 04/02/2026 - 05/31/2026 - Michael Rodriguez - Dr. chandra Gowda - Head Office - Active - 51 days
How to Open a Care Order
Click on the patient's name (the blue text) to open that patient's care order detail page.
15.3 Filtering Care Orders by Status
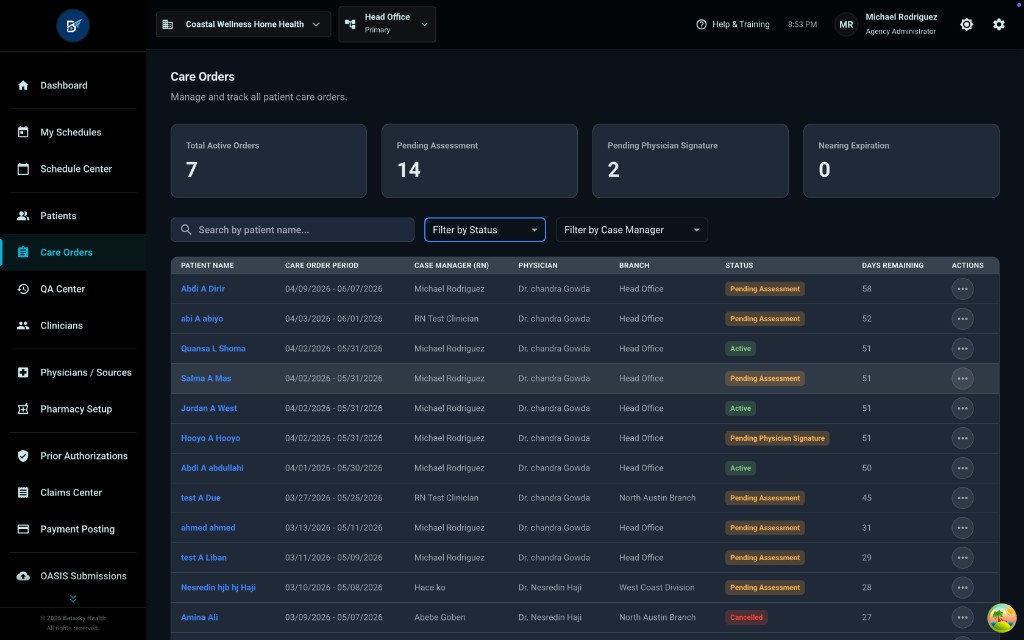
You can filter care orders by status to see specific groups of patients.
In this screenshot, the status filter is changed, and now the table shows different status badges:
Status Badges You'll See:
-
"Pending Assessment" (orange badge)
- Means: The care order exists, but the initial OASIS assessment hasn't been completed yet
- Example patients: Abd A Dirr, abi A abayo, Selma A Mas, etc.
-
"Active" (green badge)
- Means: The care order is active and patient is receiving services
- Example patients: Quansa L Shoma, Abd A abdullahi
-
"Pending Physician Signature" (yellow/orange badge)
- Means: The Plan of Care has been created but waiting for doctor's signature
- Example patient: Houya A Houya
-
"Cancelled" (red badge)
- Means: The care order was cancelled (patient didn't start or was declined)
- Example patient: Amina Ali
Days Remaining Column:
- Some show numbers (51, 50, 62, 45, 31, 29, 27)
- Some show "0" in red - This means the episode has expired or ended
15.4 Viewing an Individual Care Order
Click on a patient's name to open their care order detail page.
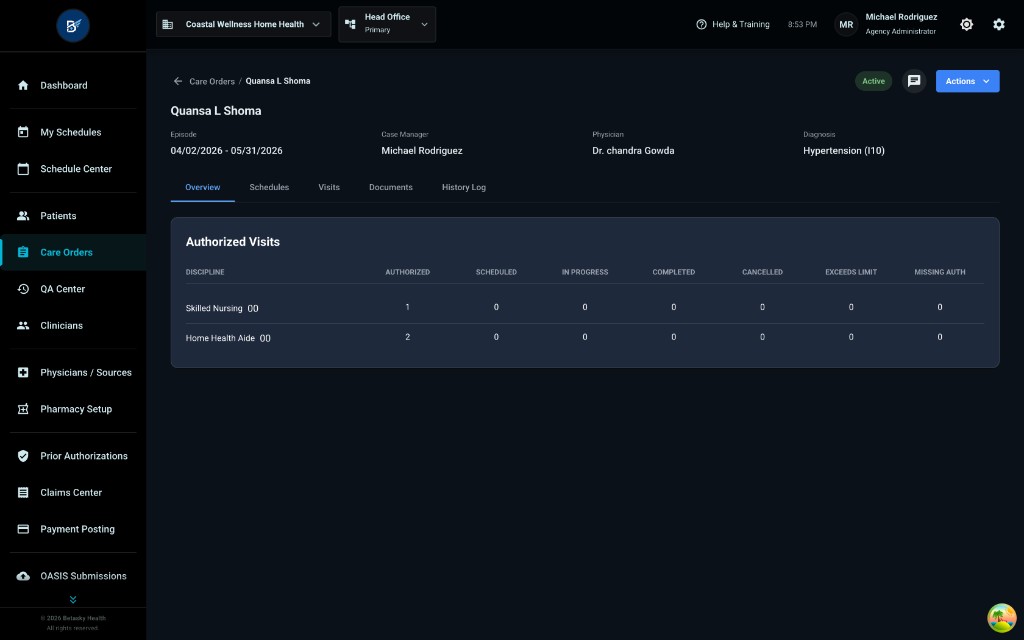
Care Order Header (Top Section)
Back Button:
- "← Care Orders / Quansa L Shoma" (breadcrumb navigation)
- Click the back arrow to return to the Care Orders list
Patient Name: "Quansa L Shoma" (large text)
Episode Information:
- Episode: 04/02/2026 - 05/31/2026
- Case Manager: Michael Rodriguez
- Physician: Dr. chandra Gowda
- Diagnosis: Hypertension (I10)
Status Badge (Top Right):
- Green "Active" badge
- This shows the care order is currently active
Action Buttons (Top Right):
- Comment icon (message bubble) - for notes or comments
- Blue "Actions" dropdown button - opens the Actions menu (we'll cover this in detail later)
Five Tabs
Below the header, you'll see 5 tabs:
- Overview (currently active - blue underline)
- Schedules
- Visits
- Documents
- History Log
Overview Tab: Authorized Visits Table
The Overview tab shows the "Authorized Visits" section.
This table shows which disciplines (types of clinicians) are authorized to visit this patient and how many visits have been scheduled, completed, etc.
Table Columns:
| Column | What It Means |
|---|---|
| DISCIPLINE | Type of clinician (Skilled Nursing, Home Health Aide, etc.) |
| AUTHORIZED | How many visits are authorized in the care order |
| SCHEDULED | How many visits have been scheduled |
| IN PROGRESS | How many visits are currently happening (clinician checked in) |
| COMPLETED | How many visits have been finished |
| CANCELLED | How many visits were cancelled |
| EXCEED LIMIT | How many visits exceed the authorized amount (if any) |
| MISSING AUTH | How many visits are missing authorization (if any) |
Example Rows:
-
Skilled Nursing 00
- AUTHORIZED: 1
- SCHEDULED: 0
- IN PROGRESS: 0
- COMPLETED: 0
- CANCELLED: 0
- EXCEED LIMIT: 0
- MISSING AUTH: 0
-
Home Health Aide 00
- AUTHORIZED: 2
- SCHEDULED: 0
- IN PROGRESS: 0
- COMPLETED: 0
- CANCELLED: 0
- EXCEED LIMIT: 0
- MISSING AUTH: 0
What This Tells You:
- The care order authorizes 1 Skilled Nursing visit and 2 Home Health Aide visits
- None of these visits have been scheduled yet (all zeros in SCHEDULED column)
- No visits have been completed yet
15.5 The Actions Menu (Very Important!)
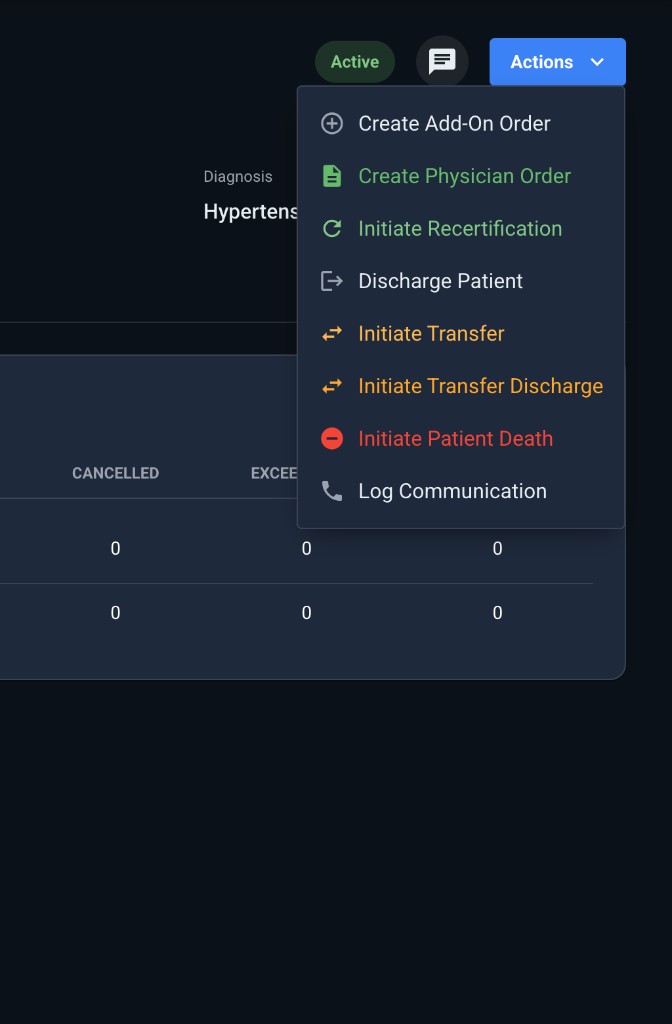
Click the blue "Actions" button (top-right) to see all the actions you can take for this care order.
The Actions Dropdown Shows These Options:
- Create Add-On Order (+ icon)
- Create Physician Order (document icon, green)
- Initiate Recertification (refresh icon, green)
- Discharge Patient (arrow icon, gray)
- Initiate Transfer (transfer icon, orange)
- Initiate Transfer Discharge (transfer icon, orange)
- Initiate Patient Death (minus icon, red)
- Log Communication (phone icon, gray)
Let's go through each one and see what happens when you click them.
Action 1: Create Add-On Order
What It Does: Allows you to add additional services to the existing care order (e.g., add Physical Therapy visits if the patient needs PT in addition to Nursing)
When to Use: When the patient's condition changes and they need additional disciplines or more visits
Note: The screenshot doesn't show what happens after clicking this, but typically a modal would open to add the new discipline and number of visits.
Action 2: Create Physician Order
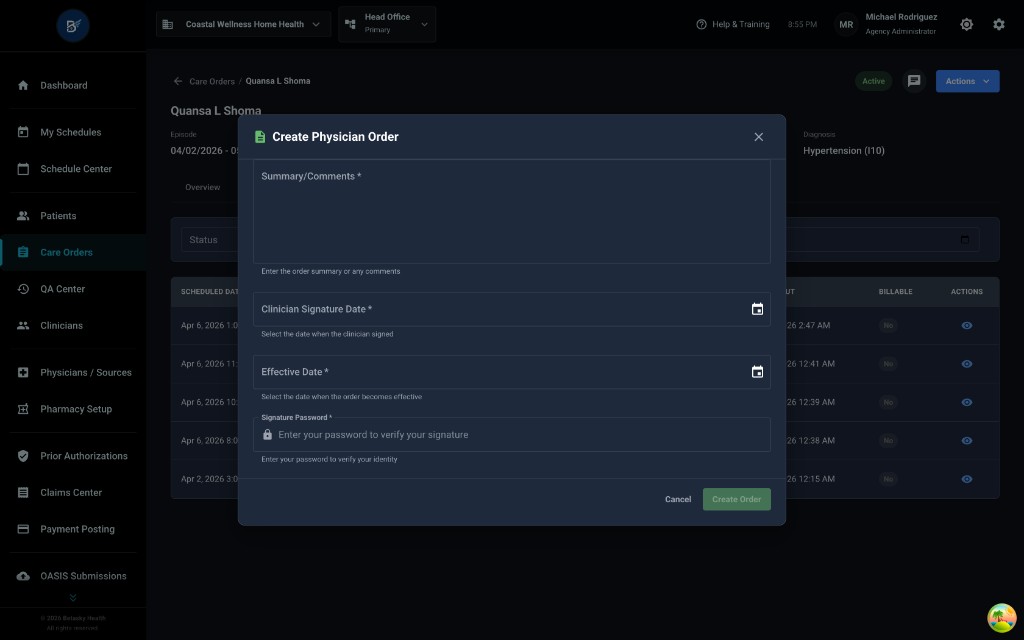
What It Does: Creates a physician order that needs to be signed by the doctor
When to Use: When you need a new order from the physician (e.g., changing medications, adding a new service, updating care instructions)
What You'll See When You Click It:
A modal opens with the title "Create Physician Order"
Fields in the Modal:
-
Summary/Comments (required - has asterisk *)
- Large text box
- Instructions: "Enter the order summary or any comments"
- This is where you type what the physician order is about
-
Clinician Signature Date (required *)
- Date picker with calendar icon
- Instructions: "Select the date when the clinician signed"
- This is the date the nurse or case manager signs off on creating the order
-
Effective Date (required *)
- Date picker with calendar icon
- Instructions: "Select the date when the order becomes effective"
- This is when the order should take effect
-
Signature Password (required *)
- Password field (locked icon)
- Instructions: "Enter your password to verify your signature"
- You must enter your password to confirm you're creating this order
Buttons:
- Cancel (gray button) - closes the modal without saving
- Create Order (green button) - saves and creates the physician order
What Happens After You Click "Create Order":
- The physician order is created and saved
- The order appears in the Documents tab with status "Pending Review" or "Pending Physician Signature"
- The order needs to be sent to the physician for signature (via fax, electronic signature, etc.)
Action 3: Initiate Recertification
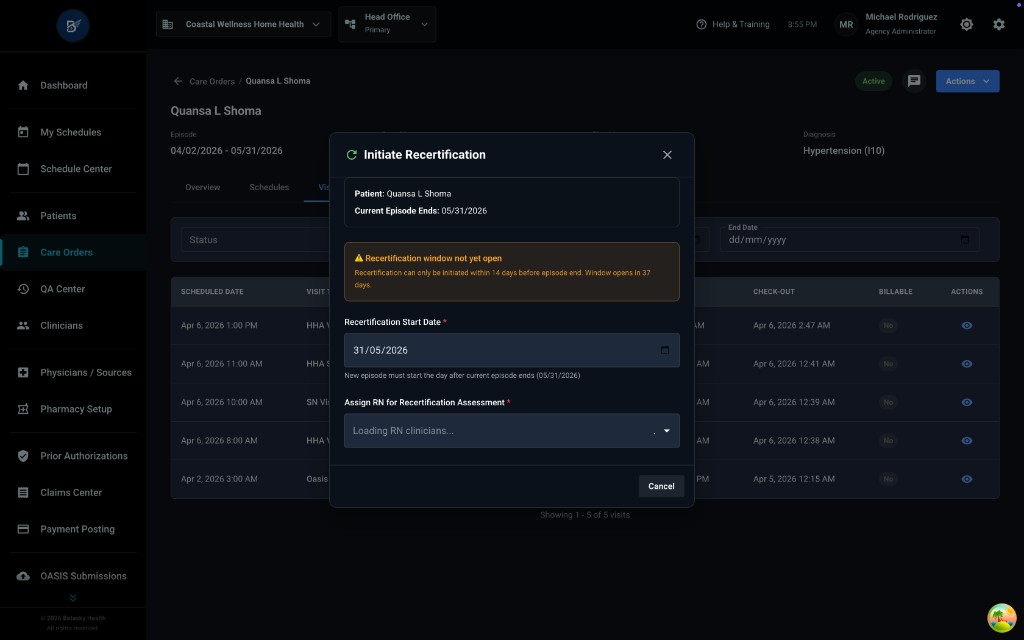
What It Does: Starts the recertification process when a patient's 60-day episode is ending and they need to continue care
When to Use: Around day 55-60 of the episode, when the patient still needs home health services and you want to continue for another 60 days
What You'll See When You Click It:
A modal opens with the title "Initiate Recertification"
Information Shown:
- Patient: Quansa L Shoma
- Current Episode Ends: 05/31/2026
Warning Message (Yellow Box): "⚠️ Recertification window not yet open" "Recertification can only be initiated within 14 days before episode end. Window opens in 37 days"
What This Means:
- You can only start recertification within the last 14 days of the episode
- In this example, the episode ends 05/31/2026, but it's still early (only April 10, 2026)
- The system won't let you start recertification until 14 days before 05/31 (around May 17, 2026)
Fields in the Modal:
-
Recertification Start Date (required *)
- Shows: "31/05/2026"
- Note: "New episode must start the day after current episode ends (05/31/2026)"
- The new episode automatically starts the day after the current one ends
-
Assign RN for Recertification Assessment (required *)
- Dropdown showing "Loading RN clinicians..."
- You must select which RN will complete the Recertification OASIS assessment
Button:
- Cancel (gray button) - closes the modal without starting recertification
What Happens When the Window Opens (After Day 46):
- The warning goes away
- You can select an RN from the dropdown
- A "Start Recertification" button appears
- Clicking it creates a new 60-day episode and schedules the Recertification OASIS visit
Action 4: Discharge Patient
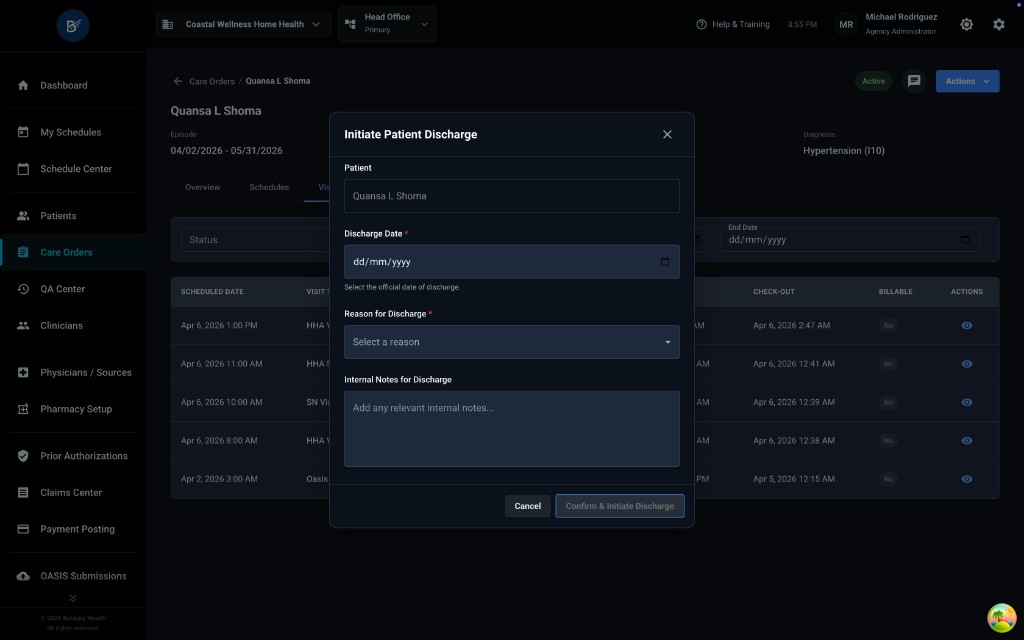
What It Does: Discharges the patient from home health care (patient no longer needs services)
When to Use:
- Patient has met all goals and no longer needs home health
- Patient moved to a facility (hospital, nursing home, assisted living)
- Patient requested to stop services
- Patient is non-compliant with care
What You'll See When You Click It:
A modal opens with the title "Initiate Patient Discharge"
Fields in the Modal:
-
Patient (read-only)
- Shows: "Quansa L Shoma"
- This confirms which patient you're discharging
-
Discharge Date (required *)
- Date picker with calendar icon
- Instructions: "Select the official date of discharge"
- This is the last day the patient was in care
-
Reason for Discharge (required *)
- Dropdown: "Select a reason"
- Common reasons include:
- Goals met
- Transferred to hospital
- Transferred to SNF (nursing home)
- Patient refused services
- Non-compliant
- Deceased (note: use "Initiate Patient Death" action instead)
-
Internal Notes for Discharge (optional)
- Large text box
- Instructions: "Add any relevant internal notes..."
- Use this for internal notes that won't appear on the discharge paperwork
Buttons:
- Cancel (gray button) - closes without discharging
- Confirm & Initiate Discharge (blue button) - starts the discharge process
What Happens After You Click "Confirm & Initiate Discharge":
- The patient's status changes from "Active" to "Discharged"
- A Discharge OASIS visit is automatically created and assigned to the case manager
- The case manager must complete the Discharge OASIS within 5 days
- The episode closes on the discharge date
Action 5: Initiate Transfer
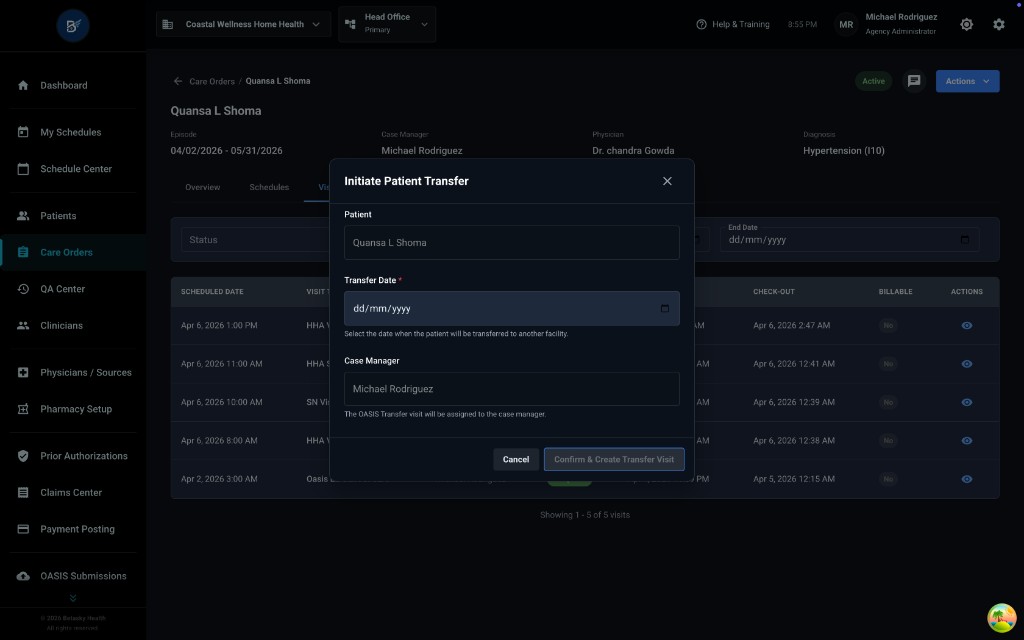
What It Does: Transfers the patient to another home health agency (patient moves or chooses a different agency)
When to Use:
- Patient moves to a different city/state and needs a local agency
- Patient requests to switch to a different home health agency
- Insurance requires transfer to a specific agency
What You'll See When You Click It:
A modal opens with the title "Initiate Patient Transfer"
Fields in the Modal:
-
Patient (read-only)
- Shows: "Quansa L Shoma"
-
Transfer Date (required *)
- Date picker with calendar icon
- Instructions: "Select the date when the patient will be transferred to another facility"
- This is the last day your agency provides care
-
Case Manager (read-only)
- Shows: "Michael Rodriguez"
- Note: "The OASIS Transfer visit will be assigned to the case manager"
- The current case manager will complete the Transfer OASIS
Buttons:
- Cancel (gray button)
- Confirm & Create Transfer Visit (blue button)
What Happens After You Click "Confirm & Create Transfer Visit":
- A Transfer OASIS visit is created and assigned to the case manager (Michael Rodriguez)
- The case manager must complete the Transfer OASIS on or before the transfer date
- The episode remains open until the Transfer OASIS is completed
- After the Transfer OASIS is done, the episode closes and the patient is no longer in your agency's care
Action 6: Initiate Transfer Discharge
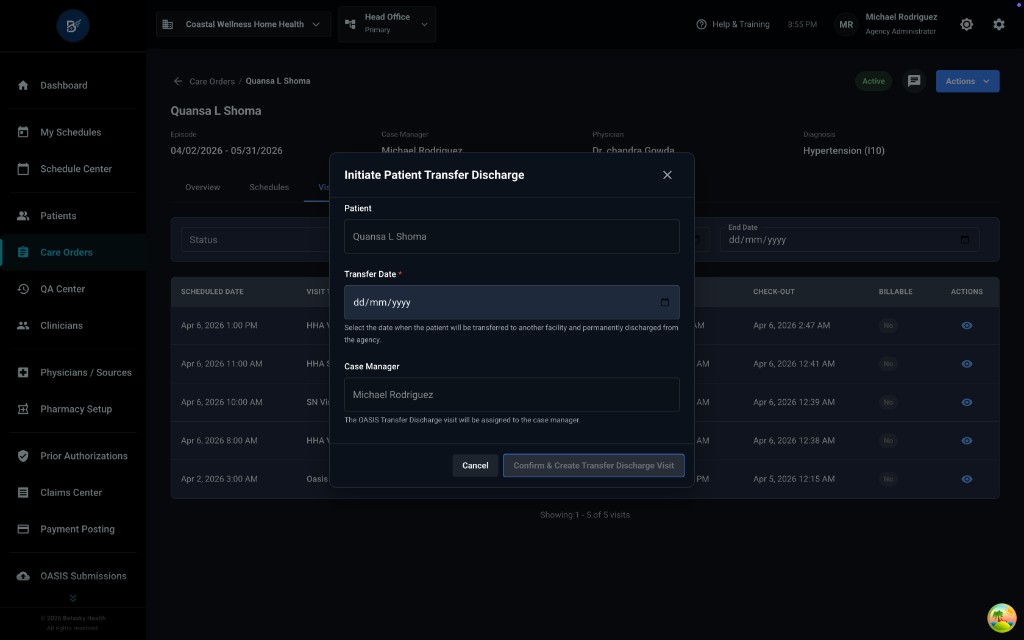
What It Does: Transfers the patient to another facility AND discharges them from home health (e.g., patient goes to hospital, nursing home, etc.)
When to Use:
- Patient is admitted to hospital (acute care)
- Patient goes to skilled nursing facility (SNF)
- Patient moves to assisted living or long-term care
- Any time the patient is transferring AND will no longer receive home health services
What You'll See When You Click It:
A modal opens with the title "Initiate Patient Transfer Discharge"
Fields in the Modal:
-
Patient (read-only)
- Shows: "Quansa L Shoma"
-
Transfer Date (required *)
- Date picker with calendar icon
- Instructions: "Select the date when the patient will be transferred to another facility and permanently discharged from the agency"
- This is the date the patient leaves home health care
-
Case Manager (read-only)
- Shows: "Michael Rodriguez"
- Note: "The OASIS Transfer Discharge visit will be assigned to the case manager"
- The case manager will complete the Transfer Discharge OASIS
Buttons:
- Cancel (gray button)
- Confirm & Create Transfer Discharge Visit (blue button)
What Happens After You Click "Confirm & Create Transfer Discharge Visit":
- A Transfer Discharge OASIS visit is created and assigned to the case manager
- The case manager must complete the Transfer Discharge OASIS within 5 days
- The episode closes
- The patient is discharged from your agency
Difference Between "Transfer" and "Transfer Discharge":
- Transfer: Patient going to ANOTHER home health agency (still gets home health)
- Transfer Discharge: Patient going to a facility and NO LONGER getting home health
Action 7: Initiate Patient Death
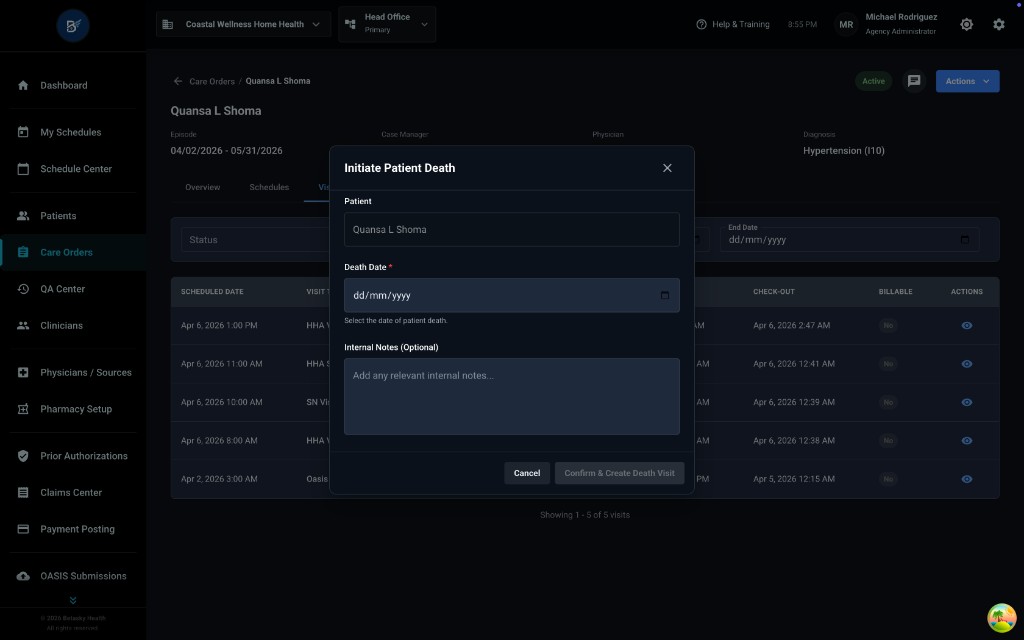
What It Does: Documents that the patient has passed away
When to Use: When the patient dies while in home health care
What You'll See When You Click It:
A modal opens with the title "Initiate Patient Death"
Fields in the Modal:
-
Patient (read-only)
- Shows: "Quansa L Shoma"
-
Death Date (required *)
- Date picker with calendar icon
- Instructions: "Select the date of patient death"
- This is the official date the patient died
-
Internal Notes (Optional)
- Large text box
- Instructions: "Add any relevant internal notes..."
- Use for internal documentation (e.g., circumstances, family notifications)
Buttons:
- Cancel (gray button)
- Confirm & Create Death Visit (blue button)
What Happens After You Click "Confirm & Create Death Visit":
- An "OASIS Death at Home" visit is created and assigned to the case manager
- The case manager must complete the Death at Home OASIS assessment
- The episode closes
- The patient's status changes to "Deceased"
- No more visits can be scheduled for this patient
Action 8: Log Communication
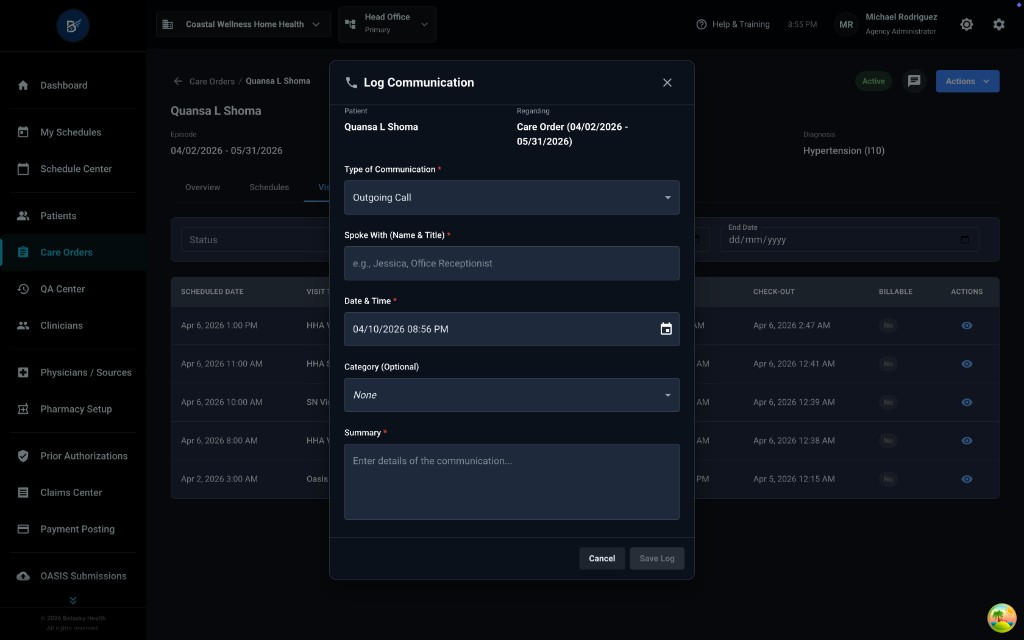
What It Does: Records phone calls, emails, or other communications related to this care order
When to Use:
- After calling the physician's office
- After speaking with family members
- When documenting any important conversation about the patient's care
- For compliance and audit trail purposes
What You'll See When You Click It:
A modal opens with the title "Log Communication"
Information Shown:
- Participant: Quansa L Shoma
- Regarding: Care Order (04/02/2026 - 05/31/2026)
Fields in the Modal:
-
Type of Communication (required *)
- Dropdown showing: "Outgoing Call"
- Other options typically include:
- Incoming Call
- Fax
- In-Person
- Voicemail
-
Spoke With (Name & Title) (required *)
- Text field
- Placeholder: "e.g., Jessica, Office Receptionist"
- Enter who you spoke with (name and their role)
-
Date & Time (required *)
- Date/time picker
- Shows: "04/10/2026 08:56 PM"
- Enter when the communication happened
-
Category (Optional)
- Dropdown showing: "None"
- You can categorize the communication (e.g., Care Plan Discussion, Medication Change, Family Update)
-
Summary (required *)
- Large text box
- Instructions: "Enter details of the communication..."
- Describe what was discussed or communicated
Buttons:
- Cancel (gray button) - closes without saving
- Save Log (blue button) - saves the communication log
What Happens After You Click "Save Log":
- The communication is recorded in the patient's History Log
- It becomes part of the patient's permanent record
- You can view it later in the History Log tab
- Useful for compliance, audits, and coordinating care
15.6 The Schedules Tab
Click the "Schedules" tab to see a calendar view of this patient's visits.
What You'll See:
Calendar Header:
- Date range: "April 5 - 11, 2026"
- Navigation arrows (< >) to move between weeks
Calendar View:
- Shows one week at a time
- Days of the week across the top (Sun, Mon, Tue, Wed, Thu, Fri, Sat)
- Date numbers below each day (5, 6, 7, 8, 9, 10, 11)
Visit Boxes (Green Rectangles):
On Monday, April 6, you can see 4 green boxes stacked vertically:
- "Completed - HHA Visit - Michael Rodriguez"
- "Completed - SN Visit - Michael Rodriguez"
- "Completed - HHA Supervisory Visit - Michael Rodriguez"
- "Completed - HHA Visit - Michael Rodriguez"
What This Tells You:
- All 4 visits on April 6 have been completed (green = completed)
- 2 HHA visits, 1 SN visit, and 1 HHA Supervisory visit
- All were done by Michael Rodriguez
How to Use This View:
- Quickly see which days have visits scheduled
- See if visits are completed, scheduled, or missed
- Click on a visit box to see details
15.7 The Visits Tab
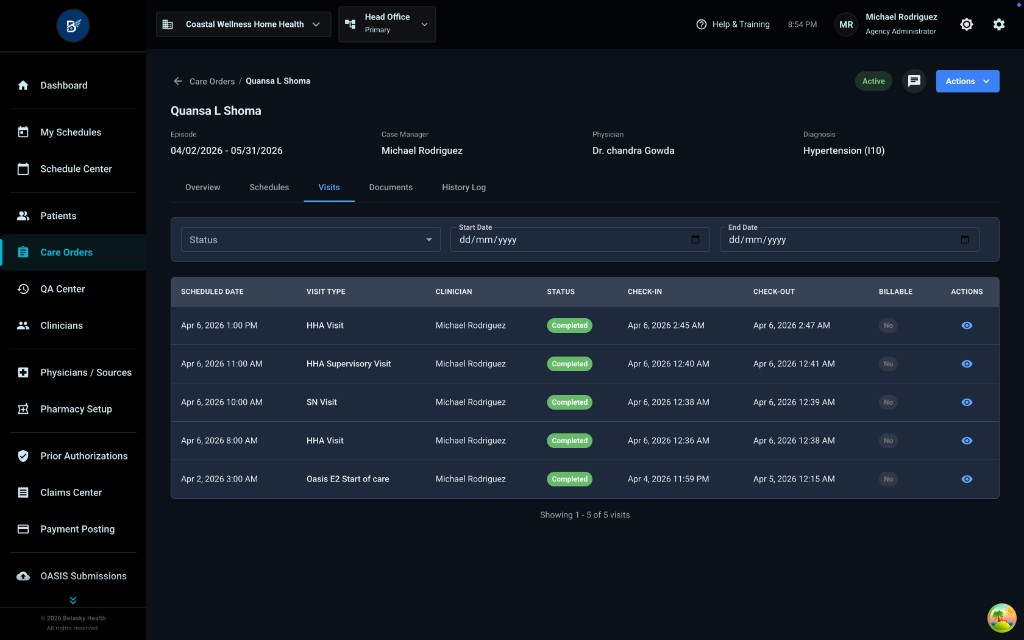
Click the "Visits" tab to see a detailed table of all visits for this patient.
What You'll See:
Filter Section (Top):
- Status dropdown
- Start Date date picker (dd/mm/yyyy)
- End Date date picker (dd/mm/yyyy)
Visits Table:
Columns:
- SCHEDULED DATE (date and time)
- VISIT TYPE (HHA Visit, SN Visit, etc.)
- CLINICIAN (who did the visit)
- STATUS (green "Completed" badges)
- CHECK-IN (date and time clinician checked in)
- CHECK-OUT (date and time clinician checked out)
- BILLABLE ("No" or "Yes")
- ACTIONS (eye icon to view details)
Example Rows:
-
Apr 6, 2026 1:00 PM - HHA Visit - Michael Rodriguez - Completed
- CHECK-IN: Apr 6, 2026 2:45 AM
- CHECK-OUT: Apr 6, 2026 2:47 AM
- BILLABLE: No
- (Eye icon)
-
Apr 6, 2026 11:00 AM - HHA Supervisory Visit - Michael Rodriguez - Completed
- CHECK-IN: Apr 6, 2026 12:40 AM
- CHECK-OUT: Apr 6, 2026 12:41 AM
- BILLABLE: No
- (Eye icon)
-
Apr 6, 2026 10:00 AM - SN Visit - Michael Rodriguez - Completed
- CHECK-IN: Apr 6, 2026 12:38 AM
- CHECK-OUT: Apr 6, 2026 12:39 AM
- BILLABLE: No
- (Eye icon)
-
Apr 6, 2026 8:00 AM - HHA Visit - Michael Rodriguez - Completed
- CHECK-IN: Apr 6, 2026 12:36 AM
- CHECK-OUT: Apr 6, 2026 12:38 AM
- BILLABLE: No
- (Eye icon)
-
Apr 2, 2026 3:00 AM - Oasis E2 Start of care - Michael Rodriguez - Completed
- CHECK-IN: Apr 4, 2026 11:59 PM
- CHECK-OUT: Apr 5, 2026 12:15 AM
- BILLABLE: No
- (Eye icon)
Bottom of Table:
- "Showing 1 - 5 of 5 visits"
How to Use This Tab:
- See all visits at once in a list
- Filter by date range or status
- Click the eye icon in the ACTIONS column to view full visit details
15.8 Viewing Visit Details
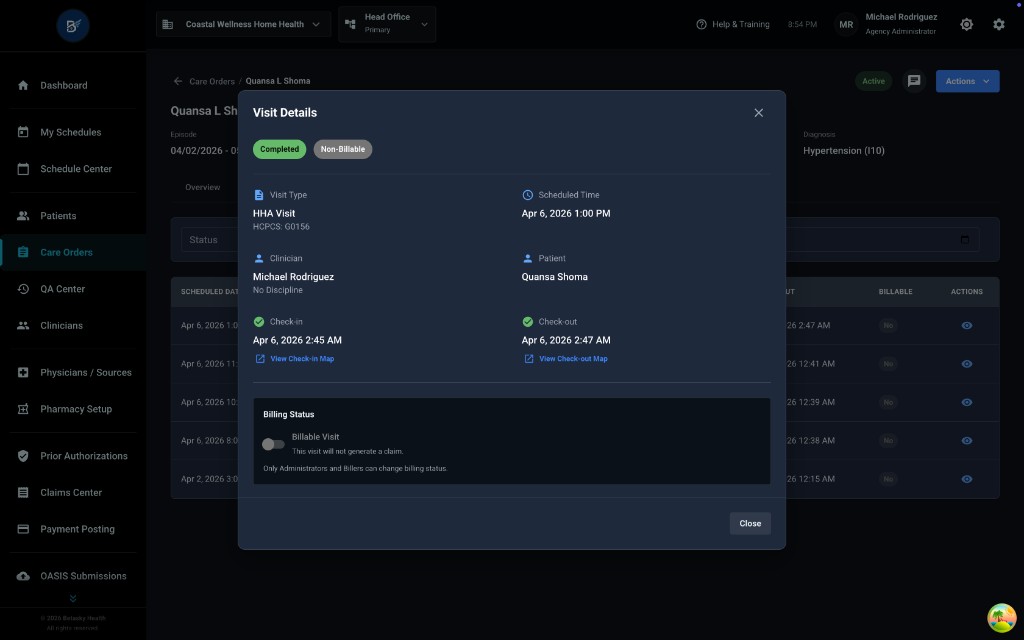
Click the eye icon in the ACTIONS column to see details for a specific visit.
What You'll See:
A modal opens with the title "Visit Details"
Status Badges (Top):
- "Completed" (green badge)
- "Non-Billable" (gray badge)
Visit Information (Left Side):
-
Visit Type
- Shows: "HHA Visit"
- HCPCS: G0156
-
Clinician
- Shows: "Michael Rodriguez"
- No Discipline (for this HHA visit)
-
Check-in
- Shows: "Apr 6, 2026 2:45 AM"
- Link: "View Check-in Map" (to see GPS location where clinician checked in)
Visit Information (Right Side):
-
Scheduled Time
- Shows: "Apr 6, 2026 1:00 PM"
-
Patient
- Shows: "Quansa Shoma"
-
Check-out
- Shows: "Apr 6, 2026 2:47 AM"
- Link: "View Check-out Map" (to see GPS location where clinician checked out)
Billing Status Section:
Checkbox: ☐ Billable Visit
- Unchecked (gray)
- Note: "This visit will not generate a claim."
- Note: "Only Administrators and Billers can change billing status."
What This Means:
- This particular visit is marked as "Non-Billable"
- It won't be included in claims
- Only admins or billing staff can change this setting
Button:
- Close (bottom-right) - closes the modal
15.9 The Documents Tab
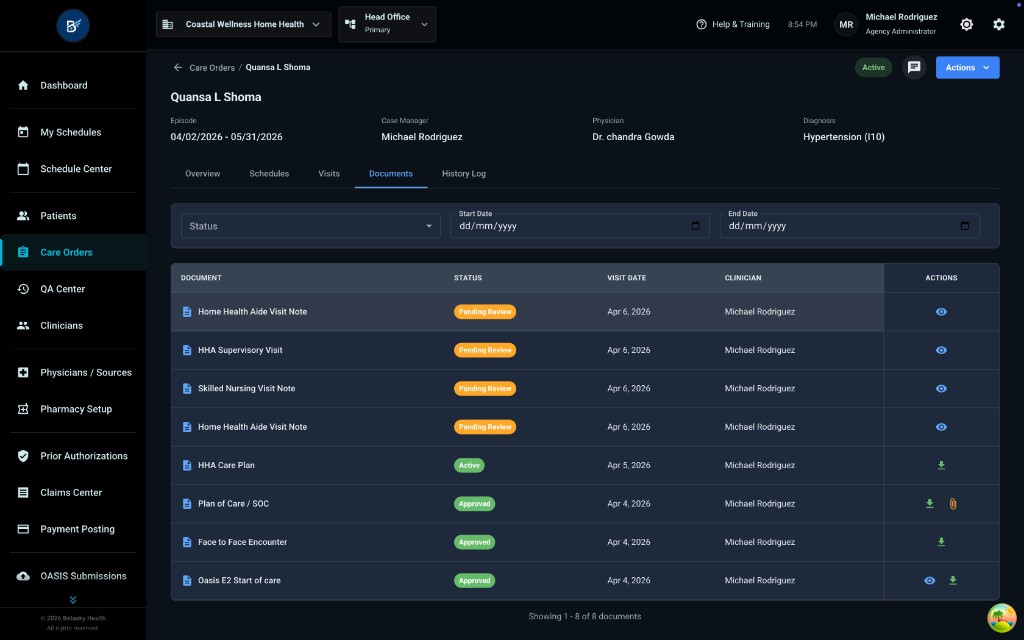
Click the "Documents" tab to see all documents related to this care order.
What You'll See:
Filter Section (Top):
- Status dropdown
- Start Date date picker (dd/mm/yyyy)
- End Date date picker (dd/mm/yyyy)
Documents Table:
Columns:
- DOCUMENT (type of document with file icon)
- STATUS (colored badges)
- VISIT DATE (when the document is related to)
- CLINICIAN (who created/completed it)
- ACTIONS (eye icon to view, download icon, lock icon)
Example Rows:
-
Home Health Aide Visit Note - Pending Review (orange) - Apr 6, 2026 - Michael Rodriguez - (Eye icon)
-
HHA Supervisory Visit - Pending Review (orange) - Apr 6, 2026 - Michael Rodriguez - (Eye icon)
-
Skilled Nursing Visit Note - Pending Review (orange) - Apr 6, 2026 - Michael Rodriguez - (Eye icon)
-
Home Health Aide Visit Note - Pending Review (orange) - Apr 6, 2026 - Michael Rodriguez - (Eye icon)
-
HHA Care Plan - Approved (green) - Apr 5, 2026 - Michael Rodriguez - (Download icon)
-
Plan of Care / SOC - Approved (green) - Apr 4, 2026 - Michael Rodriguez - (Download, Lock icons)
-
Face to Face Encounter - Approved (green) - Apr 4, 2026 - Michael Rodriguez - (Download icon)
-
Oasis E2 Start of care - Approved (green) - Apr 4, 2026 - Michael Rodriguez - (Eye, Download icons)
Bottom of Table:
- "Showing 1 - 8 of 8 documents"
What the Status Badges Mean:
- "Pending Review" (orange) - Document is completed but waiting for QA review
- "Approved" (green) - Document has been reviewed and approved by QA
What the Action Icons Mean:
- Eye icon - View/read the document
- Download icon - Download the document as PDF
- Lock icon - Document is locked (cannot be edited)
15.10 Key Takeaways
- ✅ Care Orders manage each patient's Plan of Care for their 60-day episode
- ✅ The Care Orders list shows all patients with status filters (Active, Pending Assessment, Pending Physician Signature)
- ✅ Each care order has an "Authorized Visits" table showing which disciplines are authorized and how many visits
- ✅ The Actions menu has 8 important options:
- Create Add-On Order (add services)
- Create Physician Order (get doctor's orders)
- Initiate Recertification (continue care after 60 days)
- Discharge Patient (patient no longer needs care)
- Initiate Transfer (move to another agency)
- Initiate Transfer Discharge (move to facility)
- Initiate Patient Death (document death)
- Log Communication (record phone calls/emails)
- ✅ The Schedules tab shows a calendar view of visits
- ✅ The Visits tab shows a detailed table of all scheduled/completed visits
- ✅ The Documents tab shows all paperwork (visit notes, OASIS, POC, etc.)