Chapter 14: Patient Intake
Overview
Patient Intake is where you admit new patients into your agency's care. This chapter covers everything intake coordinators and administrators need to know about adding patients to the system.
What You'll Learn:
- How to access the patient list
- Adding a new patient step-by-step
- Filling out all intake tabs (Demographics, Payer, Physician, Clinical, etc.)
- Saving drafts vs. completing admission
- Viewing and managing pending admissions
- Viewing patient profiles after admission
Who Should Read This Chapter:
- Intake Coordinators
- Agency Administrators
- Clinical Managers
- Anyone responsible for admitting patients
Prerequisites:
- Completed setup chapters (Payers, Physicians, Pharmacies, Users)
- Understanding of home health admission requirements
- Patient referral information from physician or hospital
14.1 Accessing the Patient List
Where to Find Patients
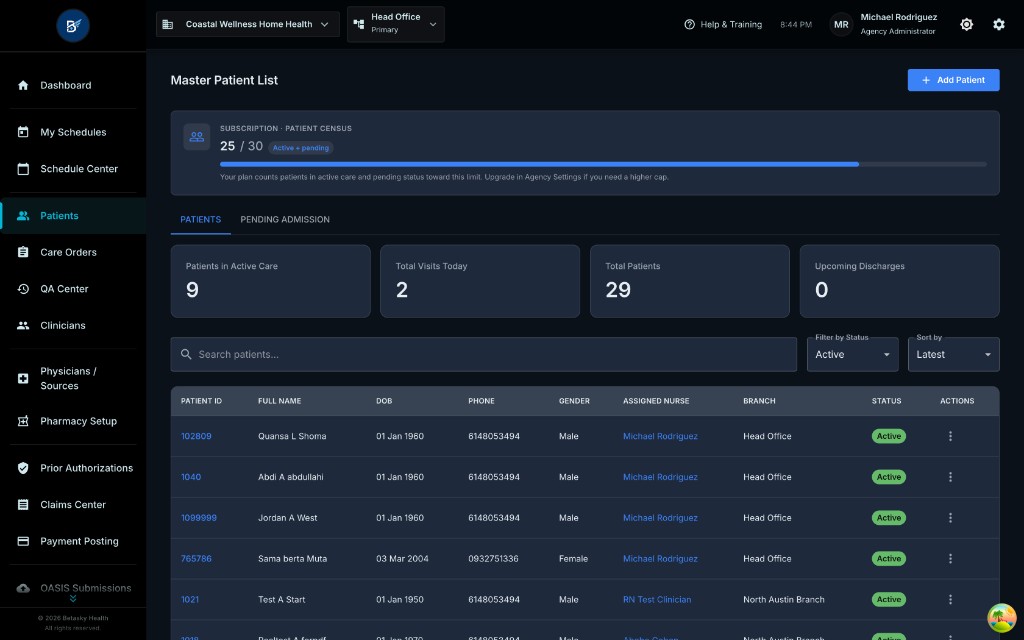
- Look at the left sidebar
- Click on "Patients" (the icon with two people)
- The Master Patient List page opens
What You'll See on This Screen:
Top Section:
- Subscription Status Bar (blue bar)
- Shows: "25 / 30" (you're using 25 patients out of your 30-patient limit)
- Text: "Active + pending"
- Note: "Your plan counts patients in active care and pending status toward this limit. Upgrade to Agency Settings if you need a higher cap."
Two Tabs:
- PATIENTS tab (main patient list)
- PENDING ADMISSION tab (draft patients not yet admitted)
Dashboard Cards (4 boxes showing quick stats):
- Patients in Active Care: 9
- Total Visits Today: 2
- Total Patients: 29
- Upcoming Discharges: 0
Search and Filter:
- Search bar: "Search patients..."
- Filter by Status: Dropdown showing "Active"
- Sort by: Dropdown showing "Latest"
Patient Table: Shows all patients with columns:
- PATIENT ID (e.g., 102809, 1040, 1099999)
- FULL NAME (e.g., Quansa L Shoma, Abd A abdullah)
- DOB (Date of Birth)
- PHONE (Phone number)
- GENDER (Male, Female)
- ASSIGNED NURSE (the clinician's name in blue)
- BRANCH (Head Office, North Austin Branch)
- STATUS (green "Active" badges)
- ACTIONS (three-dot menu for each patient)
Add Patient Button:
- Blue button in top-right corner: "+ Add Patient"
14.2 Starting a New Patient Admission
Click the "+ Add Patient" Button
- In the Master Patient List page, click the blue "+ Add Patient" button (top-right corner)
- The Add Patient modal opens (large pop-up window)
14.3 The Add Patient Modal (9 Tabs)
The Add Patient modal has 9 tabs across the top. You'll fill out information in each tab.
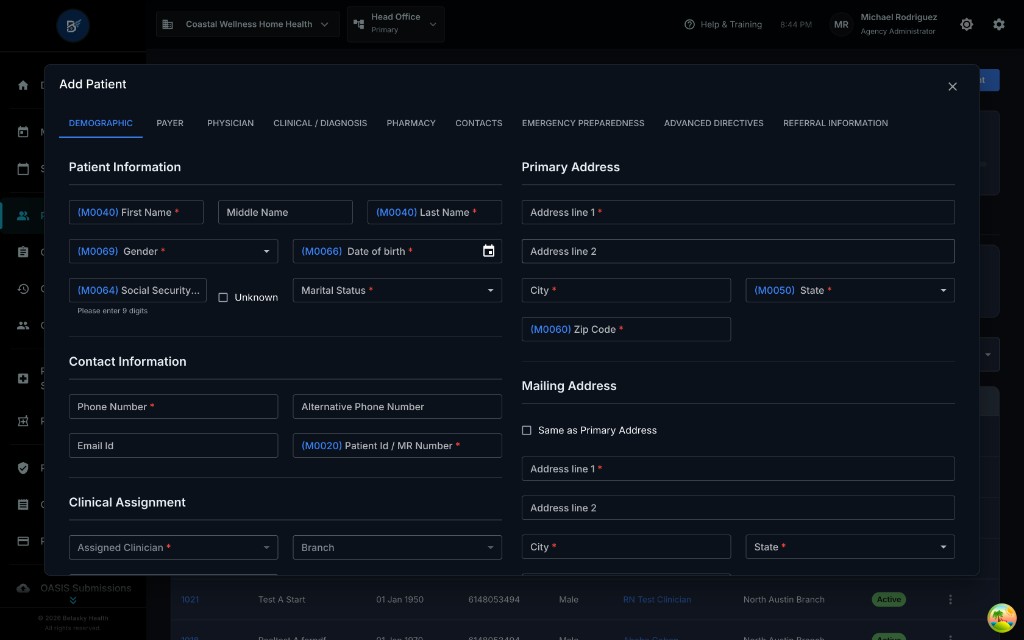
The 9 Tabs Are:
- DEMOGRAPHIC - Patient's personal information
- PAYER - Insurance information
- PHYSICIAN - Ordering physician and referral source
- CLINICAL / DIAGNOSIS - Medical conditions and clinical details
- PHARMACY - Patient's preferred pharmacy
- CONTACTS - Emergency contacts and family
- EMERGENCY PREPAREDNESS - Backup plans for emergencies
- ADVANCED DIRECTIVES - DNR, living will, power of attorney
- REFERRAL INFORMATION - How the patient was referred to your agency
Let's go through each tab step-by-step.
14.4 Tab 1: DEMOGRAPHIC
This is where you enter the patient's basic personal information.
Patient Information Section
First Name (required)
- Field code: (M0040)
- Example: "John"
- Enter the patient's legal first name
Middle Name (optional)
- Example: "Michael"
Last Name (required)
- Field code: (M0040)
- Example: "Smith"
Gender (required)
- Field code: (M0069)
- Dropdown options:
- Male
- Female
- Select the patient's gender
Date of Birth (required)
- Field code: (M0066)
- Format: MM/DD/YYYY
- Click the calendar icon to pick a date
- Example: "01/15/1950"
Social Security Number (optional)
- Field code: (M0064)
- Format: 9 digits
- Checkbox: "☐ Unknown" (check this if patient doesn't have or won't provide SSN)
- Example: "123-45-6789"
- Note: This field is sensitive - handle with care
Marital Status (required)
- Dropdown options:
- Single
- Married
- Divorced
- Widowed
- Separated
- Select the patient's current marital status
Primary Address Section
Address line 1 (required)
- Example: "123 Main Street"
- Enter the patient's street address
Address line 2 (optional)
- Example: "Apt 4B"
- Use for apartment, suite, or unit numbers
City (required)
- Example: "Austin"
State (required)
- Field code: (M0050)
- Dropdown showing all U.S. states
- Example: "TX" (Texas)
Zip Code (required)
- Field code: (M0090)
- Format: 5 digits or 9 digits
- Example: "78701" or "78701-1234"
Mailing Address Section
Checkbox: ☐ Same as Primary Address
- If checked, the system copies the primary address to mailing address
- If unchecked, you can enter a different mailing address
If mailing address is different:
- Address line 1 (required)
- Address line 2 (optional)
- City (required)
- State (required)
- Zip Code (required)
Contact Information Section
Phone Number (required)
- Format: (###) ###-####
- Example: "(512) 555-1234"
- This is the patient's primary phone number
Alternative Phone Number (optional)
- Format: (###) ###-####
- Use for a secondary phone (e.g., cell phone, spouse's phone)
Email Id (optional)
- Format: Valid email address
- Example: "john.smith@email.com"
- Use if patient has email and wants electronic communication
Patient Id / MR Number (optional)
- Field code: (M0020)
- Some agencies use their own patient ID system
- Leave blank if your agency doesn't use this
Clinical Assignment Section
Assigned Clinician (required)
- Dropdown showing all clinicians from your agency
- Select the primary nurse or case manager for this patient
- Example: "Sarah Johnson, RN"
Branch (optional if single branch, required if multi-branch)
- Dropdown showing all branches
- Select which branch this patient belongs to
- Example: "Head Office" or "North Austin Branch"
After Completing Demographic Tab
Do NOT click "Continue" yet!
You have two options:
- Click "Continue" to move to the next tab (Payer)
- Click "Save Draft" to save your progress and come back later (saves to Pending Admissions)
For this tutorial, let's continue to the next tab.
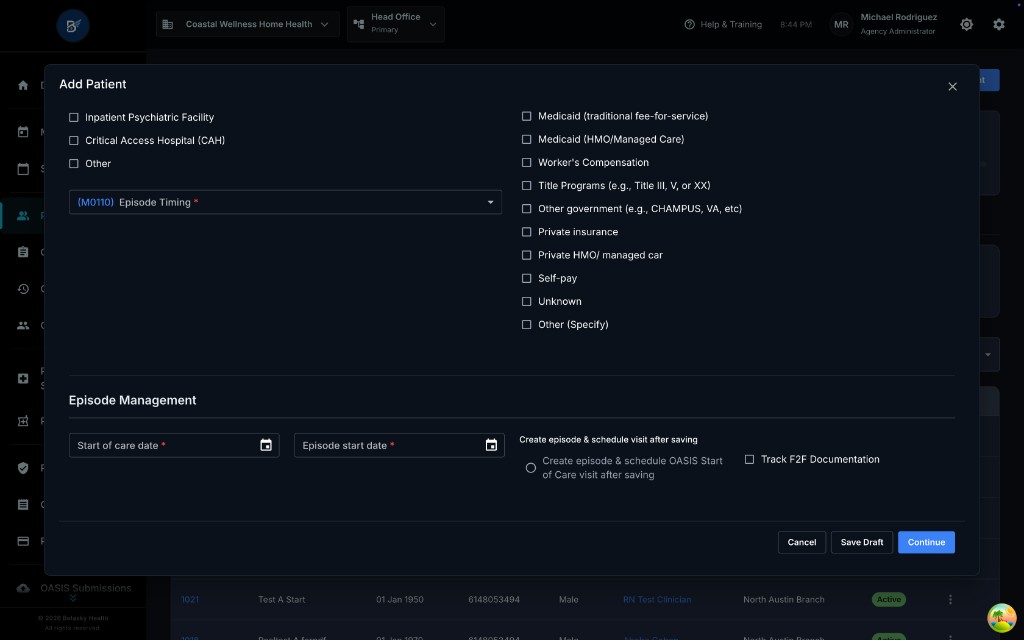
14.5 Tab 2: PAYER
The Payer tab is where you enter the patient's insurance information.
What You'll See:
- A list of insurance types (checkboxes)
- Fields for selecting primary payer, policy numbers, etc.
Insurance Type Checkboxes
Check all that apply to this patient:
☐ Inpatient Psychiatric Facility
☐ Critical Access Hospital (CAH)
☐ Other
☐ Medicaid (traditional fee-for-service)
☐ Medicaid (HMO/Managed Care)
☐ Worker's Compensation
☐ Title Programs (e.g., Title III, V, or XX)
☐ Other government (e.g., CHAMPUS, VA, etc)
☐ Private insurance
☐ Private HMO/ managed care
☐ Self-pay
☐ Unknown
☐ Other (Specify)
Most Common:
- Check "Private insurance" if patient has Blue Cross, Aetna, etc.
- Check "Medicaid" if patient has Medicaid
- Check "Self-pay" if patient has no insurance
Episode Timing
Field code: (M0110)
Episode Timing (required)
- Dropdown options:
- Early - first 30 days of episode
- Late - days 31-60 of episode
- UK/NA - Unknown or Not Applicable
- For new admissions, select "Early"
Additional Fields (More on PAYER Tab)
Note: The screenshot cuts off here, but typically the Payer tab also includes:
- Primary Payer dropdown (select from your configured payers)
- Policy Number
- Group Number
- Authorization Number (if payer requires prior auth)
- Secondary Payer (if patient has secondary insurance)
After completing the Payer tab, click "Continue" to go to the Physician tab.
14.6 Tab 3: PHYSICIAN
The Physician tab is where you select the patient's ordering physician and referral source.
What You'll See:
- Dropdown to select Ordering Physician (required)
- Field for Referral Source (who referred the patient)
- Additional physician-related information
Ordering Physician:
- Dropdown shows all physicians from Chapter 9 (Physician/Source Setup)
- Select the physician who will sign the Plan of Care
- Example: "Dr. Michael Chen"
Referral Source:
- Dropdown shows physicians and referral sources
- Select who referred the patient to your agency
- Example: "Austin Regional Hospital - Discharge Planning"
After completing the Physician tab, click "Continue" to go to Clinical/Diagnosis tab.
14.7 Tab 4: CLINICAL / DIAGNOSIS
The Clinical/Diagnosis tab is where you enter the patient's medical conditions and clinical information.
What You'll See on This Screen:
Admission Source Checkboxes
Check where the patient is being admitted from:
☐ Inpatient Psychiatric Facility
☐ Critical Access Hospital (CAH)
☐ Other
(Only check if applicable - most patients are admitted from home or hospital)
Episode Timing Section
Episode Timing (required)
- Field code: (M0110)
- Dropdown showing:
- Early
- Late
- UK/NA
- Select "Early" for new patients
Episode Management Section
Start of care date (required)
- Date picker (calendar icon)
- Enter the date home health services begin
- Example: "04/02/2026"
- Important: This date determines the episode start and billing period
Episode start date (required)
- Date picker (calendar icon)
- Usually the same as "Start of care date"
- Example: "04/02/2026"
Checkboxes:
☐ Create episode & schedule visit after saving
- Check this if you want the system to automatically create the episode when you finish intake
- Recommended for most admissions
☐ Create episode & schedule OASIS Start of Care visit after saving
- Check this if you want the system to create the episode AND schedule the initial OASIS visit
- Recommended if you know the SOC OASIS visit date
☐ Track P2P Documentation
- Check if this patient requires Physician-to-Physician documentation
After Completing Clinical/Diagnosis Tab
Click "Continue" to move to the Pharmacy tab.
14.8 Tab 5: PHARMACY
The Pharmacy tab is where you select the patient's preferred pharmacy.
What You'll See:
- Dropdown showing all pharmacies from Chapter 7 (Pharmacy Setup)
- Select the pharmacy the patient uses for prescriptions
Example: "CVS Pharmacy #1234 - Main Street"
After completing the Pharmacy tab, click "Continue" to go to Contacts tab.
14.9 Tab 6: CONTACTS
The Contacts tab is where you enter emergency contacts and family members.
What You'll See:
- Fields to add emergency contact information:
- Contact Name
- Relationship to Patient
- Phone Number
- Address (optional)
- Add Contact button to add multiple contacts
Example:
- Name: "Jane Smith"
- Relationship: "Daughter"
- Phone: "(512) 555-6789"
After completing the Contacts tab, click "Continue" to go to Emergency Preparedness tab.
14.10 Tab 7: EMERGENCY PREPAREDNESS
The Emergency Preparedness tab is where you document backup plans for emergencies.
What You'll See:
- Questions about:
- Does patient have a backup power source?
- Does patient have emergency contacts?
- Evacuation plan in place?
- Text area for notes
After completing Emergency Preparedness tab, click "Continue" to go to Advanced Directives tab.
14.11 Tab 8: ADVANCED DIRECTIVES
The Advanced Directives tab is where you document:
- Do Not Resuscitate (DNR) orders
- Living Will
- Healthcare Power of Attorney
- Other advance directives
What You'll See:
- Checkboxes for each type of directive
- Fields to upload documents (if available)
- Date fields for when directives were signed
After completing Advanced Directives tab, click "Continue" to go to the final tab: Referral Information.
14.12 Tab 9: REFERRAL INFORMATION
The Referral Information tab is where you document how the patient was referred to your agency.
What You'll See:
- Dropdown to select referral source
- Fields for referral date
- Notes about the referral
After completing all 9 tabs, you have two options:
- Save Draft - Saves your progress without admitting the patient (goes to Pending Admissions)
- Continue (or "Save & Admit") - Completes the admission and creates the patient in the system
14.13 Saving as Draft (Pending Admissions)
If you're not ready to complete the admission (missing information, waiting for documents, etc.), you can save your progress as a draft.
How to Save as Draft
- At any point while filling out the intake form, click "Save Draft" at the bottom of the modal
- A success message appears: "Patient draft saved successfully"
- The Add Patient modal closes
- Your draft is saved in the PENDING ADMISSION tab
Viewing Pending Admissions
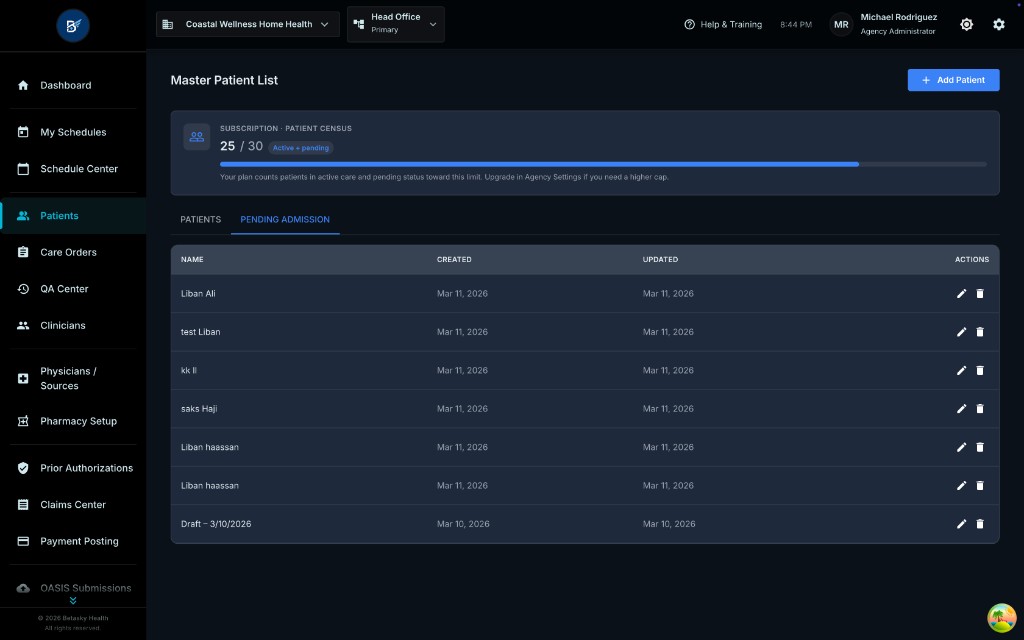
- In the Master Patient List page, click the "PENDING ADMISSION" tab (next to "PATIENTS")
- You'll see a list of all draft patients
What You'll See:
Columns:
- NAME (e.g., "Liban Ali", "test Liban", "Draft - 3/10/2026")
- CREATED (date the draft was created, e.g., "Mar 11, 2026")
- UPDATED (last time the draft was edited, e.g., "Mar 11, 2026")
- ACTIONS (two icons for each draft):
- Edit icon (pencil) - continue editing the draft
- Delete icon (trash can) - delete the draft
Editing a Draft Patient
- Click the Edit icon (pencil) next to the draft patient
- The Add Patient modal reopens with all your saved information
- Continue filling out the tabs where you left off
- When ready, click "Continue" to complete the admission
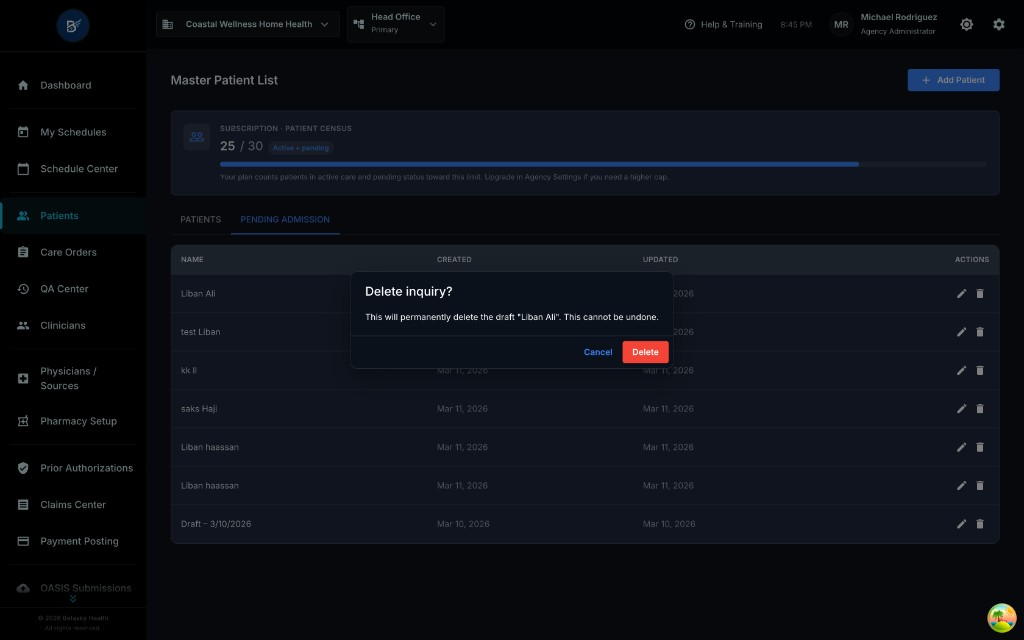
Deleting a Draft Patient
- Click the Delete icon (trash can) next to the draft patient
- A confirmation dialog appears:
- "Delete inquiry?"
- "This will permanently delete the draft 'Liban Ali'. This cannot be undone."
- Click "Delete" to confirm, or "Cancel" to keep the draft
Warning: Deleting a draft is permanent and cannot be undone!
14.14 Completing the Admission
After filling out all 9 tabs, you're ready to complete the admission.
Final Step: Click "Continue"
- Review all tabs to ensure all required fields are filled
- Click "Continue" (or "Save & Admit") at the bottom of the modal
- The system validates all fields
- If everything is correct:
- A success message appears: "Patient admitted successfully"
- The Add Patient modal closes
- The patient is added to the PATIENTS tab (main patient list)
- An episode is created (if you checked the "Create episode" checkbox)
14.15 Viewing the Patient Profile
After admission, you can view the patient's full profile.
How to Open a Patient Profile
- In the Master Patient List, find the patient
- Click anywhere on the patient's row (or click the patient's name)
- The Patient Profile page opens
What You'll See on the Patient Profile
Patient Header (Top Section):
- Patient Initials Circle (e.g., "QL" for Quansa L Shoma)
- Patient Name (large text: "Quansa L Shoma")
- Patient Information:
- Patient ID/MRN: 102809
- Age: 66
- Gender: Male
- Marital Status: Single
- Risk Badges (colored labels):
- "Fall Risk: Low" (blue)
- "Hospitalization Risk: Low" (blue)
- "Infection Risk: High" (red)
- Status Badge: "Active" (green)
- Edit Button (top-right corner)
Action Buttons:
- "View Medication Profile" (blue button)
- "Show More" (link) - opens Patient Details modal
Patient Summary Cards (5 boxes):
- Primary Payer: N/A
- Primary Physician: chandra Gowda
- Case Manager: Michael Rodriguez
- Start of Care: Apr 2, 2026
- Referral Date: Mar 3, 2026
Select Episode Section:
Episode Period Dropdown:
- Shows: "04/02/2026 - 05/31/2026"
- Status badge: "Active" (orange)
- Click the dropdown to view other episodes (if patient has multiple)
Episode Details Panel:
Shows current episode information:
- Episode Period: 04/02/2026 - 05/31/2026
- Status: Active (orange badge)
- Physician: chandra Gowda
- Reason for Care: New Admission
- Case Manager: Michael Rodriguez
Two Tabs:
- Visits (active tab)
- Documents
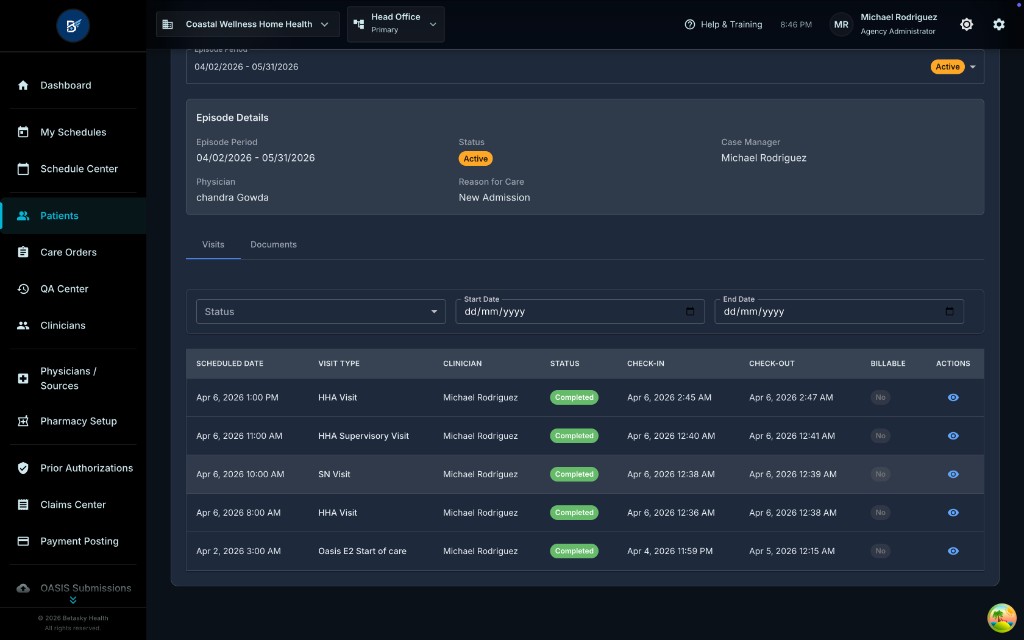
Visits Tab
The Visits tab shows all scheduled and completed visits for this patient.
Filters:
- Status dropdown
- Start Date (date picker)
- End Date (date picker)
Visit Table:
Columns:
- SCHEDULED DATE (e.g., "Apr 6, 2026 1:00 PM")
- VISIT TYPE (e.g., "HHA Visit", "HHA Supervisory Visit", "SN Visit", "Oasis E2 Start of care")
- CLINICIAN (assigned nurse/therapist)
- STATUS (green "Completed" badges)
- CHECK-IN (date/time clinician checked in, e.g., "Apr 6, 2026 2:45 AM")
- CHECK-OUT (date/time clinician checked out, e.g., "Apr 6, 2026 2:47 AM")
- BILLABLE ("No" for some visits)
- ACTIONS (eye icon to view visit details)
Example Visits Shown:
- Apr 6, 2026 1:00 PM - HHA Visit - Michael Rodriguez - Completed
- Apr 6, 2026 11:00 AM - HHA Supervisory Visit - Michael Rodriguez - Completed
- Apr 6, 2026 10:00 AM - SN Visit - Michael Rodriguez - Completed
- Apr 6, 2026 8:00 AM - HHA Visit - Michael Rodriguez - Completed
- Apr 2, 2026 3:00 AM - Oasis E2 Start of care - Michael Rodriguez - Completed
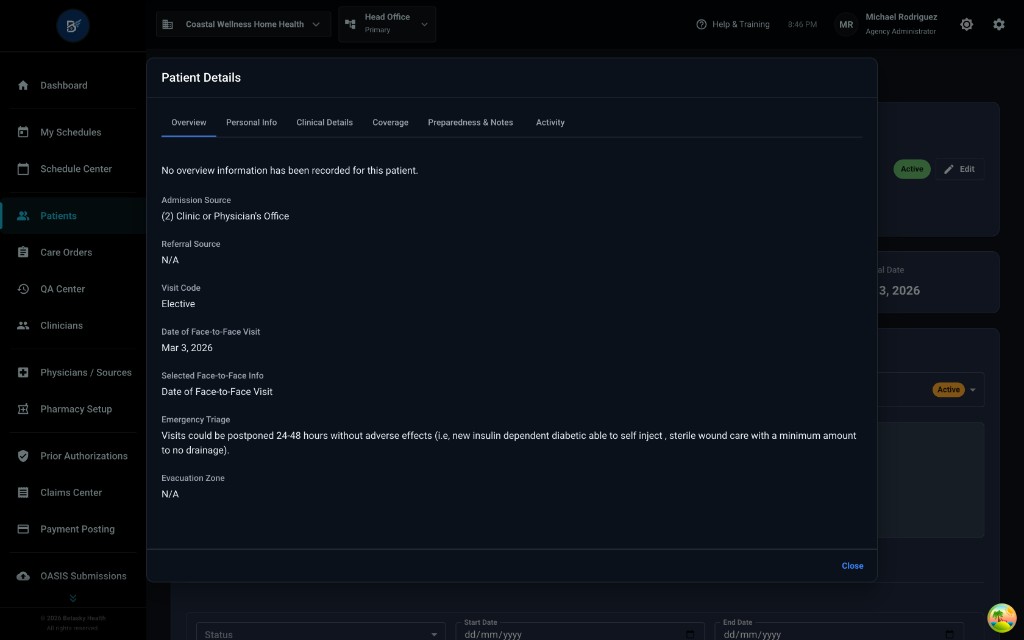
Show More: Patient Details Modal
When you click "Show More" on the patient profile, a modal opens showing additional patient details.
Patient Details Modal Tabs:
- Overview (active)
- Personal Info
- Clinical Details
- Coverage
- Preparedness & Notes
- Activity
Overview Tab Shows:
"No overview information has been recorded for this patient."
Admission Source:
- (2) Clinic or Physician's Office
Referral Source:
- N/A
Visit Code:
- Elective
Date of Face-to-Face Visit:
- Mar 3, 2026
Selected Face-to-Face Info:
- Date of Face-to-Face Visit
Emergency Triage:
- "Visits could be postponed 24-48 hours without adverse effects (i.e. new insulin dependent diabetic able to self inject, sterile wound care with a minimum amount to no drainage)."
Evacuation Zone:
- N/A
Close Button (bottom-right)
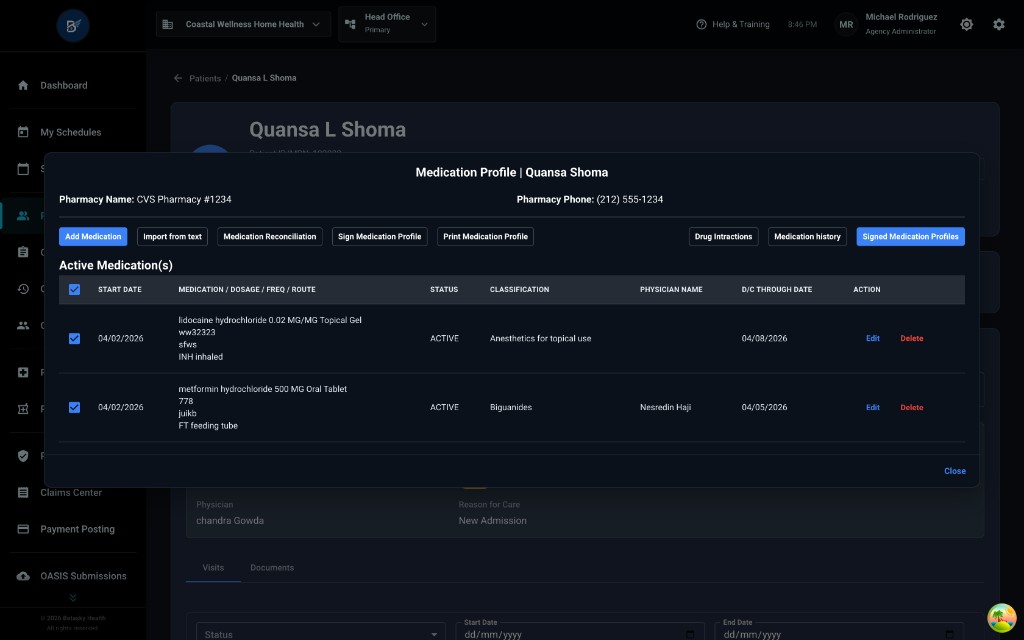
14.16 Viewing Medication Profile
One of the most important parts of patient care is managing medications. Let's see how to view and add medications.
How to Open Medication Profile
- From the Patient Profile page, click the blue button: "View Medication Profile"
- The Medication Profile modal opens
What You'll See
Modal Title: "Medication Profile | Quansa Shoma"
Top Section:
- Pharmacy Name: CVS Pharmacy #1234
- Pharmacy Phone: (212) 555-1234
Action Buttons:
- Add Medication (blue button)
- Import from text (gray button)
- Medication Reconciliation (gray button)
- Sign Medication Profile (gray button)
- Print Medication Profile (gray button)
- Drug Interactions (gray button)
- Medication History (gray button)
- Signed Medication Profiles (blue button)
Active Medication(s) Table
Shows all current medications for this patient.
Columns:
- Checkbox (to select medication)
- START DATE
- MEDICATION / DOSAGE / FREQ / ROUTE
- STATUS (e.g., "ACTIVE")
- CLASSIFICATION (e.g., "Anesthetics for topical use", "Biguanides")
- PHYSICIAN NAME
- D/C THROUGH DATE
- ACTION (Edit and Delete buttons)
Example Medications Shown:
-
04/02/2026
- lidocaine hydrochloride 0.02 MG/MG Topical Gel
- xw32323
- efvns
- INH inhaled
- Status: ACTIVE
- Classification: Anesthetics for topical use
- D/C Through Date: 04/08/2026
- Actions: Edit | Delete
-
04/02/2026
- metformin hydrochloride 500 MG Oral Tablet
- 778
- julkb
- FT feeding tube
- Status: ACTIVE
- Classification: Biguanides
- Physician: Nessndin Haji
- D/C Through Date: 04/05/2026
- Actions: Edit | Delete
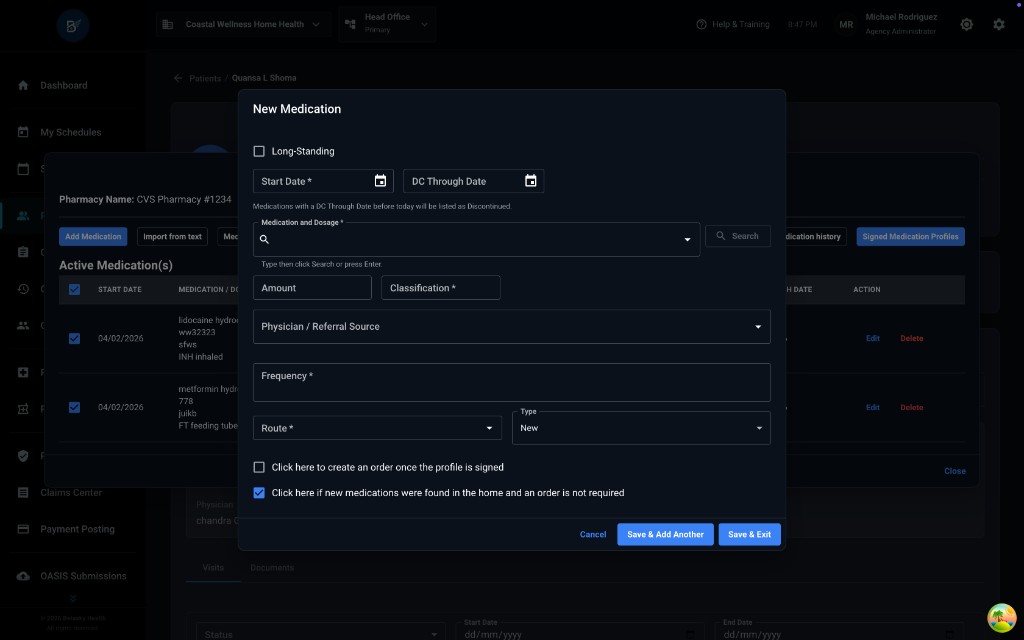
14.17 Adding a New Medication
Let's add a new medication to the patient's profile.
Click "Add Medication"
- In the Medication Profile modal, click the blue "Add Medication" button
- The New Medication modal opens
What You'll See
Checkbox: ☐ Long-Standing
- Check this if the patient has been on this medication long-term (not a new prescription)
Start Date (required)
- Date picker
- Enter when the patient started taking this medication
DC Through Date (optional)
- Date picker
- Enter the discontinuation date if known
- Note: "Medications with a DC Through Date before today will be listed as Discontinued."
Medication and Dosage (required)
- Search field: "Type then click Search or press Enter"
- This is where you search for the medication by name
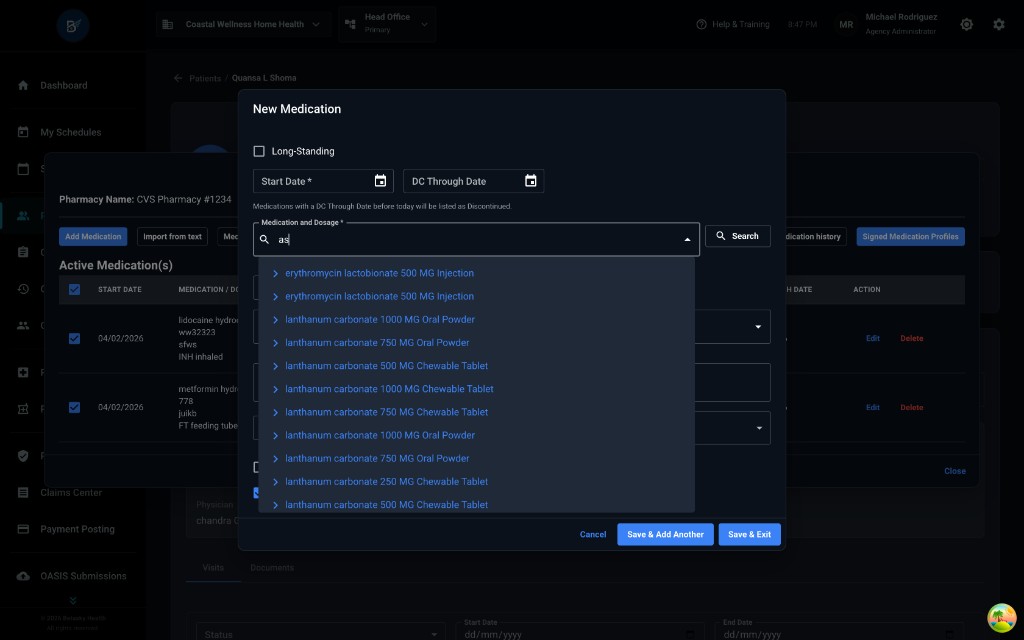
Searching for a Medication
- In the "Medication and Dosage" field, type the medication name (e.g., "lanthanum")
- Click the Search icon or press Enter
- A dropdown list appears with matching medications
Example Search Results:
- erythromycin lactobionate 500 MG Injection
- erythromycin lactobionate 500 MG Injection
- lanthanum carbonate 1000 MG Oral Powder
- lanthanum carbonate 750 MG Oral Powder
- lanthanum carbonate 750 MG Chewable Tablet
- lanthanum carbonate 1000 MG Chewable Tablet
- lanthanum carbonate 500 MG Chewable Tablet
- lanthanum carbonate 250 MG Chewable Tablet
- lanthanum carbonate 500 MG Chewable Tablet
- Click on the medication you want (e.g., "lanthanum carbonate 750 MG Oral Powder")
- The medication is selected
Completing the Medication Form
Amount (optional)
- Enter the amount if different from the standard dose
Classification (required)
- Dropdown automatically populated based on the medication selected
- Example: "Biguanides", "Anesthetics for topical use"
Physician / Referral Source (optional)
- Dropdown showing all physicians
- Select the physician who prescribed this medication
Frequency (required)
- Text field
- Enter how often the patient takes this medication
- Examples: "Twice daily", "Once daily at bedtime", "As needed"
Route (required)
- Dropdown showing medication routes:
- PO (by mouth)
- IV (intravenous)
- IM (intramuscular)
- Topical
- Inhaled
- FT (feeding tube)
- etc.
- Select how the medication is administered
Type dropdown:
- Options: "New", "Continued", etc.
- Select "New" for a new prescription
Checkboxes:
☐ Click here to create an order once the profile is signed
- Check this if you want to generate a physician order for this medication
☑ Click here if new medications were found in the home and an order is not required
- Check this if the patient already has the medication at home
Action Buttons:
- Cancel - Close without saving
- Save & Add Another - Save this medication and add another one
- Save & Exit - Save this medication and close the modal
Saving the Medication
- Fill out all required fields
- Click "Save & Exit" (or "Save & Add Another" if you have more medications to add)
- The medication is added to the patient's Active Medication(s) list
- A success message appears: "Medication added successfully"
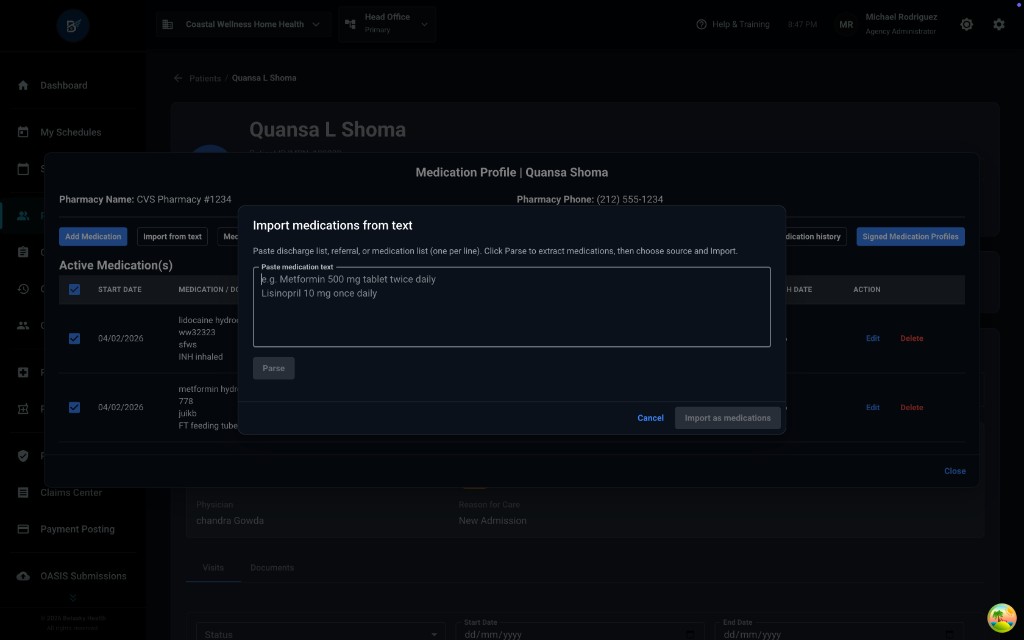
14.18 Importing Medications from Text
If you have a medication list from a hospital discharge summary or referral document, you can import medications from text instead of adding them one by one.
Click "Import from text"
- In the Medication Profile modal, click the gray "Import from text" button
- The Import medications from text modal opens
What You'll See
Instructions: "Paste discharge, list, referral, or medication list (one per line). Click Parse to extract medications, then choose source and import."
Example Format Shown:
(e.g. Metformin 500 mg tablet twice daily)
Lisinopril 10 mg once daily
Text Area:
- Large text box where you paste the medication list
- Each medication should be on its own line
Buttons:
- Parse - Click after pasting to extract medications
- Cancel - Close without importing
- Import as medications - Save the medications to the patient's profile
How to Import Medications
- Copy the medication list from the discharge summary or referral document
- Paste it into the text area
- Click "Parse"
- The system extracts the medication names, dosages, and frequencies
- Review the parsed medications
- Click "Import as medications"
- The medications are added to the patient's Active Medication(s) list
This is much faster than adding medications one by one!
14.19 Signing the Medication Profile
After adding all medications, the nurse must sign the medication profile to certify it's accurate.
Click "Signed Medication Profiles"
- In the Medication Profile modal, click the blue "Signed Medication Profiles" button
- The Signed Medication Profiles modal opens
What You'll See
Table showing all signed medication profiles:
Columns:
- SIGNATURE DATE (e.g., "04/05/2025 12:00 AM")
- SIGNED BY (e.g., "Michael Rodriguez")
- MEDICATIONS REVIEWED (number of medications, e.g., "1")
- ACTIONS (Print button)
Example:
- Signature Date: 04/05/2025 12:00 AM
- Signed By: Michael Rodriguez
- Medications Reviewed: 1
- Actions: Print (blue link)
How to Sign a Medication Profile
- Review all medications in the Active Medication(s) list
- Ensure all medications are accurate and complete
- Click "Sign Medication Profile" (in the main Medication Profile modal)
- A signature modal opens
- Enter your name or electronic signature
- Click "Sign"
- The medication profile is signed and timestamped
- The signed profile appears in the Signed Medication Profiles list