Chapter 25: Claims Center & Billing
Overview
The Claims Center is where completed patient visits are converted into billable insurance claims. This module manages the entire billing lifecycle from visit eligibility through claim generation, submission, payment posting, and denial management. Understanding how claims work is essential for maintaining healthy revenue cycles and ensuring your agency gets paid for services provided.
Understanding Claims and Billing
What is a Claim?
A claim is a formal request for payment submitted to an insurance payer (Medicare, Medicaid, or private insurance) for home health services provided to a patient. Each claim contains:
- Patient information (name, DOB, insurance details)
- Service details (visits performed, dates of service, clinicians)
- Billing codes (HCPCS codes for services, HIPPS codes for Medicare)
- Charged amounts (based on payer rate schedules or Medicare PDGM rates)
Medicare vs Private Insurance Billing
The system handles two fundamentally different billing models:
Medicare/Medicaid (PDGM - Patient-Driven Groupings Model)
- Billing Period: 30-day periods (Period 1 = Days 1-30, Period 2 = Days 31-60)
- Reimbursement: Based on HIPPS code (single rate regardless of number of visits)
- Claim Timing: One claim per 30-day period per episode
- Visit Rates: Individual visits show $0.00 (informational only)
- Total Claim Amount: HIPPS rate (e.g., $3,500 for the 30-day period)
- Prerequisite: OASIS must be submitted to CMS and status =
ACCEPTEDbefore billing
Example:
- Patient has Medicare
- Episode: Jan 1 - Feb 29, 2026
- HIPPS code:
1CABA(determined from OASIS assessment) - Period 1 (Days 1-30): 8 visits performed → Claim amount = $3,200 (HIPPS rate)
- Period 2 (Days 31-60): 5 visits performed → Claim amount = $3,200 (same HIPPS rate)
Private Insurance / Managed Care (Fee-for-Service)
- Billing Period: Flexible (bill whenever visits accumulate, no 30-day requirement)
- Reimbursement: Based on Fee Schedule (per-visit rates configured for each payer and visit type)
- Claim Timing: Can bill immediately after visits complete, or batch multiple visits into one claim
- Visit Rates: Each visit has its own rate (e.g., SN Visit = $150, PT Visit = $180)
- Total Claim Amount: Sum of all visit rates
- Prerequisite: Prior Authorization (PA) must be approved (for payers requiring PA)
Example:
- Patient has Blue Cross Blue Shield
- 3 visits performed: 2 SN visits ($150 each), 1 PT visit ($180)
- Total claim amount = $150 + $150 + $180 = $480
Visit Eligibility for Billing
Not all completed visits can be billed. The system applies strict eligibility rules to ensure only valid visits appear in the Claims Center.
Required Conditions (All Must Be Met)
| Condition | Description | Why It Matters |
|---|---|---|
Visit Status = Completed | Clinician has checked out of the visit | Incomplete visits cannot be billed |
Visit Note Status = Approved | The clinical document (visit note) passed QA review and is approved | Unapproved documentation doesn't meet insurance standards |
Care Order Status = Active or Discharged | The patient's episode is active or recently discharged | Closed or On Hold episodes are not billable |
Visit marked as isBillable = true | The visit hasn't been marked as non-billable | Some visits are non-billable (e.g., courtesy visits, training) |
Visit NOT already on a claim (claimId = null) | The visit hasn't been billed yet | Prevents double-billing |
| Patient has Primary Payer | Patient has an insurance payer assigned | Cannot bill without knowing who to bill |
Additional Filters for Specific Payers
Medicare-Specific Rules
| Rule | Description |
|---|---|
| OASIS Submitted and Accepted | The OASIS assessment for this episode must be submitted to CMS and status = ACCEPTED |
| SOC/Recert/ROC Visits Excluded | OASIS visit types (Start of Care, Recertification, Resumption of Care) cannot be billed separately |
| Post-Discharge Visits Excluded | Visits that occurred after the discharge date (M0906 from Discharge OASIS) are automatically filtered out |
Private Insurance Rules
| Rule | Description |
|---|---|
| Prior Authorization (if required by payer) | PA must be approved and have remaining units |
| Fee Schedule | Rate must be configured for (payer + visit type) combination |
Claims Center Interface
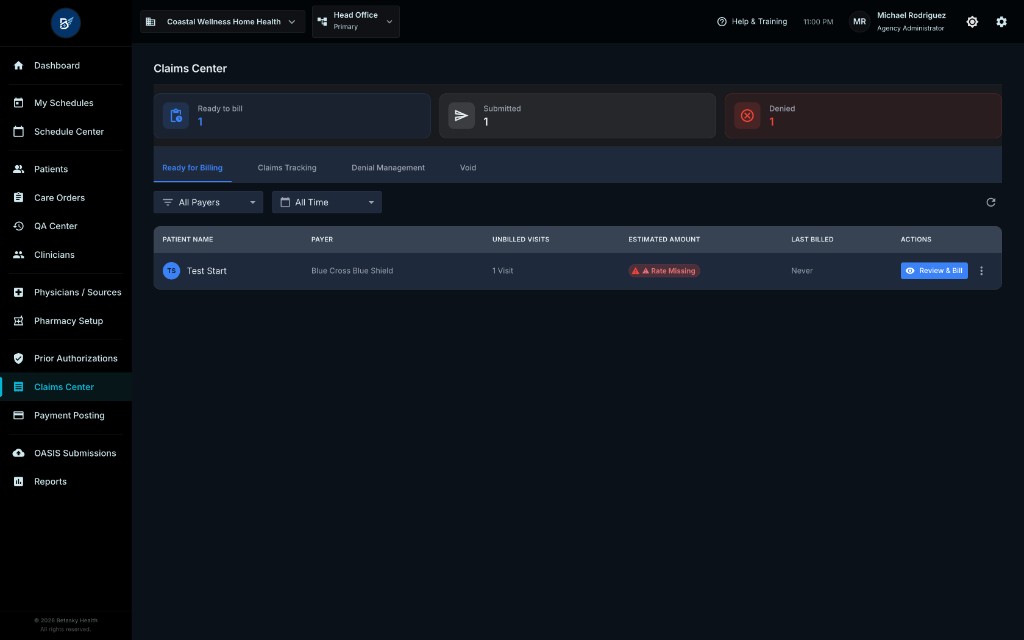
Dashboard Statistics Cards (Top Section)
Three KPI cards provide a real-time overview of your billing status:
| Card | Color | Meaning | Calculation |
|---|---|---|---|
| Ready to bill | Blue | Number of completed visits eligible for billing but not yet on a claim | Count of visits meeting all eligibility conditions |
| Submitted | Gray | Number of claims submitted to insurance and awaiting payment | Claims with status = Submitted |
| Denied | Red | Number of claims denied by insurance | Claims with status = Denied |
These stats are cached for 90 seconds and refresh automatically when you generate, submit, or update claims.
Four Main Tabs
The Claims Center is organized into four tabs, each representing a stage in the billing workflow:
1. Ready for Billing Tab
- Shows patients who have unbilled completed visits
- Grouped by patient (one row per patient showing how many visits and estimated amount)
- Primary action: "Review & Bill" button to generate claims
2. Claims Tracking Tab
- Shows all generated claims organized by status
- Sub-tabs:
- Ready to Submit - Claims generated but not yet sent to insurance
- Submitted - Claims sent to insurance, awaiting payment
- Partially Paid - Claims where insurance paid part but not full amount
- Paid - Fully paid claims (balance = $0)
- Primary actions: Mark as Submitted, Export 837, Post Payment
3. Denial Management Tab
- Shows all denied claims requiring investigation and resolution
- Helps you identify patterns (which payer denies most, what reasons)
- Primary actions: Resubmit (after correction), Write Off (if unrecoverable)
4. Void Tab
- Shows voided claims (cancelled before or after submission)
- Claims voided to release visits back to "Ready for Billing"
- Read-only (voided claims cannot be edited)
Ready for Billing Tab: Detailed Walkthrough
Patient List Table
The table shows patients grouped by unbilled visits:
| Column | Description |
|---|---|
| Patient Name | Patient's full name. Shown with an avatar containing initials. |
| Payer | Primary insurance payer name (e.g., "Blue Cross Blue Shield"). |
| Unbilled Visits | Number of completed, approved visits that haven't been billed yet (e.g., "1 Visit"). |
| Estimated Amount | Projected claim amount. Shows "⚠ Rate Missing" if Fee Schedule rates are not configured. For Medicare, shows the HIPPS rate. |
| Last Billed | Date of the most recent claim for this patient. Shows "Never" if patient has never been billed. |
| Actions | "Review & Bill" button - Opens the billing modal to select visits and generate a claim. |
Filters (Top of Table)
Payer Filter:
- Dropdown showing "All Payers" or specific payer names
- Filters the patient list to show only patients with selected payer
- Useful for batch-submitting claims to one insurance company
Date Range Filter:
- Options: "All Time", "Last 7 Days", "Last 30 Days", "This Month"
- Filters based on last billed date
- Helps identify patients who haven't been billed recently
Refresh Button:
- Icon button (circular arrow) on the right
- Reloads the Ready for Billing list
- Use after visits are completed/approved to see updated counts
Interpreting "Estimated Amount"
The Estimated Amount column shows different things based on payer type:
Medicare Patients
- Shows the HIPPS rate for the current billing period
- Example: "$3,500.00"
- If HIPPS code is missing or rate not configured: "⚠ Rate Missing"
Private Insurance Patients
- Shows the sum of individual visit rates from Fee Schedules
- Example: 3 visits → 2 SN ($150 each) + 1 PT ($180) = "$480.00"
- If any visit type lacks a rate: "⚠ Rate Missing"
Warning: "⚠ Rate Missing"
- One or more visits cannot be billed because the rate is not configured
- You must either:
- Configure the missing rate in Fee Schedule Setup (for private insurance)
- Configure the missing HIPPS rate in Payer Setup (for Medicare)
- Manually enter a rate when generating the claim (override)
Generating Claims: Step-by-Step
Step 1: Click "Review & Bill"
Click the blue "Review & Bill" button for a patient in the Ready for Billing table.
Step 2: Review Patient and Visits
The Bill Patient modal opens:
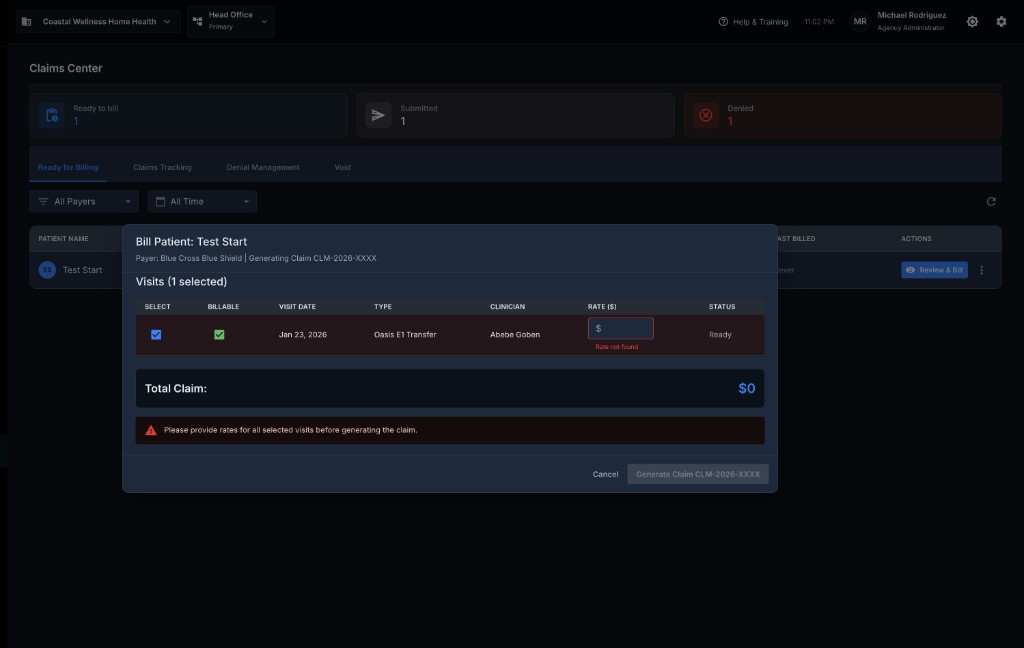
Modal Header:
- Title: "Bill Patient: [Patient Name]"
- Subtitle: "Payer: [Payer Name] | Generating Claim [Claim Number Preview]"
- Claim number preview format:
CLM-YYYY-XXXX(actual number assigned by backend)
- Claim number preview format:
For Medicare Patients:
The modal shows a Medicare HIPPS Information section at the top:
| Field | Description | Editable? |
|---|---|---|
| Detected HIPPS Code | HIPPS code from the approved OASIS assessment (stored in Care Order). Example: 1CABA. | No (read-only chip) |
| Reimbursement Rate | The rate for this HIPPS code. Automatically looked up from Payer Settings. If missing, field is red with error message. | Yes - You can override the rate if needed |
Validation Alert: If the HIPPS rate is missing:
- Field shows error styling (red border)
- Helper text: "Rate for HIPPS code not found in Payer Settings. Please enter manually."
- You must enter a rate before generating the claim
For Private Insurance Patients:
No HIPPS section. Rates are shown per visit in the visits table.
Step 3: Select Visits to Bill
The modal displays a Visits Table with the following columns:
| Column | Description |
|---|---|
| Select | Checkbox to include this visit on the claim. Auto-selected by default unless visit has authorization alerts. |
| Billable | Checkbox showing if visit is marked as billable. You can toggle this to mark visits as non-billable (removes from billing queue). |
| Visit Date | Date the visit was performed (e.g., "Jan 23, 2026"). |
| Type | Visit type (e.g., "OASIS E1 Transfer", "HHA Visit", "PT Evaluation"). May show authorization alert icons. |
| Clinician | Name of the clinician who performed the visit (e.g., "Abeble Godeen"). |
| Rate ($) | For Medicare: Shows "$0.00" (visits are informational only). For Private Insurance: Shows the rate from Fee Schedule or allows manual entry if rate is missing. |
| Status | Shows "Ready" or authorization alert chips ("No Authorization", "Exceeds Limit"). |
Visit Selection Logic
Auto-Selected Visits:
- Have no authorization alerts
- Are marked as billable (
isBillable = true)
Disabled Visits (Cannot Select):
- Have authorization alerts:
- "No Authorization" (MISSING_AUTH) - Critical error, shown with red error icon
- "Exceeds Limit" (EXCEEDS_LIMIT) - Warning, shown with yellow warning icon
Authorization Alerts Explained:
| Alert Type | Icon | Meaning | Action Required |
|---|---|---|---|
| MISSING_AUTH | Red exclamation mark | Visit has no valid Prior Authorization. PA is either missing, expired, exhausted, or denied. | Go to Prior Authorizations module, create or update PA to approve units for this discipline. Then click "Re-Validate" button. |
| EXCEEDS_LIMIT | Yellow warning triangle | Visit would exceed the approved PA units. Example: PA approved 10 visits, but 11 visits were completed. | Go to Prior Authorizations module, request extension from insurance to approve additional units. Then click "Re-Validate" button. |
Re-Validate Button:
- Appears next to authorization alert chips
- Clicking it re-checks the PA status for this visit
- If PA has been updated (e.g., more units approved), alert clears and visit becomes selectable
- Shows loading spinner while validating
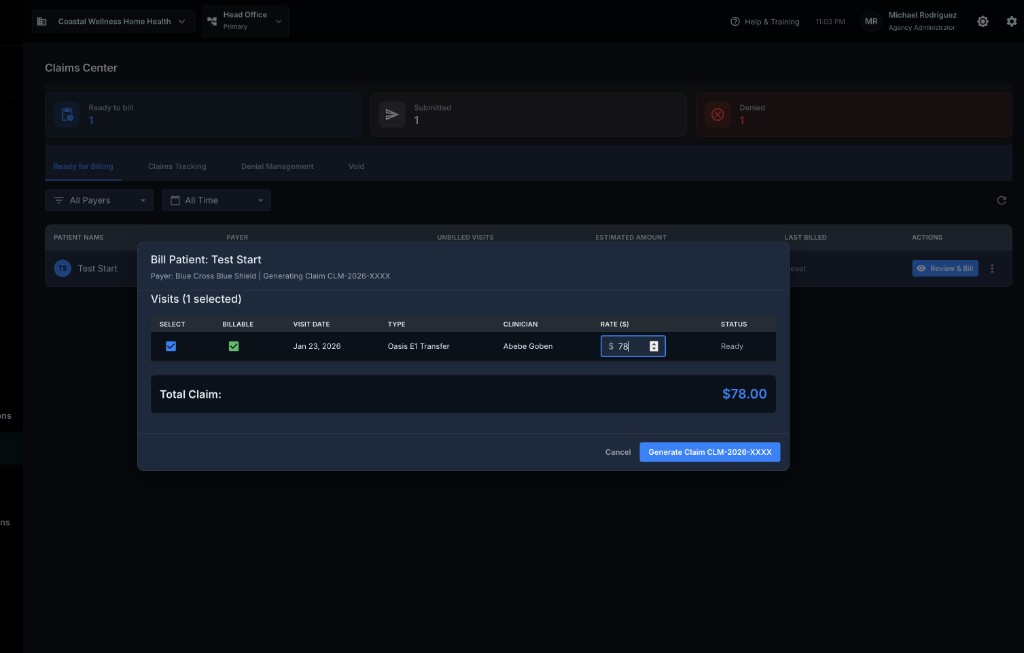
Rate Overrides (Private Insurance Only)
For private insurance visits:
- If Fee Schedule rate exists, it's auto-populated
- If missing, the rate field is empty with red error styling
- You can manually enter a rate to override
- Example: Rate configured = $150, but you want to bill $160 for this specific visit → Enter $160 in the rate field
Step 4: Review Total and Generate Claim
Total Claim Section (bottom of modal):
- Shows the calculated total claim amount
- Formula:
- Medicare: Total = HIPPS rate (regardless of number of visits)
- Private Insurance: Total = Sum of (selected visit rates)
Validation Errors:
The "Generate Claim" button is disabled if:
- No visits are selected
- Any selected visit has a missing rate (and no override entered)
- For Medicare: HIPPS rate is missing (and no override entered)
Error Messages:
- If no visits selected and all have authorization alerts: "Cannot generate claim: X visit(s) have authorization errors and cannot be billed. Please resolve authorization issues first."
- If missing rates: "Please provide rates for all selected visits before generating the claim."
- Red alert banner at bottom: "Please provide rates for all selected visits before generating the claim."
Step 5: Claim Generation Process
When you click "Generate Claim CLM-2026-XXXX":
Backend Actions:
- Validation: Re-checks all visit eligibility conditions
- Rate Lookup:
- Medicare: Looks up HIPPS rate from Payer Settings (or uses override)
- Private: Looks up Fee Schedule rates for each visit (or uses overrides)
- 30-Day Period Validation (Medicare Only):
- Ensures all visits are in the same 30-day period
- Error if visits span Period 1 and Period 2: "Medicare claims cannot span payment periods. 3 visit(s) are in Period 1 (Days 1-30) and 2 visit(s) are in Period 2 (Days 31-60). Please select visits only from Days 1-30 or Days 31-60."
- Claim Number Generation: Assigns unique claim number (format:
CLM-YYYY-####) - Claim Record Created:
- Status =
Ready to Submit totalAmount= calculated totalbalanceDue=totalAmount(initially unpaid)claimStartDate= earliest visit dateclaimEndDate= latest visit date
- Status =
- Line Items Created: One line item per visit with:
chargeAmount= visit rate (or $0.00 for Medicare)visitId= linked to visitserviceCode= HCPCS code from visit type
- Visits Updated: Each visit's
claimIdfield is set to the new claim ID (marks them as billed) - Cache Invalidation: "Ready to Bill" count decreases, claim list refreshes
Success Message: "Successfully generated claim CLM-2026-0002!"
Result:
- Modal closes
- Patient disappears from "Ready for Billing" table
- Claim appears in "Claims Tracking" tab → "Ready to Submit" sub-tab
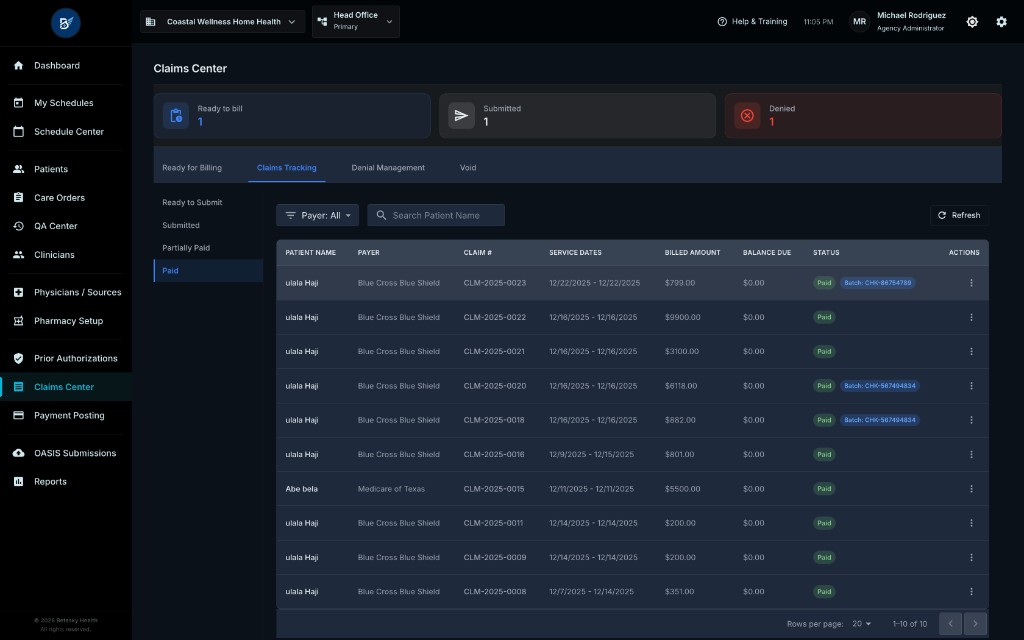
Claims Tracking Tab: Managing Generated Claims
![]()
Sub-Tab Structure
The Claims Tracking tab uses a left sidebar navigation with four sub-tabs:
| Sub-Tab | Status Filter | Description |
|---|---|---|
| Ready to Submit | status = "Ready to Submit" | Claims generated but not yet sent to insurance |
| Submitted | status = "Submitted" | Claims sent to insurance, awaiting response |
| Partially Paid | status = "Partially Paid" | Claims where insurance paid part but not full amount |
| Paid | status = "Paid" | Fully paid claims with balance = $0 |
Claims Table (All Sub-Tabs)
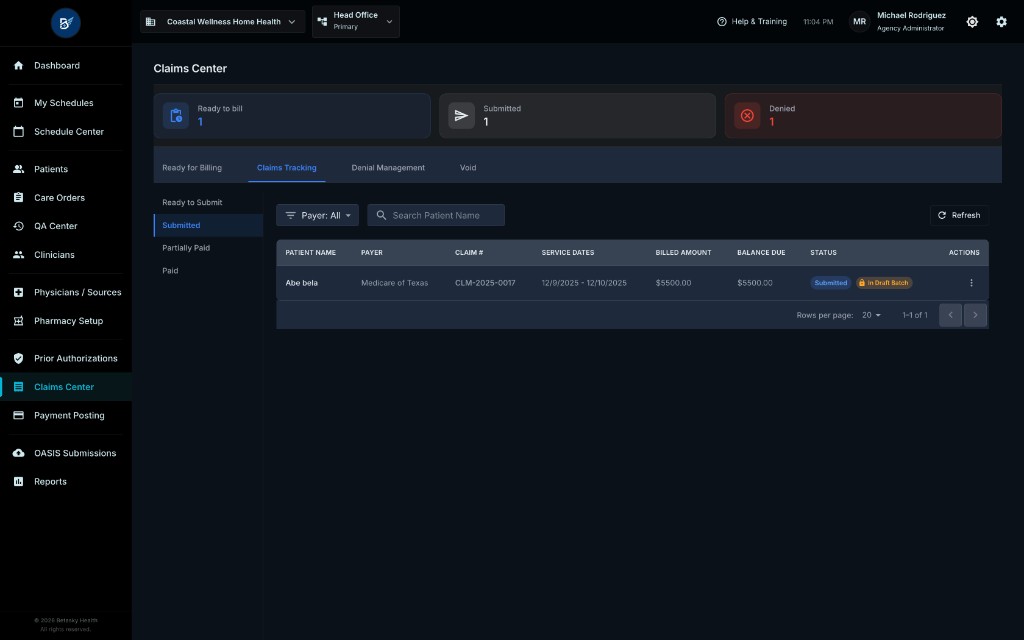
The table displays claims with the following columns:
| Column | Description |
|---|---|
| Patient Name | Patient's full name. Clickable link opens patient profile. |
| Payer | Insurance company name (e.g., "Blue Cross Blue Shield", "Medicare of Texas"). |
| Claim # | Unique claim identifier (e.g., "CLM-2026-0002"). |
| Service Dates | Start → End date of services on this claim (e.g., "1/11/2026 - 1/11/2026" for single-visit claim, or "12/1/2025 - 12/30/2025" for monthly billing period). |
| Billed Amount | Total amount billed to insurance (e.g., "$77.00" for private insurance, "$3,500.00" for Medicare HIPPS). |
| Balance Due | Remaining unpaid amount. Initially equals Billed Amount. Decreases as payments are posted. Shows "$0.00" when fully paid. |
| Status | Color-coded status badge: - Blue "Ready to Submit" - Gray "Submitted" - Green "Paid" - Yellow "Partially Paid" |
| Actions | Two icon buttons: - Eye icon (View Details) - Three-dot menu (More Actions) |
Filters and Search (Top of Table)
Payer Filter:
- Dropdown showing "All" or specific payer names
- Filters claims by payer
Search Bar:
- Search by patient name or claim number
- Real-time filtering as you type
Refresh Button:
- Reloads claims list
- Use after submitting claims externally or receiving payment notifications
Claim Details Modal
Click the eye icon or patient name to open the claim details modal.
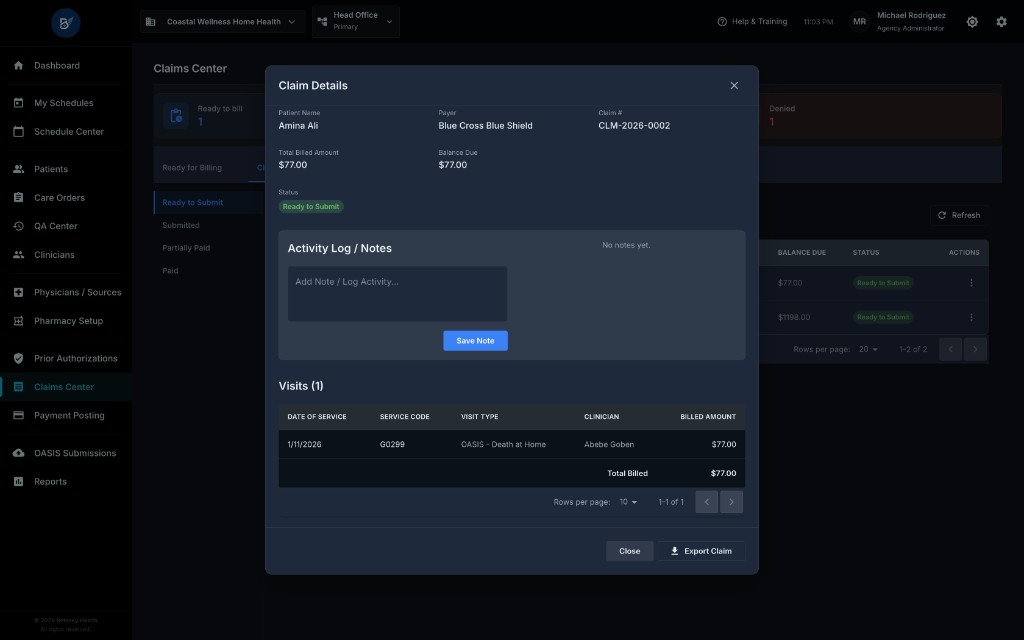
Header Section
| Field | Description |
|---|---|
| Patient Name | Full patient name (e.g., "Test Start") |
| Payer | Insurance company (e.g., "Blue Cross Blue Shield") |
| Claim # | Unique identifier (e.g., "CLM-2020-XXXX") |
| Total Billed Amount | Total charged to insurance (e.g., "$77.00") |
| Balance Due | Unpaid amount remaining (e.g., "$77.00" if no payments posted) |
| Status | Color-coded badge (Green "Ready to Submit") |
Activity Log / Notes Section
- Text area to add notes or log activity about this claim
- Example: "Called insurance on 4/10/26 - representative confirmed authorization is valid"
- Click "Save Note" to save
- Notes appear with timestamp and user name
- Useful for tracking follow-ups, appeal status, or special instructions
Visits Table
Shows all visits included on this claim:
| Column | Description |
|---|---|
| Date of Service | Date the visit was performed (e.g., "1/11/2026") |
| Service Code | HCPCS code for the service (e.g., "G0299" for RN visit, "G0156" for HHA visit) |
| Visit Type | Description of the visit (e.g., "OASIS - Death at Home", "HHA Visit") |
| Clinician | Name of clinician who performed the visit (e.g., "Abeble Godeen") |
| Billed Amount | Amount billed for this specific visit. For Medicare: always "$0.00" (informational only). For Private Insurance: individual visit rate (e.g., "$77.00"). |
Total Billed Row:
- Bottom row shows sum of all visit amounts
- For Medicare: Shows the HIPPS rate here (since individual visits are $0)
- For Private Insurance: Sum of all visit rates
Action Buttons (Bottom of Modal)
| Button | Availability | Action |
|---|---|---|
| Close | Always | Closes the modal |
| Export Claim | Always | Downloads a CMS-1500 PDF or 837 EDI file for this claim (see Export section below) |
Marking Claims as Submitted
After you export a claim and submit it to insurance (via clearinghouse, payer portal, or mail), you must mark it as submitted to track its status.
Step 1: Open Mark as Submitted Modal
From the Ready to Submit sub-tab, click the three-dot menu icon → "Mark as Submitted" (or use the bulk action button if multiple claims selected).
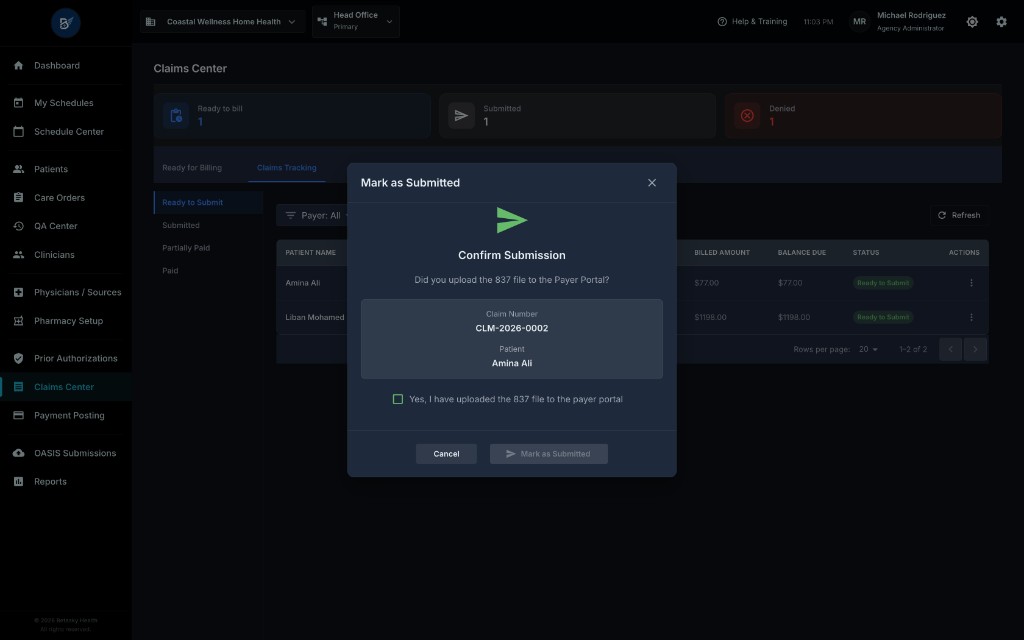
Step 2: Confirm Submission
The "Mark as Submitted" modal displays:
Header:
- Title: "Confirm Submission"
- Question: "Did you upload the 837 file to the Payer Portal?"
Claim Information Box:
- Claim Number (e.g., "CLM-2026-0002")
- Patient name (e.g., "Amina Ali")
Confirmation Checkbox:
- Text: "Yes, I have uploaded the 837 file to the payer portal"
- Must be checked to enable the submit button
Action Buttons:
- Cancel - Closes modal without changes
- Mark as Submitted - Changes claim status to
Submitted
Step 3: Claim Status Changes
When you click "Mark as Submitted":
Backend Actions:
- Claim status changes from
Ready to Submit→Submitted exportedAttimestamp is recorded (if not already set)- Claim moves to the "Submitted" sub-tab
What This Means:
- Claim is now "in flight" with the insurance company
- You're waiting for payment or denial response
- Claim disappears from "Ready to Submit" sub-tab
- Claim appears in "Submitted" sub-tab
Posting Payments to Claims
When insurance sends payment (via check, EFT, or ERA), you must record it in the system.
Step 1: Open Post Payment Modal
From the Submitted sub-tab, click the three-dot menu icon for a claim → "Post Payment".
Step 2: Fill in Payment Details
The Post Payment modal includes:
| Field | Description | Required? |
|---|---|---|
| Payment Amount | Amount insurance paid (can be less than, equal to, or more than billed amount) | Yes |
| Payment Date | Date the payment was received (from check date or EFT transaction date) | Yes |
| Check Number | Check number (if paid by check) | No (but recommended) |
| Payment Method | Dropdown: "Check", "EFT" (Electronic Funds Transfer), "Credit", "Other" | Yes |
| Notes | Optional note about this payment (e.g., "ERA ID: 12345", "Adjustment reason code: 50") | No |
Example:
- Billed Amount: $480.00
- Insurance Paid: $420.00
- Payment Date: April 5, 2026
- Check Number: 789456
- Payment Method: Check
- Notes: "Paid in full per contracted rate. Patient responsibility: $60 co-pay."
Step 3: Payment is Posted
When you click "Post Payment":
Backend Actions:
- Payment Record Created in the
paymentstable with all entered details - Balance Recalculated:
- Formula:
balanceDue = totalAmount - SUM(all payments) - Example: $480 billed - $420 paid = $60 remaining
- Formula:
- Claim Status Auto-Updated:
- If balance = $0 → Status changes to
Paid - If balance > $0 and < total → Status changes to
Partially Paid - If balance = total (no payment yet) → Status remains
Submitted
- If balance = $0 → Status changes to
Result:
- Claim moves to "Paid" sub-tab (if fully paid) or "Partially Paid" sub-tab (if partial)
- Balance Due column updates to show remaining amount
Posting Multiple Payments
If insurance pays in multiple installments:
- Post first payment (e.g., $200) → Status becomes
Partially Paid, balance = $280 - Post second payment (e.g., $280) → Status becomes
Paid, balance = $0
Overpayment Handling
If insurance pays more than billed:
- Example: Billed $480, insurance paid $500
- Balance becomes -$20 (negative balance = credit)
- Status becomes
Paid - The $20 credit can be applied to future claims or refunded to insurance
Denial Management Tab
When insurance denies a claim, it moves to the Denial Management tab for investigation and resolution.
How Claims Become Denied
Path 1: Mark as Denied (Manual)
- You receive a denial letter or ERA from insurance
- Go to Claims Tracking → Submitted sub-tab
- Click three-dot menu for the claim → "Mark as Denied"
- Modal opens to confirm denial (similar to mark as submitted)
- Claim status changes to
Denied - Claim moves to Denial Management tab
Path 2: Post Payment with Full Denial
- Insurance pays $0 with denial codes
- You post payment amount = $0
- Claim status becomes
Denied(because balance = total amount, indicating no payment)
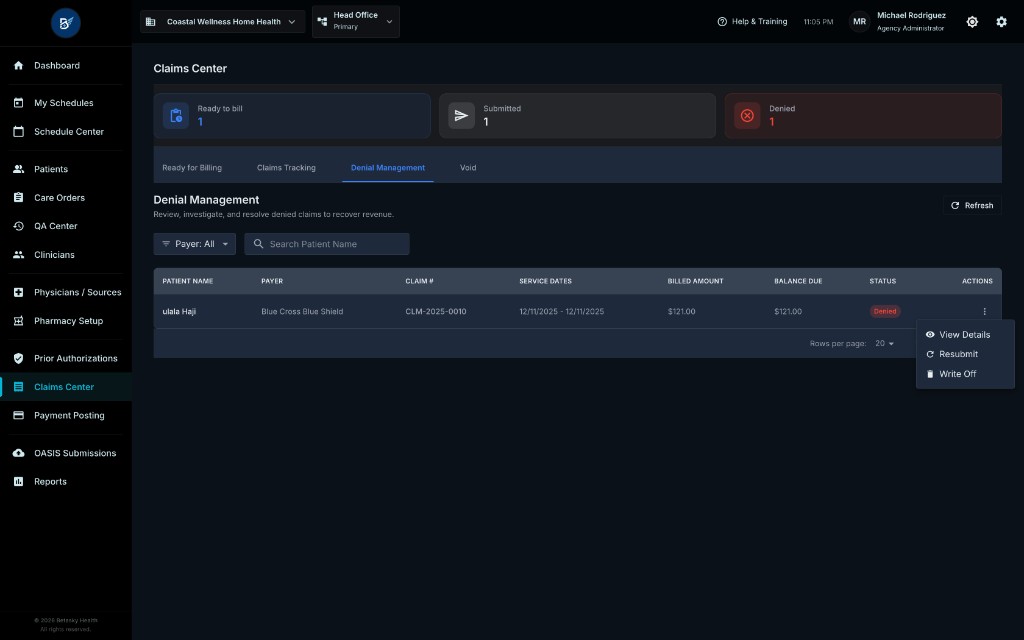
Denial Management Table
Same columns as Claims Tracking, but filtered to show only status = "Denied" claims.
| Column | Value Example |
|---|---|
| Patient Name | "ulala Haji" |
| Payer | "Blue Cross Blue Shield" |
| Claim # | "CLM-2025-0010" |
| Service Dates | "12/11/2025 - 12/11/2025" |
| Billed Amount | "$121.00" |
| Balance Due | "$121.00" (full amount unpaid) |
| Status | Red "Denied" badge |
| Actions | Eye icon (View Details), Three-dot menu (Resubmit, Write Off) |
Actions for Denied Claims
Click the three-dot menu for a denied claim:
| Action | Description |
|---|---|
| View Details | Opens claim details modal to see visits and add notes |
| Resubmit | Corrects the claim and changes status back to Ready to Submit for resubmission |
| Write Off | Marks claim as uncollectible, sets balance to $0 (does not change status to Paid - remains Denied) |
Resubmitting Denied Claims
When to Resubmit
Resubmit a claim when:
- Denial was due to correctable error (wrong code, missing authorization number, incorrect date)
- You've obtained additional documentation insurance requested
- You've appealed and insurance approved the appeal
Do NOT resubmit if:
- Denial is final and insurance won't reconsider
- Claim is not worth the effort (low amount, high collection cost)
- Patient is responsible for the balance (co-pay, out-of-pocket)
Resubmit Process
Step 1: Open Resubmit Modal
- Go to Denial Management tab
- Click three-dot menu for the denied claim
- Select "Resubmit"
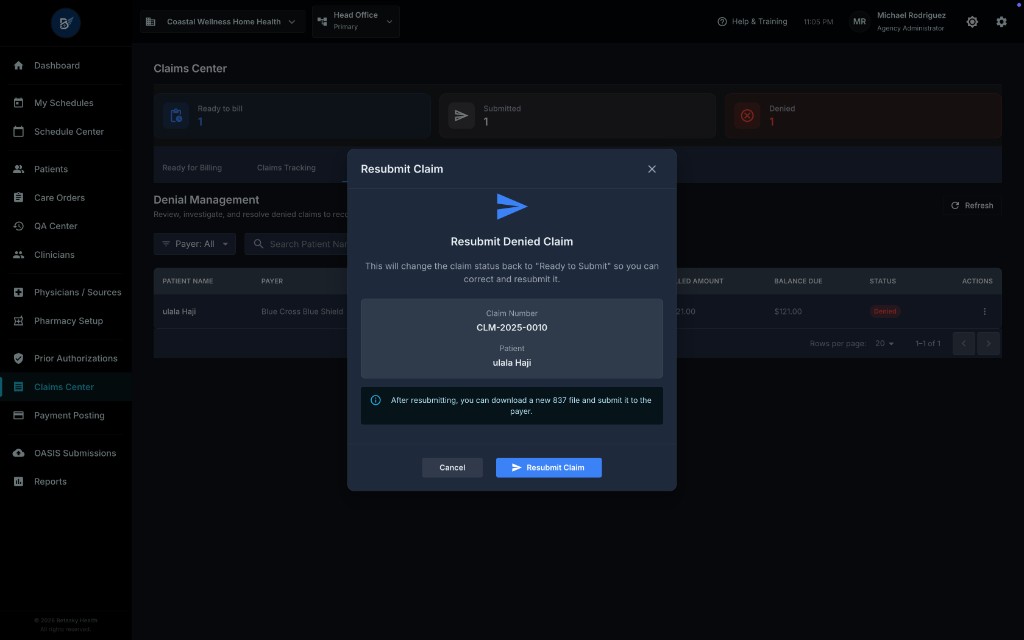
Step 2: Review Claim Information
The modal shows:
- Title: "Resubmit Denied Claim"
- Description: "This will change the claim status back to 'Ready to Submit' so you can correct and resubmit it."
- Claim Number (e.g., "CLM-2025-0010")
- Patient name (e.g., "ulala Haji")
- Info Note: "After resubmitting, you can download a new 837 file and submit it to the payer."
Step 3: Confirm Resubmit
Click the blue "Resubmit Claim" button.
Backend Actions:
- Claim status changes from
Denied→Ready to Submit - Claim moves from Denial Management tab to Claims Tracking → Ready to Submit sub-tab
- Cache invalidated (stats updated)
What Happens Next:
- Go to Claims Tracking → Ready to Submit
- Find the resubmitted claim
- Export a new 837 file or CMS-1500 PDF
- Submit it to insurance (via clearinghouse or payer portal)
- Mark as Submitted again
Note: Resubmitting does NOT change the visits, line items, or amounts. It only resets the claim status to allow another submission attempt.
Writing Off Uncollectible Claims
If a denied claim cannot be collected, you can write it off to remove it from your accounts receivable.
When to Write Off
| Scenario | Action |
|---|---|
| Insurance final denial | After appeal period expires, write off the claim |
| Patient unresponsive | Patient owes co-pay but hasn't paid after multiple attempts |
| Small balance | Amount is too small to justify collection efforts (e.g., $5 balance) |
| Bankruptcy | Patient filed bankruptcy and balance is discharged |
| Death | Patient deceased and estate won't pay (no balance transfer to responsible party) |
Write Off Process
Step 1: Open Write Off Modal
- Go to Denial Management tab
- Click three-dot menu for the denied claim
- Select "Write Off"
Step 2: Confirm Write Off
The modal shows:
- Warning: Writing off a claim sets the balance to $0 but keeps status as
Denied - Claim details (patient, payer, amount)
- Checkbox: "I confirm this balance is uncollectible and should be written off"
Step 3: Execute Write Off
Click "Write Off" button.
Backend Actions:
- Claim's
balanceDueis set to$0.00 - Claim status remains
Denied(to preserve audit trail showing it was never paid by insurance) - A write-off record may be created (depending on accounting configuration)
Result:
- Claim shows balance = "$0.00"
- Claim remains in Denial Management tab (status is still
Denied, notPaid) - Financial reports show this as a write-off, not revenue
Important Distinction:
- Paid Claim: Insurance or patient paid the full amount → status =
Paid - Written Off Claim: No one paid, agency absorbed the loss → status =
Denied, balance = $0
Voiding Claims
What is Voiding?
Voiding a claim permanently cancels it and releases all associated visits back to the "Ready for Billing" queue. This is useful when:
- Claim was generated in error (wrong patient, wrong payer, wrong visits)
- You need to regenerate the claim with different visits
- Claim was submitted to wrong insurance company
When You Can Void
| Claim Status | Can Void? | Why? |
|---|---|---|
| Ready to Submit | Yes | Claim hasn't been submitted yet - safe to cancel |
| Submitted | Yes | Claim was submitted but you discovered an error - void it before insurance processes |
| Denied | Yes | Claim was denied and you want to recreate it differently |
| Partially Paid | Yes | Rare, but possible if you want to cancel the claim and refund the partial payment |
| Paid | NO | Cannot void paid claims - financial integrity rule. Paid claims are locked. |
| Void | No | Already voided |
Voiding Process
Step 1: Open Void Modal
- From any Claims Tracking sub-tab (except Paid), click three-dot menu → "Void"
- Or right-click the claim row and select Void
Step 2: Review Warnings
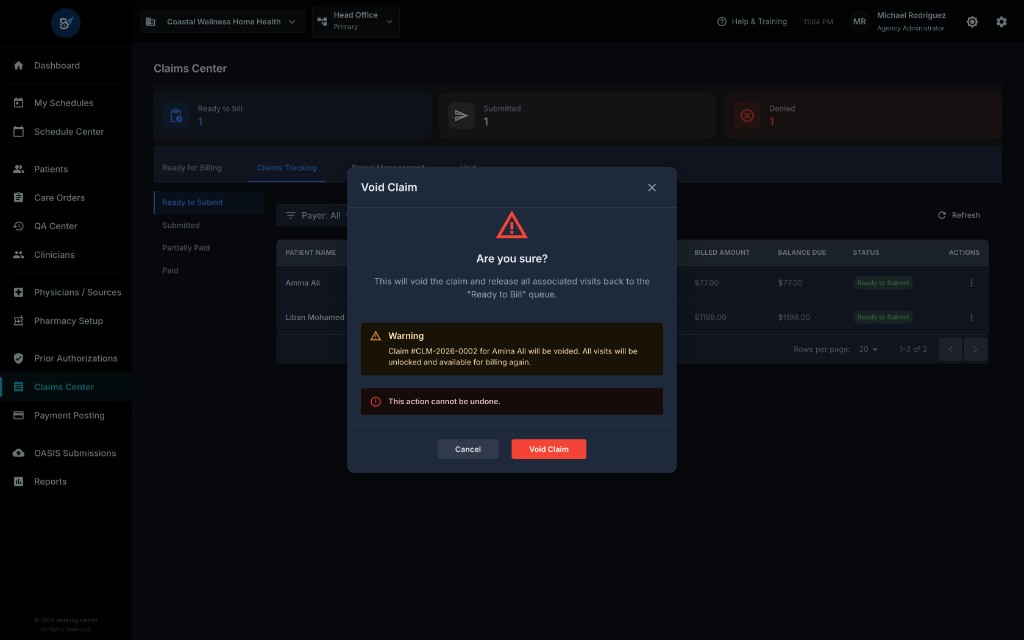
The "Void Claim" modal shows:
Header:
- Title: "Are you sure?"
- Triangle warning icon (red)
Main Warning: "This will void the claim and release all associated visits back to the 'Ready to bill' queue."
Important Notices:
- Yellow Warning Box: "Claim [Claim Number] for [Patient Name] will be voided. All visits will be unlocked and available for billing again."
- Red Error Box: "This action cannot be undone."
Step 3: Confirm Void
Click the red "Void Claim" button.
Backend Actions:
- Claim status changes to
Void - CRITICAL: All visits'
claimIdfield is set toNULL- This "releases" the visits so they're no longer linked to any claim
- Visits reappear in "Ready for Billing" tab
- You can now generate a new claim with those visits (with corrections)
Result:
- Claim moves to "Void" tab
- Patient reappears in "Ready for Billing" with those visits
- You can regenerate the claim correctly
Use Cases for Voiding
Use Case 1: Wrong Payer Selected
Problem: You generated a claim billing Medicare, but the patient's primary payer is actually Blue Cross.
Solution:
- Void the Medicare claim
- Visits return to "Ready for Billing"
- Update patient's primary payer to Blue Cross (in Patient module)
- Generate a new claim (now correctly billing Blue Cross)
Use Case 2: Included Wrong Visits
Problem: Claim includes 5 visits, but 2 of them belong to a different care order (different episode).
Solution:
- Void the claim
- Visits return to "Ready for Billing"
- Review & Bill again, selecting only the correct 3 visits for Episode 1
- Generate a separate claim for the 2 visits from Episode 2
Use Case 3: Submitted to Wrong Clearinghouse
Problem: You accidentally uploaded the 837 file to the wrong clearinghouse.
Solution:
- Void the claim in the system
- Delete the file from the wrong clearinghouse (if possible)
- Generate the claim again
- Export and submit to the correct clearinghouse
- Mark as Submitted
Void Tab: Viewing Voided Claims
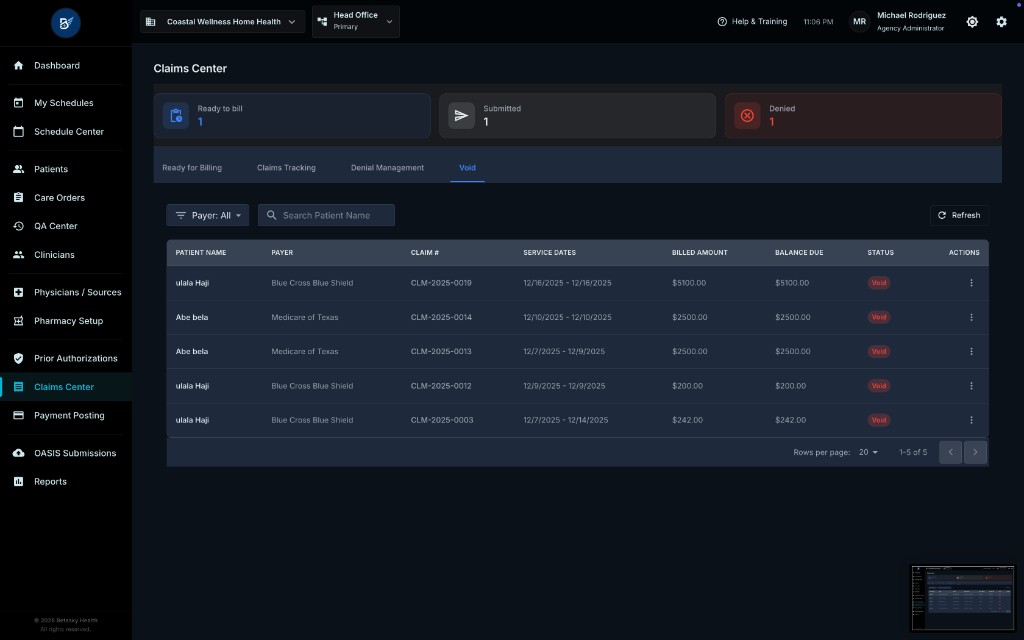
What's in the Void Tab?
The Void tab shows all claims with status = "Void".
Table Columns:
- Same as Claims Tracking tabs (Patient, Payer, Claim #, Service Dates, Billed Amount, Balance Due, Status, Actions)
- Status column shows red "Void" badge
- Balance Due shows the original balance (voided claims keep financial totals for audit trail)
Actions Available:
- View Details - See the claim details and visits (read-only)
- No other actions - Voided claims cannot be edited, resubmitted, or unvoided
Why Keep Voided Claims?
- Audit Trail: Shows what claims were generated and then cancelled
- Financial Reporting: Voided claims are excluded from revenue calculations
- Compliance: Demonstrates you're not double-billing (visit was released and re-billed on a different claim)
Voided Claim Details: When you click "View Details" on a voided claim:
- Shows all original information (visits, dates, amounts)
- Shows "Void" status badge
- No action buttons (read-only)
- Visits table may show empty if visits were re-billed on a different claim
Exporting Claims (837 EDI and CMS-1500)
Claims can be exported in two formats for submission to insurance:
Format 1: 837P EDI File (Electronic)
What is 837P?
- 837P = HIPAA-compliant electronic claim format (P = Professional claims)
- Plain text file with standardized segments (ISA, GS, ST, NM1, etc.)
- Required by most clearinghouses and payer electronic portals
When to Use:
- Submitting to a clearinghouse (e.g., Change Healthcare, Waystar)
- Uploading to payer electronic portal (e.g., Availity)
- Most efficient for bulk claims
How to Export:
- Click "Export Claim" button on claim details modal, OR
- From Claims Tracking → Ready to Submit, select multiple claims and click bulk "Download 837"
- System generates the 837P file
- File downloads automatically (filename:
837P_BATCH_[timestamp].txt)
File Structure Example:
ISA*00*          *00*          *ZZ*AGENCY123      *ZZ*PAYER456       *260410*1200*^*00501*000000001*0*P*:~
GS*HC*AGENCY123*PAYER456*20260410*1200*1*X*005010X222A1~
ST*837*0001*005010X222A1~
BHT*0019*00*CLM-2026-0002*20260410*1200*CH~
...
Format 2: CMS-1500 PDF (Paper)
What is CMS-1500?
- Standard paper claim form (red-outlined boxes)
- Used for mailing claims or uploading scanned copies
When to Use:
- Submitting to payers that don't accept electronic claims
- Printing for patient records or audits
- Small volume of claims
How to Export:
- Click "Export Claim" → Choose "CMS-1500 PDF"
- System generates a filled PDF form
- PDF downloads with patient info, services, codes, and amounts
Understanding Claim Statuses: Complete Lifecycle
Status Flow Chart
Ready to Bill (Visits)
    ↓ [Generate Claim]
Ready to Submit (Claim)
    ↓ [Export 837/CMS-1500 & Submit to Insurance]
Ready to Submit (Claim)
    ↓ [Mark as Submitted]
Submitted (Claim)
    ↓ [Insurance Processes]
    ├→ [Full Payment] → Paid (Final)
    ├→ [Partial Payment] → Partially Paid (Can receive more payments)
    ├→ [Denial] → Denied (Can Resubmit or Write Off)
    └→ [Void] → Void (Released back to Ready to Bill)
Status Definitions in Detail
| Status | Color | Description | Actions Available | Next Steps |
|---|---|---|---|---|
| Ready to Submit | Blue | Claim generated, includes selected visits, has claim number, ready to export and send to insurance | Export 837, Export CMS-1500, Edit, Void | Export and submit to insurance, then mark as submitted |
| Submitted | Gray | Claim sent to insurance, awaiting response (payment or denial) | Post Payment, Mark as Denied, Void | Wait for ERA/EOB from insurance, then post payment or mark as denied |
| Paid | Green | Insurance paid full amount, balance = $0, claim is closed | View Details, Export (read-only) | None - claim is complete |
| Partially Paid | Yellow | Insurance paid some but not all, balance > $0 | Post Additional Payment, Mark as Denied (remaining balance), Write Off (remaining balance) | Follow up with insurance for remaining balance, or collect from patient |
| Denied | Red | Insurance denied claim, balance = full amount | View Details, Resubmit (correct and resubmit), Write Off (if uncollectible) | Investigate denial reason, correct error, and resubmit, or write off if not worth pursuing |
| Void | Red | Claim cancelled, visits released back to billing queue | View Details (read-only) | Visits are now available to bill on a new claim |
Medicare-Specific Billing Rules
Medicare billing has unique requirements that differ from private insurance.
1. OASIS Acceptance Requirement
Rule:
For Medicare care orders, the OASIS assessment must be submitted to CMS and status must be ACCEPTED before you can generate claims for visits in that episode.
Why: Medicare ties payment to OASIS assessments. Without an accepted OASIS, Medicare has no basis to determine the HIPPS code or approve payment.
Error If Not Met: When trying to generate a claim: "Cannot generate Medicare claim: OASIS submission status is 'READY_TO_SUBMIT'. OASIS must be submitted and accepted before billing Medicare. Please check the OASIS Submissions workspace."
Solution:
- Go to OASIS Submissions module
- Export the OASIS XML
- Submit to CMS via QIES system
- Mark as Submitted in the system
- Wait for CMS response (usually 24-48 hours)
- Mark as Accepted once CMS confirms
- Return to Claims Center - visits now appear in Ready for Billing
2. 30-Day Period Validation
Rule: All visits on a Medicare claim must fall within the same 30-day billing period.
Period Definitions:
- Period 1: Days 1-30 of the episode (Day 1 = certification start date, Day 30 = start date + 29 days)
- Period 2: Days 31-60 of the episode (Day 31 = start date + 30 days, Day 60 = start date + 59 days)
Example:
- Episode starts Jan 1, 2026
- Period 1: Jan 1 - Jan 30, 2026
- Period 2: Jan 31 - Mar 1, 2026
Validation Error: If you try to bill visits from both periods on the same claim: "Medicare claims cannot span payment periods. 4 visit(s) are in Period 1 (Days 1-30) and 2 visit(s) are in Period 2 (Days 31-60). Please select visits only from Days 1-30 or Days 31-60."
Solution:
- Generate two separate claims:
- Claim 1: Include only Period 1 visits (4 visits)
- Claim 2: Include only Period 2 visits (2 visits)
- Both claims will have the same HIPPS rate (e.g., $3,200 each)
3. HIPPS Code and Rate Lookup
Process:
- System retrieves HIPPS code from the Care Order (stored when OASIS was approved)
- System looks up the HIPPS rate from Payer Settings (based on HIPPS code and effective date)
- If rate is missing, you must manually enter it in the billing modal
Rate Lookup Logic:
- Finds rate with HIPPS code matching AND effective date <= earliest visit date
- If multiple rates exist, uses the most recent one (by effective date DESC)
Why Effective Date Matters: HIPPS rates change annually (January 1 each year). A visit on Jan 15, 2026 uses the 2026 rate, but a visit on Dec 20, 2025 uses the 2025 rate.
4. Medicare Does Not Use Line Item Rates
In Medicare claims:
- Individual visit amounts = $0.00 (informational only, not billed separately)
- Total claim amount = HIPPS rate (flat rate for the 30-day period)
- Visits are listed on the claim to document services provided, but payment is based on HIPPS, not visit count
Why This Matters: If you provide 3 visits or 15 visits in a 30-day period, Medicare pays the same HIPPS rate. The payment is based on patient acuity and clinical characteristics (captured in OASIS), not visit frequency.
Private Insurance-Specific Billing Rules
1. Fee Schedule Requirement
Rule: For private insurance and Medicaid Managed Care, each visit type must have a configured rate in the Fee Schedule.
How Rates Are Looked Up:
- System finds Fee Schedule entry where:
payerId= patient's primary payervisitTypeId= visit type being billedeffectiveDate<= visit date
- If multiple rates exist, uses the most recent one (by effective date DESC)
Missing Rate Handling:
- If rate is missing, visit shows "Rate not found" error in the billing modal
- You can manually enter a rate override
- Better solution: Go to Fee Schedule Setup and configure the rate for future claims
2. Prior Authorization Validation
Rule: If the payer requires prior authorization, the visit must be linked to an approved PA with remaining units.
Authorization Alerts:
- MISSING_AUTH: Visit has no valid PA (PA is expired, exhausted, denied, or doesn't exist)
- EXCEEDS_LIMIT: Visit exceeds approved PA units
Error Prevention:
- Visits with authorization alerts are automatically unselected in the billing modal
- Checkbox is disabled (cannot include them on the claim)
- Must resolve the PA issue first, then click "Re-Validate" to clear the alert
3. Multiple Claims Per Patient
Unlike Medicare (which requires one claim per 30-day period), private insurance allows flexibility:
- Option A: Generate one claim with all unbilled visits (monthly billing)
- Option B: Generate separate claims for each visit (immediate billing)
- Option C: Group visits by week or other custom period
Recommendation: Bill weekly or bi-weekly for private insurance to improve cash flow and reduce risk of large denials.
Best Practices for Claims Management
1. Bill Medicare Period 1 Claims Immediately
Why:
- Period 1 claims can be submitted as soon as Day 1 visits are complete (don't need to wait for Day 30)
- Faster billing = faster payment = better cash flow
- CMS allows submitting RAP (Request for Anticipated Payment) after first visit
How:
- As soon as OASIS is accepted and first few visits are complete, generate Period 1 claim
- Even if only 2 visits are complete out of 10 planned, you can bill
- Medicare pays based on HIPPS, not visit count
2. Verify Rates Before Mass Billing
Why:
- Missing rates cause claim generation to fail
- Entering rates manually for every visit is time-consuming
- Consistent rates ensure predictable revenue
How:
- Before running monthly billing, spot-check a few patients:
- Click "Review & Bill"
- Check if any visits show "Rate not found"
- If rates are missing, go to Fee Schedule Setup and configure them
- Once rates are confirmed, proceed with bulk billing
3. Resolve Authorization Alerts Immediately
Why:
- Visits with authorization alerts cannot be billed
- They remain stuck in "Ready for Billing" until PA is fixed
- Delays in PA renewal delay claims and revenue
How:
- In the billing modal, if you see visits with "No Authorization" or "Exceeds Limit":
- Pause billing for that patient
- Go to Prior Authorizations module
- Update the PA (approve units, extend dates, or create new PA)
- Return to Claims Center and click "Re-Validate" button
- Alert should clear, visit becomes billable
4. Add Notes to Claims
Why:
- Notes serve as communication log between billing staff
- Helps with follow-ups ("Called insurance on 4/10, waiting for response")
- Provides context for appeals or disputes
How:
- Open claim details modal
- Use the "Activity Log / Notes" text area
- Save note
- Notes are timestamped and attributed to your user account
5. Monitor Denial Patterns
Why:
- Recurring denials from the same payer indicate systemic issues
- Common denial reasons can often be prevented
How:
- Weekly review of Denial Management tab
- Track denial reasons (manually in notes, or use denial codes if system supports)
- Identify patterns:
- Is one clinician's visits frequently denied? (documentation quality issue)
- Is one payer denying more than others? (authorization or rate issue)
- Are specific visit types denied? (incorrect HCPCS code or medical necessity issue)
- Address root causes instead of resubmitting repeatedly
6. Don't Let Claims Sit in "Ready to Submit" Too Long
Why:
- Delayed billing extends your cash conversion cycle
- Timely filing limits (insurance may deny claims submitted more than 90 days after service date)
- Increases risk of missing information (clinician may forget visit details)
How:
- Set a target: Export and submit claims within 5 business days of generation
- Use a weekly billing schedule:
- Monday: Generate claims for last week's visits
- Tuesday: Export 837 files and submit to clearinghouse
- Wednesday: Mark all as Submitted
- Automate where possible (EDI integrations)
7. Post Payments Promptly
Why:
- Accurate balance tracking
- Identify payment shortfalls early (under-payments, incorrect adjustments)
- Timely follow-up on remaining balances
How:
- When ERA (Electronic Remittance Advice) arrives:
- Post payment within 1-2 business days
- Record exact amount, check number, and date
- Add note with ERA reference number
- If payment differs from billed amount, note the reason in the payment notes (e.g., "Adjusted to contracted rate per fee schedule")
8. Use Write-Offs Judiciously
Why:
- Write-offs reduce revenue (permanently)
- Premature write-offs = lost recovery opportunity
- Audit trail requirement
How:
- Establish a write-off policy:
- Balances < $10: Write off after 60 days
- Balances $10-$100: Attempt collection for 90 days, then write off
- Balances > $100: Pursue aggressively, appeal, or send to collections
- Document reason for each write-off
- Get supervisor approval for write-offs > $500
Common Scenarios and Solutions
Scenario 1: Visit is Complete But Not Showing in "Ready for Billing"
Possible Causes:
- Visit note is not approved yet (still in QA)
- Patient has no primary payer assigned
- Visit is marked as non-billable
- For Medicare: OASIS not submitted or not accepted
- Care order status is "Closed" or "On Hold"
Solutions:
- Check QA Center: Is the visit note approved?
- Check Patient Payer: Go to Patient module → Insurance tab → Verify primary payer is assigned
- Check Visit: Go to Schedule Center → Find the visit → Verify
isBillable = true - For Medicare: Check OASIS Submissions → Status should be
ACCEPTED - Check Care Order: Care order must be "Active" or "Discharged" (not "Closed")
Scenario 2: Cannot Generate Claim Due to HIPPS Rate Missing
Error Message: "HIPPS rate not found for code 1CABA. Please configure the rate in Payer Setup for payer [Medicare] with an effective date on or before 2026-01-15, or provide a rate override."
Solution:
- Option A: Configure Missing Rate
- Go to Payer Setup → Select Medicare payer
- Go to HIPPS Rates section
- Add rate for HIPPS code
1CABA - Set effective date to Jan 1, 2026 (or earlier)
- Set rate amount (e.g., $3,200)
- Save
- Return to Claims Center and try again
- Option B: Manual Override (Temporary Fix)
- In the billing modal, manually enter the rate in the "Reimbursement Rate" field
- Generate the claim
- Note: This only fixes this one claim; configure the rate in Payer Setup for future claims
Scenario 3: Claim Generated for Wrong Billing Period (Medicare)
Problem: You selected 6 visits: 4 from Period 1 (Jan 1-30) and 2 from Period 2 (Jan 31 - Feb 28). System shows error.
Solution:
- Deselect the 2 Period 2 visits in the modal
- Generate claim with only the 4 Period 1 visits
- Close modal
- Immediately click "Review & Bill" again for the same patient
- Generate a second claim with the 2 Period 2 visits
- Result: Two claims created (one per period, as required by Medicare)
Scenario 4: Insurance Paid Less Than Billed
Situation:
- Billed: $480.00
- Paid: $420.00
- Difference: $60.00
Actions:
- Post the $420 payment → Claim status becomes
Partially Paid, balance = $60 - Review the ERA (Explanation of Benefits) to understand why:
- Reason: Contractual Adjustment → $60 was adjusted to meet contracted rate (common, usually non-collectible from patient)
- Reason: Deductible → $60 is patient's responsibility (bill patient separately)
- Reason: Co-insurance → Patient owes 20% co-pay (bill patient)
- Reason: Denied Line Item → One visit was denied on the claim (investigate and appeal or write off)
- If patient-responsible:
- Generate patient statement (separate workflow)
- Attempt to collect
- If contractual adjustment:
- Write off the $60 (not collectible)
- Claim status remains
Partially Paidwith balance = $0 after write-off
Scenario 5: Need to Bill Visits from Multiple Episodes
Problem: Patient had two care orders (episodes) in the same month:
- Episode 1: Jan 1 - Feb 29 (5 visits)
- Episode 2 (Recert): Mar 1 - Apr 29 (3 visits)
All 8 visits are complete and ready to bill.
Solution: Critical Rule: You MUST generate separate claims for each episode.
Why: Each episode has a different HIPPS code (from different OASIS assessments). Medicare will deny a claim that mixes HIPPS codes.
Steps:
- In billing modal, look at visit dates
- Identify which visits belong to Episode 1 (Jan 1 - Feb 29)
- Select only Episode 1 visits
- Generate Claim 1
- Return to Ready for Billing
- Click "Review & Bill" for the same patient again
- Select only Episode 2 visits (Mar 1 - Apr 29)
- Generate Claim 2
Scenario 6: Claim Submitted But Insurance Says They Never Received It
Problem: You marked claim as "Submitted" 30 days ago, but insurance has no record of it.
Cause:
- 837 file was not actually uploaded to clearinghouse or payer portal
- File upload failed (network error, format error)
- Submitted to wrong payer ID
Solution:
- Check if you have a confirmation from the clearinghouse (submission receipt, transaction ID)
- If no confirmation exists, claim was never sent
- Go to Claims Tracking → Submitted tab
- Find the claim
- Export a fresh 837 file
- Submit to clearinghouse/payer portal (verify payer ID is correct)
- Confirm submission (wait for receipt/confirmation email)
- If insurance still says they don't have it after confirmed submission, escalate with clearinghouse support
Scenario 7: Want to Add More Visits to an Existing Claim
Problem: You generated a claim with 3 visits. Now 2 more visits for the same patient are complete, and you want to add them to the existing claim.
Solution: You cannot add visits to an existing claim. Claims are immutable once generated.
Workaround:
- If claim is still
Ready to Submit(not yet sent to insurance):- Void the claim
- Visits return to Ready for Billing (now 5 total)
- Generate a new claim including all 5 visits
- If claim is already
Submitted:- Leave the original claim as-is
- Generate a second claim with the 2 new visits
- Result: Two claims for the same patient (this is acceptable)
Scenario 8: Patient Changed Insurance Mid-Episode
Problem:
- Jan 1-15: Patient had Blue Cross (5 visits completed)
- Jan 16: Patient switched to Medicaid (3 visits completed after switch)
All 8 visits are ready to bill, but patient's primary payer is now Medicaid.
Solution: You must generate two separate claims:
- Temporarily change patient's primary payer back to Blue Cross (or create a manual claim override - if supported)
- Generate claim for the 5 visits (Jan 1-15) → Bills Blue Cross
- Change patient's primary payer back to Medicaid
- Generate claim for the 3 visits (Jan 16+) → Bills Medicaid
Better Approach:
- In patient module, assign secondary payer (Blue Cross) in addition to primary payer (Medicaid)
- When generating claims, system can intelligently bill based on effective dates of each payer
- Consult with your billing specialist if this scenario occurs frequently
Troubleshooting
Issue: "Ready to Bill" Count Doesn't Match Actual Patients
Symptom: Dashboard says "Ready to bill: 5" but only 3 patients appear in the table.
Possible Causes:
- Cache is stale (stats cached for 90 seconds)
- Branch filter is applied (multi-branch feature)
- Payer filter is hiding some patients
Solutions:
- Wait 90 seconds for cache to refresh, or click Refresh button
- Check branch selector (top of page) - are you viewing Head Quarter or a specific branch?
- Check payer filter - change to "All Payers"
Issue: Cannot Generate Claim Due to Missing Document Approval
Error Message: "One or more provided visits are not in a billable state..." or visit doesn't appear in Ready for Billing at all.
Cause: Visit note is not approved in QA Center yet.
Solution:
- Go to QA Center
- Find the visit note for this visit (search by patient name or date)
- Review and approve the visit note
- Return to Claims Center after 2-3 minutes (give backend time to process)
- Visit should now appear in Ready for Billing
Issue: Medicare Claim Shows "OASIS Not Accepted" Error
Error Message: "Cannot generate Medicare claim: OASIS submission status is '[status]'. OASIS must be submitted and accepted before billing Medicare."
Cause: OASIS for this episode is not yet submitted to CMS, or CMS rejected it.
Solution:
- Go to OASIS Submissions module
- Find the OASIS for this patient's care order
- Check status:
- READY_TO_SUBMIT → Export XML, submit to QIES, mark as Submitted
- SUBMITTED → Wait for CMS response (usually 24-48 hours)
- REJECTED → Fix the errors CMS reported, resubmit
- PENDING_CORRECTION → Notify clinician to make corrections, re-approve in QA, resubmit
- Once status is
ACCEPTED, return to Claims Center - Visits should now be billable
Issue: Claim Generated But Visits Still Show in "Ready for Billing"
Symptom: You generated a claim for patient John Doe, but John Doe still appears in the Ready for Billing table with the same visits.
Possible Causes:
- Claim generation failed partway through (database transaction rolled back)
- Frontend didn't refresh after claim generation
- Those are different visits (not the ones you billed)
Solutions:
- Refresh the page (F5)
- Go to Claims Tracking → Ready to Submit → Verify the claim exists
- If claim doesn't exist, generation failed - check browser console for errors
- If claim exists, those may be new visits completed after you generated the first claim
Issue: Voided Claim Visits Don't Reappear in "Ready for Billing"
Symptom: You voided a claim, but the visits don't show up in the Ready for Billing table.
Possible Causes:
- Visits are no longer eligible (care order closed, visit note un-approved, etc.)
- Frontend cache hasn't refreshed
- Visits were re-billed on another claim already
Solutions:
- Click Refresh button
- Verify visit eligibility:
- Go to Schedule Center → Find the visits
- Check visit status =
Completedand visit note status =Approved - Check care order status =
ActiveorDischarged
- If visits were re-billed on another claim, they won't reappear (already claimed)
Permissions and Access Control
Required Permissions
| Action | Required Permission | Notes |
|---|---|---|
| View Claims Center | VIEW_CLAIMS | Without this, Claims Center menu is hidden |
| Generate Claims | CREATE_CLAIM | "Review & Bill" button hidden without this permission |
| Mark as Submitted | EDIT_CLAIM | Cannot change claim status without this |
| Post Payments | POST_PAYMENT | Cannot record insurance payments without this |
| Void Claims | VOID_CLAIM | Cannot cancel claims without this |
| Resubmit Denied Claims | EDIT_CLAIM | Resubmit button hidden without this |
| Write Off | WRITE_OFF_CLAIM or POST_PAYMENT | Cannot write off balances without this |
Role-Based Access Examples
Billing Manager (Full Access)
- Permissions: All claims permissions
- Can Do:
- Generate claims
- Export 837 and CMS-1500
- Mark as submitted
- Post payments
- Manage denials (resubmit, write off)
- Void claims
Billing Specialist (Limited)
- Permissions:
VIEW_CLAIMS,CREATE_CLAIM,EDIT_CLAIM - Can Do:
- View claims
- Generate claims
- Export claims
- Mark as submitted
- Cannot Do:
- Post payments (requires manager approval)
- Void claims
- Write off claims
Finance Director (Read-Only)
- Permissions:
VIEW_CLAIMSonly - Can Do:
- View all claims and their statuses
- Run reports on revenue and denials
- Export claim data for analysis
- Cannot Do:
- Generate, edit, or void claims
- Post payments
Clinician (No Access)
- Permissions: None
- Cannot Access: Claims Center
- Why: Clinicians focus on patient care, not billing. Their visit notes feed into claims, but they don't manage the billing process.
Integration with Other Modules
Visit Forms / Schedule Center
- Link: Completed visits feed into Claims Center
- Impact: Visit status and visit note approval determine billing eligibility
- Flow: Clinician completes visit → QA approves note → Visit appears in Ready for Billing
QA Center
- Link: Visit note must be approved before visit can be billed
- Impact: QA bottlenecks delay billing
- Recommendation: Prioritize QA review of visits approaching timely filing limits
OASIS Submissions (Medicare Only)
- Link: OASIS acceptance is a prerequisite for Medicare billing
- Impact: Cannot bill Medicare visits until OASIS status =
ACCEPTED - Timeline: OASIS approval → CMS submission → 24-48 hour wait → Acceptance → Visits become billable
Prior Authorizations (Private Insurance)
- Link: PA approval and remaining units determine visit eligibility
- Impact: Expired/exhausted PAs block billing with MISSING_AUTH alert
- Flow: PA approved → Visits generated → Visits completed → Appear in Ready for Billing (if PA still valid)
Care Orders
- Link: Care order status and dates affect billing eligibility
- Impact: Closed care orders block billing, discharged care orders filter post-discharge visits
- Rule: Care order must be "Active" or "Discharged" to bill
Payer Setup
- Link: Fee Schedules (private insurance) and HIPPS Rates (Medicare) determine claim amounts
- Impact: Missing rates prevent claim generation
- Recommendation: Configure all rates during payer setup, before seeing patients
Payment Posting
- Link: Posted payments update claim balance and status
- Impact: Claims transition from Submitted → Partially Paid → Paid based on payments received