Chapter 26: Payment Posting & Remittance Batches
Overview
The Payment Posting module is where you record bulk payments received from insurance companies. Instead of posting payments one claim at a time (as covered in Chapter 25), you can create Remittance Batches to process multiple claims from a single insurance check or EFT (Electronic Funds Transfer) payment efficiently.
This chapter explains the complete remittance batch workflow from creation through posting, with step-by-step instructions for each status.
Understanding Remittance Batches
What is a Remittance Batch?
A Remittance Batch is a container that groups multiple claim payments together, representing a single payment from an insurance company. When you receive an ERA (Electronic Remittance Advice) or paper EOB (Explanation of Benefits) with a check, you create a batch to match that payment.
Key Concepts:
- One batch = One insurance check/EFT
- Batches are payer-specific (all claims in a batch must be from the same payer)
- Batches track total amount vs. applied amount (ensures you allocate the entire check correctly)
- Batches have two statuses:
Draft(in progress) andPosted(finalized)
Why Use Remittance Batches?
| Benefit | Description |
|---|---|
| Efficiency | Post 10+ claims at once instead of one-by-one |
| Accuracy | Balance counter ensures you allocate the full check amount |
| Audit Trail | Links all claims to a specific check number and payment date |
| ERA Processing | Perfect for processing ERAs with multiple claims |
| Adjustments | Record contractual adjustments, interest, penalties in one place |
| Reconciliation | Easily match your batch total to bank deposit |
Remittance Batch vs Individual Payment Posting
| Feature | Remittance Batch | Individual Payment (Chapter 25) |
|---|---|---|
| Use Case | Insurance sends one check for multiple claims | Posting one claim payment at a time |
| Claims Processed | Multiple (5, 10, 50+ claims) | One claim per action |
| Check/EFT | One check number for entire batch | Separate check number per payment |
| Efficiency | Fast (bulk processing) | Slower (repetitive) |
| Balance Tracking | Yes (total check amount tracked) | No |
| Adjustments | Can add general adjustments (interest, penalties) | Per-claim adjustments only |
| Best For | ERAs, large EOBs, monthly remittances | Quick single-claim payments, patient payments |
Remittance Batch Statuses
Batches have two statuses that represent their lifecycle:
| Status | Badge Color | Description | Editable? | Actions Available |
|---|---|---|---|---|
| Draft | Blue "Ready to Post" | Batch is being built; claims can be added/removed | YES | Edit Batch Details, Select Claims, Add/Remove Claims, Add General Adjustments, Edit Payment Amounts, Delete Batch, Post Batch |
| Posted | Green "Posted" | Batch is finalized; payments created, claim statuses updated | NO (read-only) | View Details, Export Report |
Status Transitions
[Create Batch] → Draft
    ↓
[Add Claims + Adjust Amounts]
    ↓
[Post Batch] → Posted (FINAL)
Important: Once a batch is Posted, it CANNOT be edited or reversed. You must:
- Create payment records for each claim
- Update claim statuses automatically
- Mark all batch claims as
posted = true
Payment Posting Interface
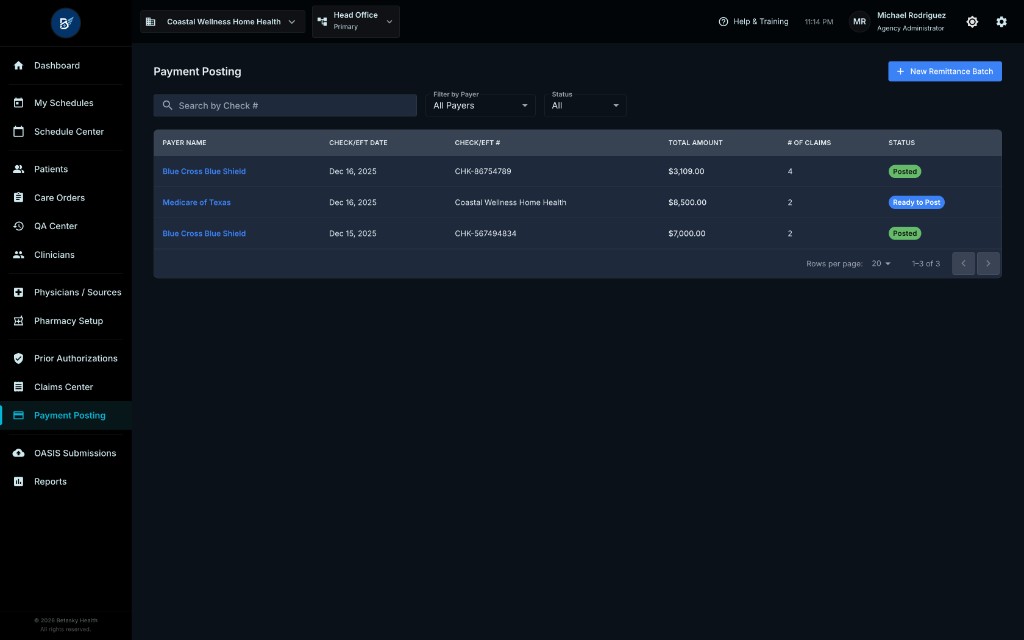
Main Batch List Table
The Payment Posting page shows all remittance batches:
| Column | Description |
|---|---|
| Payer Name | Insurance company name (e.g., "Blue Cross Blue Shield", "Medicare of Texas"). Shown as a blue link. |
| Check/EFT Date | Date the payment was received (e.g., "Dec 16, 2025"). |
| Check/EFT # | Check number or EFT reference (e.g., "CHK-803754769", "Coastal Wellness Home Health"). |
| Total Amount | Total amount of the check/EFT (e.g., "$3,109.00", "$8,500.00"). |
| # of Claims | Number of claims included in this batch (e.g., "4", "2"). |
| Status | Badge showing batch status: - Blue "Ready to Post" = Draft - Green "Posted" = Posted |
Filters (Top of Page)
Search by Check #:
- Text input field with search icon
- Search by check number or EFT reference
- Real-time filtering
Filter by Payer:
- Dropdown showing "All Payers" or specific payer names
- Filters batches to show only selected payer
Status Filter:
- Dropdown showing "All" or specific status (Draft, Posted)
- Filters batches by status
Create New Batch Button
Blue "+ New Remittance Batch" button in the top right corner.
- Clicking opens the "Post New Remittance" modal to create a new Draft batch
Creating a Draft Batch: Step-by-Step
Step 1: Click "+ New Remittance Batch"
From the main Payment Posting page, click the blue "+ New Remittance Batch" button.
Step 2: Fill in Batch Information
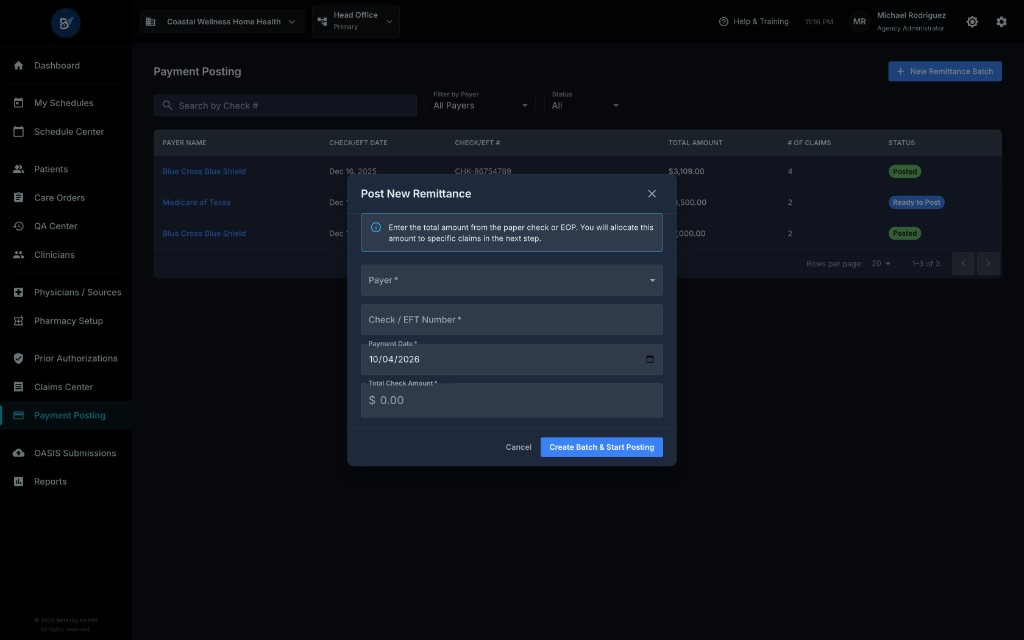
The "Post New Remittance" modal opens with the following fields:
| Field | Description | Required? | Example |
|---|---|---|---|
| Payer | Dropdown of all payers. Select the insurance company that sent this payment. | YES | "Medicare of Texas" |
| Check / EFT Number | Check number or electronic payment reference. This appears on the ERA or EOB. | YES | "CHK-567494834" |
| Payment Date | Date the payment was received (date picker). | YES | "10/04/2026" |
| Total Check Amount | Total amount of the check or EFT. Must match the bank deposit amount. | YES | "$8500" |
Info Message: Blue information box at the top says: "Enter the total amount from the paper check or EOP. You will allocate this amount to specific claims in the next step."
Validation:
- Payer is required
- Check/EFT Number is required (cannot be blank)
- Payment Date is required
- Total Check Amount must be > $0.00
Step 3: Create Batch
Click the blue "Create Batch & Start Posting" button.
What Happens:
- Backend creates a new
RemittanceBatchrecord with:status = "Draft"payerId= selected payercheckNumber= entered check numberpaymentDate= entered datetotalAmount= entered total amountcreatedBy= your user ID
- Batch is created and you're redirected to the Batch Detail View
Success Message: Green toast notification: "Remittance batch created successfully!"
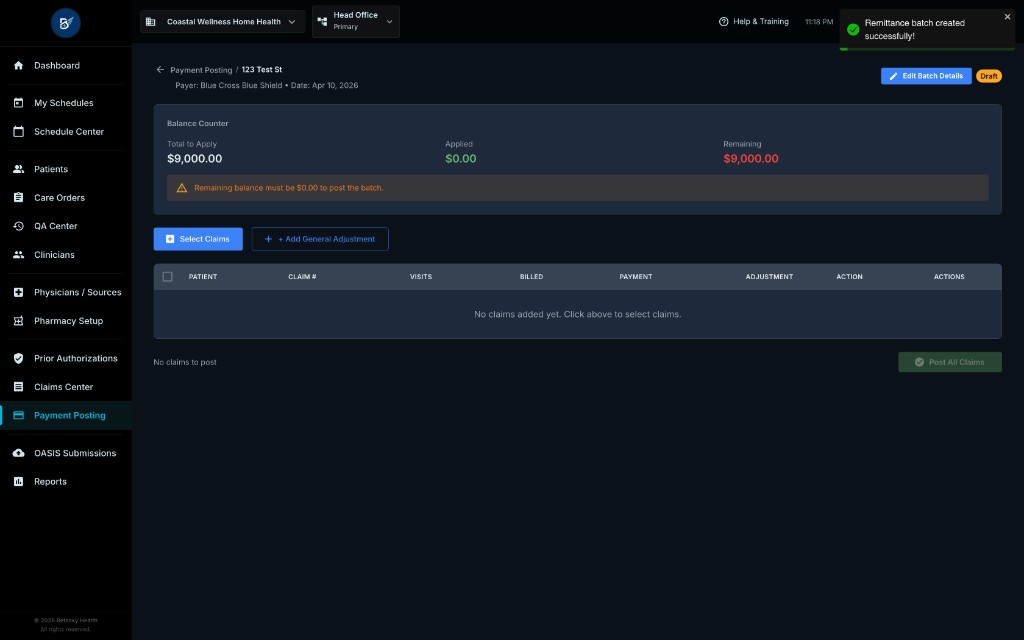
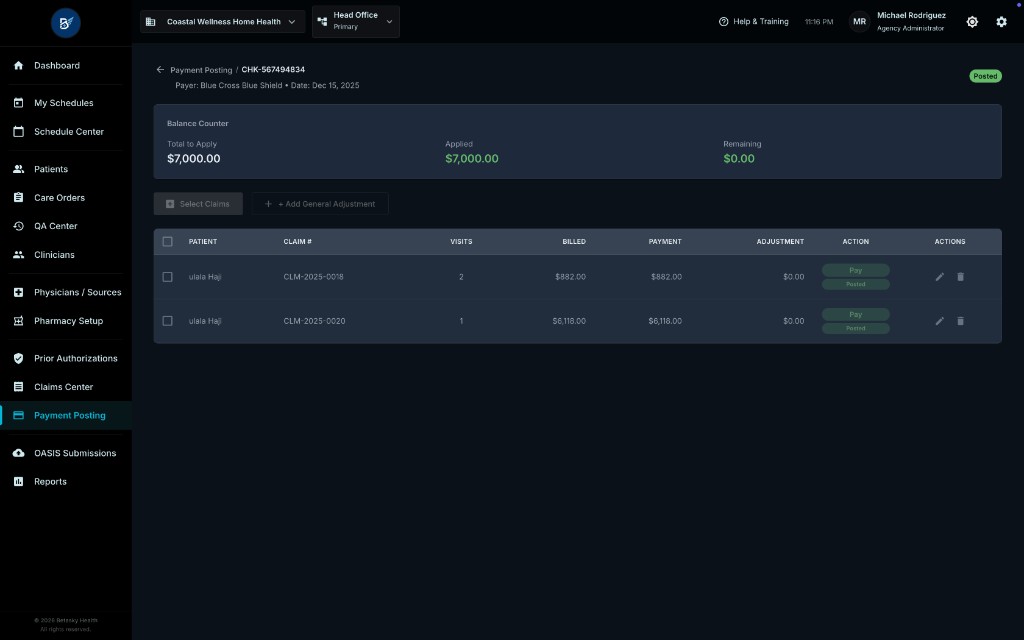
Batch Detail View (Draft Status)
Header Section
Back Button:
- Arrow icon on the left
- Returns to main Payment Posting list
Breadcrumb:
- "Payment Posting / [Check/EFT Number]"
- Shows payer name and payment date below
Edit Batch Details Button:
- Blue button with pencil icon
- Allows editing payer, check number, payment date, or total amount
- Only available in Draft status
Status Badge:
- Orange "Draft" badge in top right corner
- Indicates batch is editable
Balance Counter (Top Section)
Critical section showing allocation status:
| Metric | Description | Formula |
|---|---|---|
| Total to Apply | Total amount of the check/EFT (from batch header) | Fixed amount from batch creation |
| Applied | Sum of all claim payments + adjustments allocated so far | Sum of (payment amounts + adjustment amounts) for all claims in batch |
| Remaining | Amount left to allocate | Total to Apply - Applied |
Color Coding:
- Remaining = $0.00 (green) - Batch is balanced, ready to post
- Remaining > $0.00 (red) - Under-applied, more claims or adjustments needed
- Remaining < $0.00 (red) - Over-applied, exceeds check amount (ERROR - cannot post)
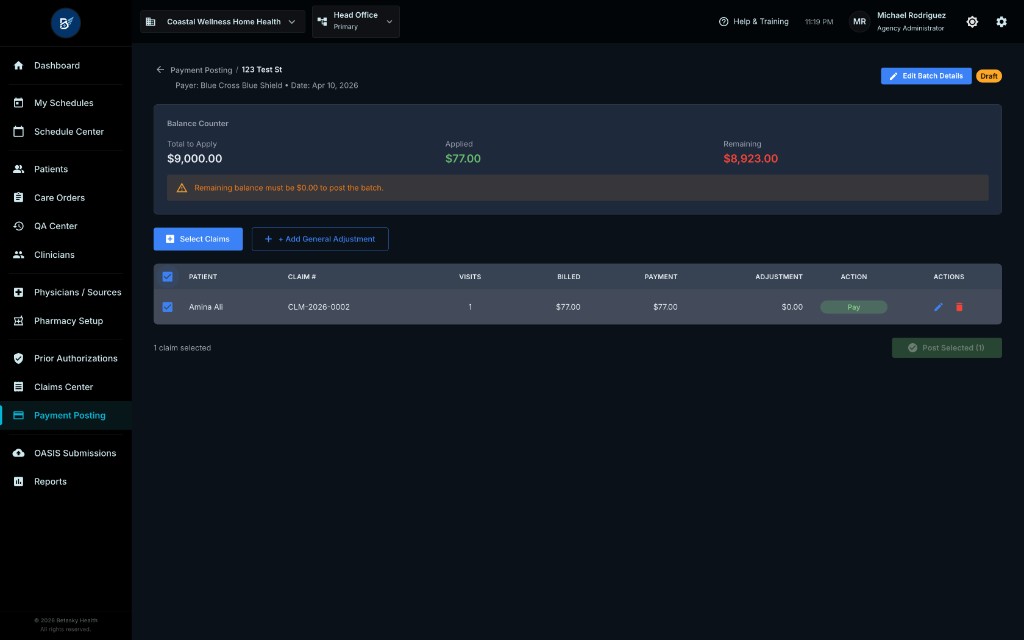
Warning Message (if remaining ≠ $0): Orange alert box appears: "⚠ Remaining balance must be $0.00 to post the batch."
Adding Claims to Draft Batch: Step-by-Step
Step 1: Click "Select Claims" Button
From the Batch Detail View (Draft status), click the blue "Select Claims" button.
Step 2: Select Claims Modal Opens
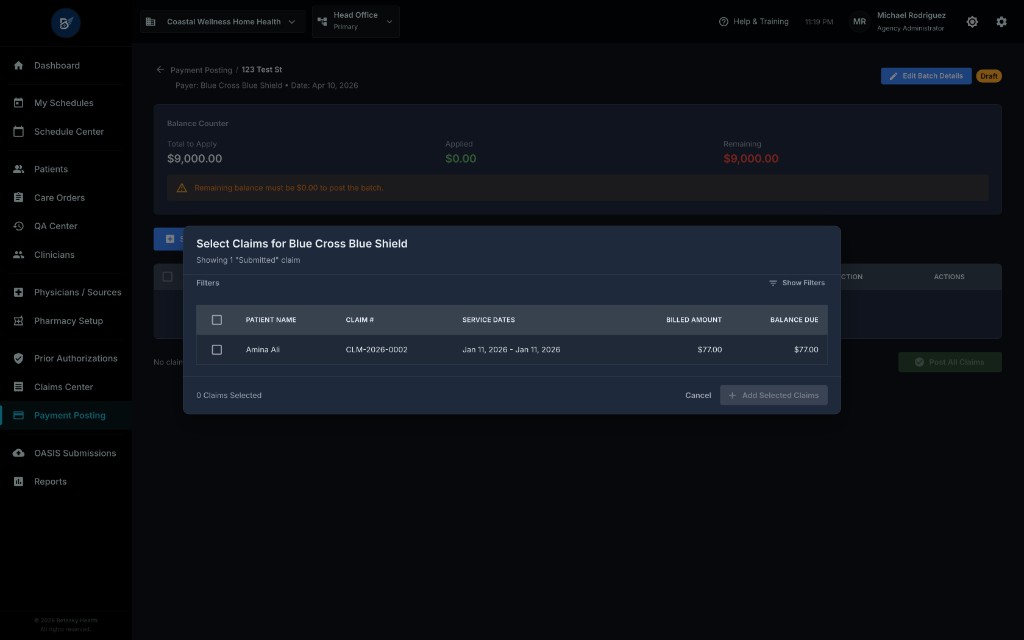
The "Select Claims for [Payer Name]" modal opens.
Claims Table:
| Column | Description |
|---|---|
| Checkbox | Select checkbox to include this claim in the batch |
| Patient Name | Patient's full name (e.g., "Amina Ali") |
| Claim # | Claim number (e.g., "CLM-2026-0002") |
| Service Dates | Start date → End date (e.g., "Jan 11, 2026 - Jan 11, 2026") |
| Billed Amount | Total amount billed to insurance (e.g., "$77.00") |
| Balance Due | Unpaid balance on the claim (e.g., "$77.00") |
Filtering:
The modal includes a "Show Filters" button. Clicking it reveals:
- Claim Number (text search)
- Service Date From (date picker)
- Service Date To (date picker)
Claims Shown:
- Only
Submittedstatus claims are shown - Only claims for the batch's payer are shown
- Claims already in the batch are excluded
Selection:
- Check individual claims to select them
- Selected count appears at bottom: "0 Claims Selected"
Step 3: Select Claims and Add
- Check the checkbox for each claim you want to include
- Counter updates: "1 Claim Selected" (or 2, 3, etc.)
- Click the blue "+ Add Selected Claims" button
What Happens:
- System adds each selected claim to the batch
- For each claim:
- Creates a
RemittanceBatchClaimrecord with:claimId= selected claim IDpaymentAmount= claim'sbalanceDue(default)adjustmentAmount= $0.00 (default)action= "Pay" (default)type= "CLAIM"posted= false
- Creates a
- Modal closes
- Batch Detail View refreshes showing added claims
Success Message: Green toast: "1 claim added to batch" (or "3 claims added to batch" if multiple)
Batch Detail View with Claims (Draft Status)
Claims Table
After adding claims, the batch detail view shows a table with all included claims:
| Column | Description |
|---|---|
| Checkbox | Select claims for selective posting (advanced feature) |
| Patient | Patient's full name (e.g., "Abe bela") |
| Claim # | Claim number (e.g., "CLM-2025-0017") |
| Visits | Number of visits on this claim (e.g., "2") |
| Billed | Total amount billed (e.g., "$5,500.00") |
| Payment | Payment amount to apply (editable field with $ symbol) (e.g., "$5,500.00") |
| Adjustment | Contractual adjustment/write-off amount (editable field) (e.g., "$0.00") |
| Action | Dropdown: "Pay" or "Deny". Green "Pay" chip shown by default. |
| Actions | Two icon buttons: - Pencil icon (Edit) - opens edit modal for this claim - Trash icon (Remove) - removes claim from batch |
Editing Payment Amounts
Each claim has editable Payment and Adjustment fields:
Payment Field:
- Dollar amount the insurance is paying
- Default = claim's balance due
- You can edit this to match the ERA amount
Adjustment Field:
- Dollar amount being written off or adjusted
- Default = $0.00
- Example: Insurance approved $450 but only pays $400 due to contractual adjustment → Payment = $400, Adjustment = $50
Action Dropdown:
- "Pay" (default) - Insurance is paying this claim (full or partial)
- "Deny" - Insurance denied this claim (no payment)
- If "Deny" is selected, payment and adjustment are ignored
- Claim status will become "Denied" when batch is posted
Real-Time Balance Updates: As you edit payment/adjustment amounts, the Balance Counter at the top updates instantly:
- Applied increases/decreases based on your edits
- Remaining recalculates (Total to Apply - Applied)
Edit Icon (Pencil)
Clicking the pencil icon opens an "Edit Claim Payment" modal where you can:
- Change payment amount
- Change adjustment amount
- Change action (Pay vs Deny)
- Add adjustment reason codes
- Add denial reason codes
Remove Icon (Trash)
Clicking the trash icon:
- Confirmation prompt appears (not shown in screenshot, but assumed)
- If confirmed, claim is removed from the batch
- Claim can be added back later if needed
Adding General Adjustments (Interest, Penalties, Incentives)
Sometimes insurance sends payments that include non-claim items like:
- Interest - Late payment interest earned
- Provider Adjustment - Adjustments not tied to specific claims
- Incentive - Quality bonuses or performance bonuses
- Penalty - Deductions or penalties
Step 1: Click "+ Add General Adjustment"
From the Batch Detail View (Draft status), click the green "+ Add General Adjustment" button (appears next to "Select Claims" button).
Step 2: Add General Adjustment Modal
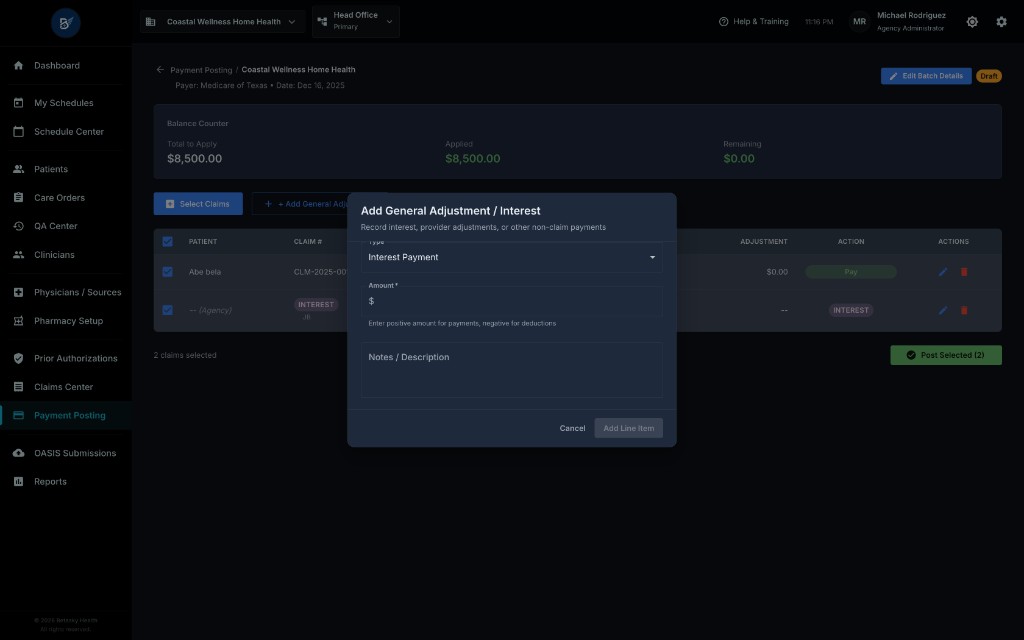
The "Add General Adjustment / Interest" modal opens with fields:
| Field | Description | Required? | Options |
|---|---|---|---|
| Type | Dropdown of adjustment types | YES | - Interest Payment (earned interest) - Provider Adjustment (non-claim adjustments) - Incentive (bonuses) - Penalty (deductions or fees) |
| Amount | Dollar amount (can be positive or negative) | YES | Enter positive amount for payments, negative for deductions |
| Notes / Description | Free text field to explain this adjustment | No (optional) | Example: "Late payment interest for Dec 2025" |
Info Message: Blue note: "Enter positive amount for payments, negative for deductions."
Step 3: Fill and Add
- Select Type from dropdown (e.g., "Interest Payment")
- Enter Amount (e.g., "$3000.00")
- (Optional) Add Notes (e.g., "Q4 2025 quality incentive payment")
- Click blue "Add Line Item" button
What Happens:
- System creates a
RemittanceBatchClaimrecord with:claimId= NULL (no claim associated)paymentAmount= entered amountadjustmentAmount= $0.00type= selected type (e.g., "INTEREST")description= entered notesaction= "Pay"posted= false
- Modal closes
- Adjustment appears in the claims table with:
- Patient column shows "-- (Agency)" (no patient)
- Claim # column shows "INTEREST" chip (or other type chip)
- Payment column shows the amount
- Action column shows "INTEREST" chip (purple/secondary color)
Success Message: Green toast: "General adjustment added to batch"
Result: The adjustment is now part of the batch and counts toward the Applied amount in the Balance Counter.
Balancing the Batch
Before you can post a batch, the Remaining amount in the Balance Counter must be $0.00.
Scenario 1: Remaining > $0 (Under-Applied)
Problem:
- Total to Apply = $8,500.00
- Applied = $5,500.00
- Remaining = $3,000.00 (shown in red)
Warning: Orange alert box: "⚠ Remaining balance must be $0.00 to post the batch."
Solutions:
- Add more claims from the same payer
- Increase payment amounts on existing claims (if insurance paid more than balance due)
- Add a general adjustment to account for the difference (e.g., interest, incentive)
Example Fix: Add an "Interest Payment" general adjustment for $3,000.00 → Remaining becomes $0.00 → Ready to post
Scenario 2: Remaining < $0 (Over-Applied)
Problem:
- Total to Apply = $8,500.00
- Applied = $8,923.00
- Remaining = -$423.00 (shown in red, negative)
Error: You've allocated more than the check amount. This is an error.
Solutions:
- Reduce payment amounts on claims to match ERA amounts
- Remove claims that weren't actually on this check
- Edit the batch total amount if you entered the wrong check amount
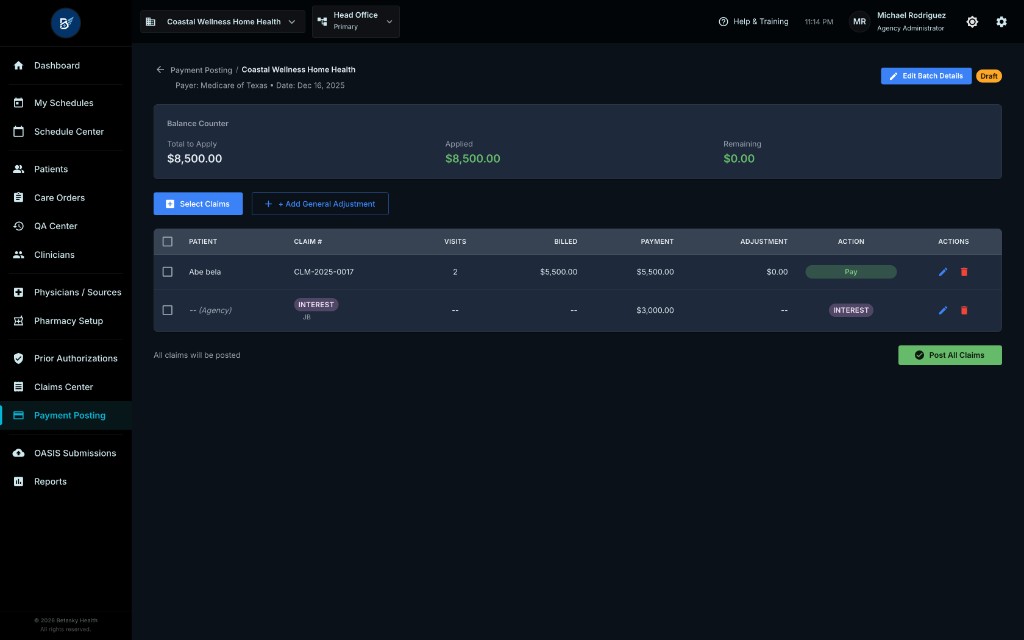
Scenario 3: Remaining = $0 (Balanced)
Success:
- Total to Apply = $8,500.00
- Applied = $8,500.00
- Remaining = $0.00 (shown in green)
Ready to Post: No warning message appears. The green "Post Selected (2)" or "Post All Claims" button is enabled.
Posting the Batch: Step-by-Step
Step 1: Ensure Batch is Balanced
Verify:
- Remaining = $0.00 (green)
- No orange warning message
- All claims have correct payment/adjustment amounts
- All general adjustments are added
Step 2: Select Claims to Post (Optional)
Option A: Post All Claims
- Leave all checkboxes unchecked
- Button shows "Post All Claims" (green button at bottom right)
- Will post all claims in the batch
Option B: Post Selected Claims (Selective Posting)
- Check the checkboxes for specific claims you want to post
- Button shows "Post Selected (2)" where "2" is the number selected
- Only selected claims will be posted; unselected claims remain in Draft status
Note: Most users post all claims at once. Selective posting is advanced/rare.
Step 3: Click "Post All Claims" or "Post Selected"
Click the green button at the bottom right of the table.
Step 4: Confirm Posting
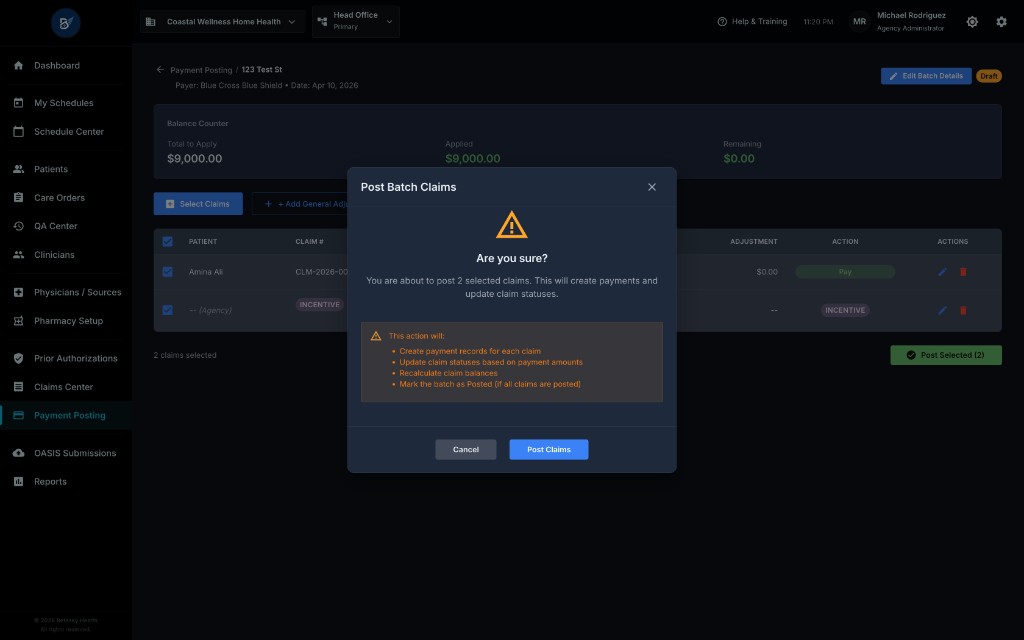
The "Post Batch Claims" confirmation modal opens:
Header:
- Title: "Are you sure?"
- Warning Icon (yellow triangle)
Main Message: "You are about to post 2 selected claims. This will create payments and update claim statuses."
Warning Box (Orange): "⚠ This action will:
- Create payment records for each claim
- Update claim statuses based on payment amounts
- Recalculate claim balances
- Mark the batch as Posted (if all claims are posted)"
Action Buttons:
- Cancel (gray) - Closes modal, no changes
- Post Claims (blue) - Confirms posting
Step 5: Confirm Post
Click the blue "Post Claims" button.
Backend Actions:
For each claim in the batch:
-
Create Payment Record:
- Creates a
Paymentrecord in thepaymentstable claimId= claim IDpaymentAmount= from batch claim'spaymentAmountfieldpaymentDate= batch'spaymentDatecheckNumber= batch'scheckNumberpaymentMethod= "Check" (assumed)createdBy= your user ID
- Creates a
-
Recalculate Claim Balance:
claim.balanceDue=claim.totalAmount- SUM(all payments)- Example: Billed $500, insurance paid $450 → Balance = $50
-
Update Claim Status:
- If
balanceDue = $0→status = "Paid"(fully paid) - If
balanceDue > $0andbalanceDue < totalAmount→status = "Partially Paid" - If
balanceDue = totalAmount(no payment) →status = "Denied"(for "Deny" action)
- If
-
Mark Batch Claim as Posted:
remittanceBatchClaim.posted = true
-
Update Batch Status (if all claims posted):
- If all
remittanceBatchClaimsin the batch haveposted = true→batch.status = "Posted" - If some are unposted (selective posting) →
batch.statusremains "Draft"
- If all
-
Cache Invalidation:
- Claims list cache cleared
- Batch list cache cleared
- Billing stats cache cleared
Success Message: Green toast notification: "2 claims posted successfully!"
Result:
- You're returned to the main Payment Posting list
- The batch now shows "Posted" status (green badge)
Viewing Posted Batches
Posted batches are read-only. You can view them but not edit them.
Posted Batch Detail View
When you click a Posted batch from the main list:
Differences from Draft:
- Status Badge: Green "Posted" instead of Orange "Draft"
- No Edit Batch Details button
- No Select Claims button
- No Add General Adjustment button
- No Edit/Remove icons on claims table
- No Post button
- All fields are read-only
What You CAN See:
- Payer name, check number, payment date, total amount
- Balance Counter (will always show Remaining = $0.00 since batch was balanced before posting)
- List of all claims that were posted in this batch
- Payment and adjustment amounts for each claim
- General adjustments (if any)
What You CAN Do:
- View batch details (for audit/reference)
- Export batch report (if export feature available)
- Click patient names to navigate to their patient profile
- Click claim numbers to navigate to claim detail view
Complete Workflow Summary: From Check to Posted
Example: You Receive a Check from Medicare
Scenario:
- Payer: Medicare of Texas
- Check Number: CHK-567494834
- Payment Date: Oct 4, 2026
- Check Amount: $8,500.00
- ERA shows: 2 claims paid
Step-by-Step:
-
Create Draft Batch
- Go to Payment Posting
- Click "+ New Remittance Batch"
- Enter: Medicare of Texas, CHK-567494834, 10/04/2026, $8,500.00
- Click "Create Batch & Start Posting"
- Batch created with status = Draft
-
Add Claims from ERA
- Click "Select Claims"
- See list of Submitted claims for Medicare of Texas
- Check the 2 claims mentioned in the ERA:
- Abe bela - CLM-2025-0017 - $5,500.00
- (Another patient) - CLM-2025-0016 - $3,000.00
- Click "+ Add Selected Claims"
- Claims added to batch
-
Review Payment Amounts
- Check Balance Counter:
- Total to Apply: $8,500.00
- Applied: $8,500.00
- Remaining: $0.00 (green ✓)
- Payment amounts auto-populated to balance due amounts
- ERA shows insurance paid full balance for both → No changes needed
- Check Balance Counter:
-
Post Batch
- Click "Post All Claims"
- Confirmation modal appears
- Click "Post Claims"
- Backend creates payments, updates claim statuses, marks batch as Posted
- Success! 2 claims are now marked as Paid
-
Result
- Batch status → Posted (green badge)
- Claim CLM-2025-0017 → Status = "Paid", Balance = $0.00
- Claim CLM-2025-0016 → Status = "Paid", Balance = $0.00
- Check is fully allocated and recorded
Advanced Features
Selective Posting (Posting Some Claims, Not All)
Use Case: You have 5 claims in a Draft batch, but you only want to post 3 of them right now (waiting for verification on the other 2).
How:
- In Batch Detail View (Draft), check the checkboxes for the 3 claims you want to post
- Button changes from "Post All Claims" to "Post Selected (3)"
- Click "Post Selected (3)"
- Only the 3 selected claims are posted
- Batch remains in Draft status (because 2 claims are unposted)
- You can return later to post the remaining 2 claims
When Batch Becomes Posted:
- Batch status only changes to "Posted" when ALL claims in the batch have
posted = true - Until then, batch stays "Draft" and remains editable
Editing Batch Details (Draft Only)
What: Change the payer, check number, payment date, or total amount after creating the batch.
How:
- Open Batch Detail View (Draft status)
- Click "Edit Batch Details" button (blue button with pencil icon)
- Modal opens with batch fields (same as "Post New Remittance" modal)
- Edit fields as needed
- Click "Save Changes"
Use Case:
- Typo in check number
- Wrong payment date
- Total amount needs correction after reviewing ERA
Limitation:
- Can only edit while batch is in Draft status
- Once Posted, batch details are locked
Denying Claims in a Batch
Scenario: ERA shows insurance denied one of the claims, but paid others on the same check.
How:
- Add the denied claim to the batch
- In the Action column dropdown, change from "Pay" to "Deny"
- (Optional) Click Edit icon to add denial reason code
- Post the batch
Result:
- When batch is posted, the denied claim's status changes to "Denied"
- No payment is created for the denied claim
- Denied claim's balance remains unchanged
Note: The denied claim still "uses up" $0 in the balance allocation (it doesn't count toward Applied amount).
Adding Adjustments Without Payment
Scenario: Insurance issued a contractual adjustment of $200 across multiple claims, but you don't want to allocate it per-claim. You want to record it as a batch-level adjustment.
How:
- Add claims to batch with correct payment amounts
- Click "+ Add General Adjustment"
- Select Type: "Provider Adjustment"
- Enter Amount: $200.00
- Description: "Contractual adjustment per contract amendment 2025"
- Add Line Item
Result:
- Adjustment appears in batch with no claim attached
- Counts toward Applied amount
- Recorded in batch for audit trail
Common Scenarios and Solutions
Scenario 1: ERA Amount Doesn't Match Claim Balance
Problem:
- Claim balance due = $500.00
- ERA says insurance paid = $450.00 (contractual adjustment of $50)
Solution:
- Add claim to batch
- Payment field defaults to $500.00 (balance due)
- Edit payment amount to $450.00 (match ERA)
- Edit adjustment amount to $50.00
- Total applied to claim = $450 + $50 = $500 (matches balance)
- Claim balance becomes $0, status = "Paid"
Scenario 2: Check Includes Claims and Interest
Problem:
- Check amount = $10,000.00
- Claims total = $9,800.00
- Remaining = $200.00 (late payment interest)
Solution:
- Add all claims to batch (total $9,800 applied)
- Click "+ Add General Adjustment"
- Type: "Interest Payment"
- Amount: $200.00
- Description: "Late payment interest for Q4 2025"
- Add Line Item
- Remaining = $0.00 (balanced)
- Post batch
Scenario 3: Wrong Payer Selected During Batch Creation
Problem: Created batch for "Blue Cross" but check is actually from "Medicare"
Solution (if batch is still Draft with no claims):
- Click "Edit Batch Details"
- Change Payer dropdown to "Medicare"
- Save Changes
- Now "Select Claims" will show Medicare claims
Alternative (if claims already added):
- Remove all claims from batch
- Edit Batch Details to change payer
- Re-add correct claims
Scenario 4: Insurance Paid Partial Amount on One Claim
Problem:
- Claim billed = $1,000.00
- Claim balance due = $1,000.00
- ERA shows insurance paid = $600.00 (patient owes $400 co-pay)
Solution:
- Add claim to batch
- Edit payment amount to $600.00
- Do NOT add adjustment (the $400 is patient responsibility, not an adjustment)
- Post batch
- Claim balance becomes $400, status = "Partially Paid"
- Later, collect $400 from patient and post separately
Scenario 5: Accidentally Posted Batch with Wrong Amounts
Problem: You posted a batch, but realized one payment amount was wrong.
Solution: You CANNOT undo a Posted batch. Posted batches are final.
Workaround:
- Go to Claims Center → find the claim with wrong amount
- Post a manual adjustment payment (positive or negative) to correct the balance
- Example: Claim was paid $450 but should have been $400
- Post a -$50 adjustment payment to the claim
- Add note: "Correction for overpayment in batch CHK-567494834"
Scenario 6: Batch Has Remaining Balance You Can't Identify
Problem:
- Total to Apply = $8,500.00
- Applied = $8,350.00
- Remaining = $150.00
- You've added all claims from the ERA and can't find where the $150 went
Possible Causes:
- Interest - Check includes interest not shown clearly on ERA
- Rounding - Multiple small rounding differences add up
- Provider-level adjustment - ERA has a batch-level adjustment line
Solution:
- Review ERA carefully for non-claim line items
- If found, add as General Adjustment
- If not found and amount is small (<$10), you can:
- Add "Provider Adjustment" for $150 with note "Unidentified variance, reconciled per bank deposit"
- Or distribute the $150 across claims as additional payment
Best Practices
1. Create One Batch Per Check/EFT
Why:
- Maintains 1:1 mapping between batch and bank deposit
- Easier reconciliation
- Clear audit trail
How:
- One check from Blue Cross = One batch
- Multiple checks from Blue Cross = Multiple batches (one per check)
2. Match Batch Total to Bank Deposit
Why:
- Ensures all money received is allocated
- Prevents over-allocating or under-allocating
How:
- Enter Total Check Amount exactly as shown on check or bank deposit
- Don't round or estimate
- If check says $8,542.17, enter $8,542.17 (not $8,500)
3. Process ERAs Daily or Weekly
Why:
- Timely payment posting improves cash flow visibility
- Reduces backlog and errors
- Keeps A/R (Accounts Receivable) accurate
How:
- Set a schedule: Every Monday and Thursday, process ERAs received
- Use Payment Posting module for bulk processing
- Use individual payment posting (Chapter 25) for single quick payments
4. Always Balance Before Posting
Why:
- Posting an unbalanced batch causes errors
- Remaining ≠ $0 means you're missing something
How:
- Don't rush to post
- Review Balance Counter carefully
- If Remaining ≠ $0, investigate ERA for:
- Interest payments
- Provider adjustments
- Denied claims you forgot to add
5. Use Descriptive Notes for General Adjustments
Why:
- Future auditors (or yourself in 6 months) need to understand what the adjustment was for
How:
- Good note: "Q4 2025 quality incentive per contract section 7.3"
- Bad note: "Adjustment"
6. Don't Mix Payers in One Batch
Why:
- Each payer sends separate checks/EFTs
- System enforces this (all claims in a batch must match batch's payer)
How:
- If you receive checks from Blue Cross and Medicare on the same day, create two separate batches
7. Review Posted Batches Monthly
Why:
- Catch errors early
- Reconcile with bank statements
- Ensure no batches were missed
How:
- Export Posted batches for the month
- Compare total deposited vs. total batches created
- Verify all checks/EFTs have corresponding batches
8. Train Multiple Staff on Payment Posting
Why:
- Backup coverage during vacation/sick days
- Faster processing during high-volume periods
How:
- Document your agency's specific ERA processing workflow
- Cross-train billing staff
- Use permissions to control who can post (vs. just view)
Troubleshooting
Issue: "Remaining balance must be $0.00 to post the batch" Warning
Symptom: Orange warning appears, "Post" button is disabled or grayed out.
Cause: Remaining amount in Balance Counter is not zero.
Solution:
- Check Balance Counter:
- If Remaining > $0 → Add more claims or increase payments
- If Remaining < $0 → Remove claims or decrease payments
- Review ERA for any missed line items
- Add General Adjustments if needed
- Once Remaining = $0.00, warning disappears and Post button enables
Issue: Claims I Need Are Not Showing in "Select Claims" Modal
Symptom: When you click "Select Claims", the claims you're looking for don't appear in the list.
Possible Causes:
- Claim status is not "Submitted" - Only Submitted claims appear
- Claim is for a different payer - Only claims matching the batch's payer appear
- Claim is already in the batch - Claims already added are hidden
- Claim is already in another Draft batch - Claims locked in a different batch don't appear
Solution:
- Go to Claims Center → Claims Tracking → check claim status
- If status is "Ready to Submit" → Mark as Submitted first
- Verify claim's payer matches batch's payer
- If claim is in another Draft batch, remove it from there first
Issue: Posted Batch But Need to Make a Change
Symptom: You posted a batch and realized a payment amount was wrong, or you forgot a claim.
Reality: Posted batches cannot be edited or reversed. This is by design for financial integrity.
Solution:
- For wrong payment amounts:
- Go to the claim in Claims Center
- Post a manual adjustment payment (positive or negative) to correct the balance
- For forgotten claims:
- Post them individually in Claims Center using the "Post Payment" modal (Chapter 25)
- Or create a new batch for the remaining claims
- For audit trail:
- Add a note to the claim explaining the correction and referencing the batch
Issue: "Claim is already in a remittance batch" Error
Symptom: When trying to add a claim to a batch, you get an error saying the claim is already in a batch.
Cause: The claim is already included in another Draft batch.
Solution:
- Go to Payment Posting main list
- Find the other Draft batch (check Status = "Ready to Post")
- Open that batch
- Remove the claim from that batch
- Return to your batch and add the claim
Issue: Balance Counter Shows Negative Remaining
Symptom: Remaining = -$423.00 (red negative number)
Cause: You've allocated more than the check amount. This usually means:
- Payment amounts are too high
- You added claims that shouldn't be in this batch
Solution:
- Review ERA - Confirm which claims are actually on this check
- Check payment amounts - Ensure each payment matches ERA amount, not full balance
- Remove extra claims - If you accidentally added claims from a different check
- Edit batch total - If you entered the wrong check amount initially
Permissions and Access Control
Required Permissions
| Action | Required Permission | Notes |
|---|---|---|
| View Payment Posting | VIEW_PAYMENT_POSTING | Without this, Payment Posting menu is hidden |
| Create Remittance Batches | CREATE_REMITTANCE_BATCH | "New Remittance Batch" button hidden without this |
| Edit Draft Batches | EDIT_REMITTANCE_BATCH | Cannot add/remove claims or edit amounts without this |
| Post Batches | POST_REMITTANCE_BATCH | "Post" button hidden without this |
| View Posted Batches | VIEW_PAYMENT_POSTING | Can see Posted batches in list, but not edit them |
Role-Based Access Examples
Billing Manager (Full Access)
- Permissions: All payment posting permissions
- Can Do:
- Create remittance batches
- Add/remove claims
- Edit payment amounts
- Add general adjustments
- Post batches
- View all batches (Draft and Posted)
Billing Specialist (Limited)
- Permissions:
VIEW_PAYMENT_POSTING,CREATE_REMITTANCE_BATCH,EDIT_REMITTANCE_BATCH - Can Do:
- View batches
- Create new batches
- Add/remove claims
- Edit payment amounts
- Cannot Do:
- Post batches (requires manager approval)
Finance Director (Read-Only)
- Permissions:
VIEW_PAYMENT_POSTINGonly - Can Do:
- View all batches
- View batch details
- Export batch reports for analysis
- Cannot Do:
- Create, edit, or post batches
Clinician (No Access)
- Permissions: None
- Cannot Access: Payment Posting module
- Why: Clinicians focus on patient care, not billing/payment processing
Integration with Other Modules
Claims Center (Chapter 25)
Link:
- Batches pull from claims with
status = "Submitted" - Posting a batch creates payment records and updates claim statuses
Impact:
- When batch is posted, claims automatically transition:
- Submitted → Paid (if full payment)
- Submitted → Partially Paid (if partial payment)
- Submitted → Denied (if "Deny" action)
Flow: Claims Center (generate claims) → Mark as Submitted → Payment Posting (create batch, add claims) → Post Batch → Claims Center (claims now show Paid/Partially Paid)
Payer Setup (Chapter 6)
Link:
- Batches are payer-specific
- Payer dropdown in "Post New Remittance" pulls from Payer Setup
Impact:
- If payer is not configured, you can't create a batch for them
- Payer name appears on batch list and detail views
Billing Stats (Claims Center Dashboard)
Link:
- Posting batches updates claim counts on Claims Center KPIs
Impact:
- "Submitted" count decreases as claims are posted from batches
- "Paid" count increases
- Stats cached for 90 seconds, then auto-refresh