Chapter 18: HHA Care Plans
Overview
The HHA Care Plan is a comprehensive document that guides Home Health Aides (HHAs) during their visits. It outlines the specific tasks they need to perform, safety parameters to monitor, and important precautions to follow for each patient. This chapter covers when and how to create HHA Care Plans, what information to include, and how the care plan integrates with your workflow.
What You'll Learn
- When HHA Care Plans are required
- Where to create and manage HHA Care Plans
- How to build a care plan using the task library
- Setting vital sign safety parameters
- Adding safety precautions and functional limitations
- How care plans appear in patient documents
- Understanding care plan versions and updates
18.1 When HHA Care Plans Are Required
Automatic Requirement During OASIS Assessments
The system automatically determines when an HHA Care Plan is required:
-
During OASIS Start of Care (SOC):
- If you enter HHA frequency > 0 in the assessment
- The "Create HHA Care Plan" button appears
- You MUST create the plan before completing the assessment
-
During OASIS Resumption of Care (ROC):
- Same rules apply if HHA services are ordered
- Required before finalizing the ROC assessment
-
During OASIS Re-Certification:
- If HHA services continue in the new certification period
- Must be created or updated before completing the recert
For HHA Visits
Before an HHA can complete a visit note, an Active HHA Care Plan must exist for the patient. The system blocks completion if no active plan is found.
Important: The care plan requirement is tied to HHA frequency in the Plan of Care. If no HHA visits are ordered, you won't see the option to create a care plan.
18.2 Where to Access HHA Care Plans
From OASIS Assessment Forms
While completing an OASIS SOC, ROC, or Recertification form:
- Look for the "Create HHA Care Plan" button in the top action bar
- The button appears only if HHA frequency > 0
- Button colors indicate status:
- Red border: No active care plan exists (action required)
- Green checkmark: Active care plan exists
Visual Indicator:
- "Create HHA Care Plan" (red) = You need to create one
- "✓ HHA Care Plan Created" (green) = Already created
From Care Order Documents Tab
After a care plan is created, it appears in the Care Order's Documents tab:
- Navigate to Care Orders → Select the patient's care order
- Click the Documents tab
- Look for "HHA Care Plan" in the document list
- Status shows "Active" for current plans
- Click the download icon to view the care plan PDF
From HHA Supervisory Visit Forms
When conducting an HHA supervisory visit, you can also access and review the active HHA Care Plan directly from the visit form.
18.3 Creating a New HHA Care Plan
Step 1: Opening the Care Plan Editor
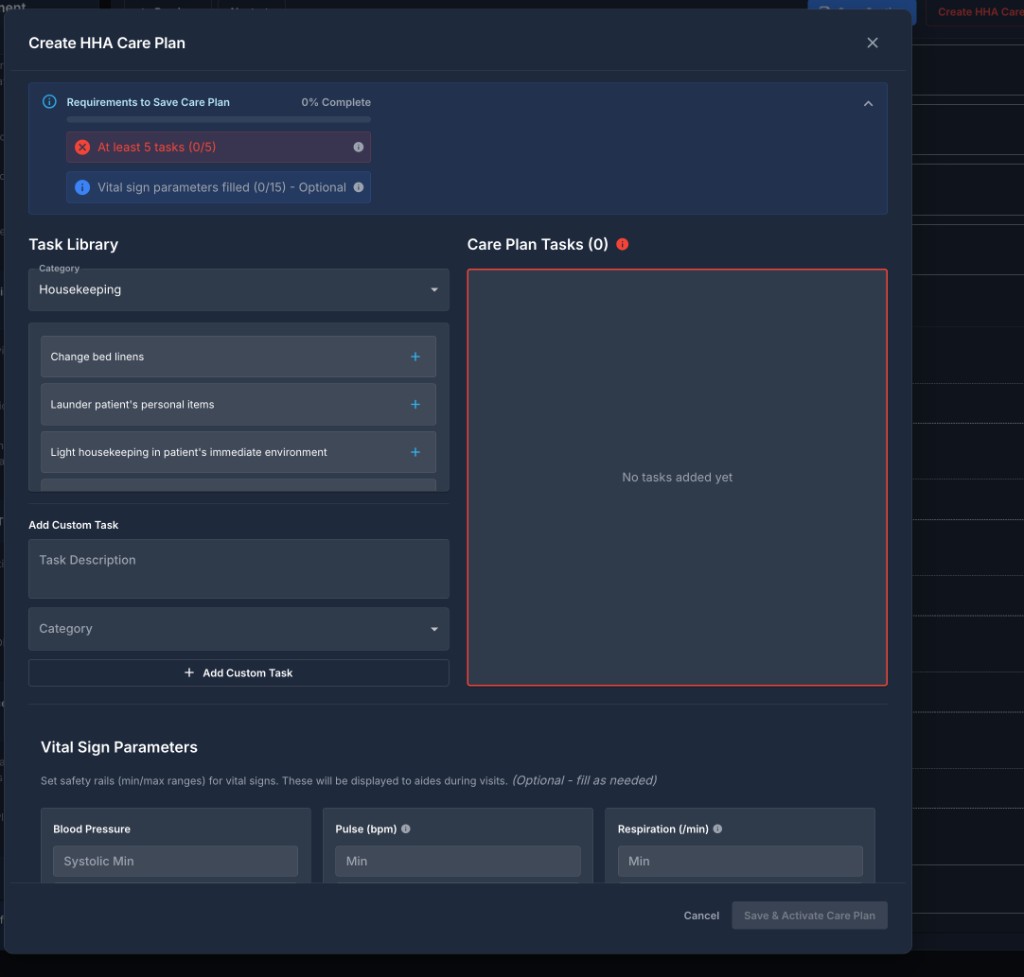
- Click "Create HHA Care Plan" from an OASIS form
- The "Create HHA Care Plan" modal opens
- You'll see the Requirements Checklist at the top:
- "At least 5 tasks (0/5)" - Required
- "Vital sign parameters filled (0/15)" - Optional
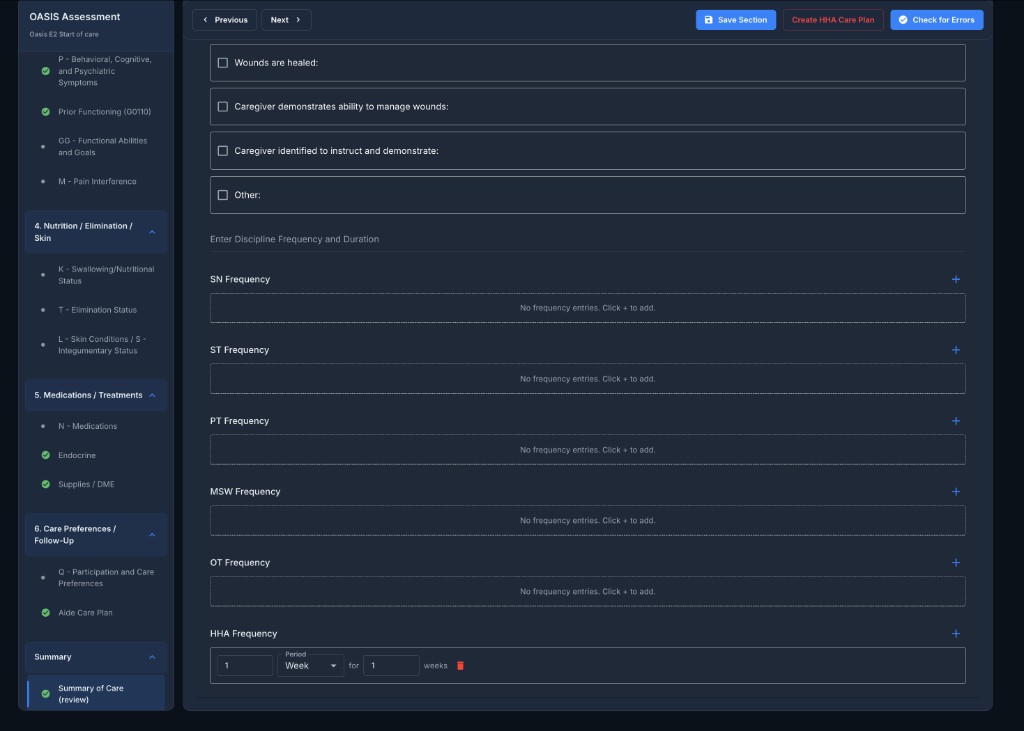
Step 2: Understanding the Modal Layout
The modal has three main sections:
-
Requirements Checklist (top):
- Shows completion percentage
- Tracks required vs. optional fields
- Expands/collapses for a cleaner view
-
Task Library & Care Plan Tasks (middle):
- Left side: Browse tasks by category
- Right side: Your selected tasks (Care Plan Tasks)
-
Vital Sign Parameters & Additional Sections (bottom):
- Vital sign safety ranges
- Safety precautions
- Functional limitations
- Activities permitted
- Comments field
18.4 Adding Tasks to the Care Plan
Understanding the Task Library
The Task Library on the left contains pre-defined care tasks organized by category:
Available Categories:
- Housekeeping: Change bed linens, launder items, light housekeeping, maintain environment
- Personal Care: Bathing, grooming, dressing, toileting assistance
- Nutrition: Meal preparation, feeding assistance, hydration monitoring
- Mobility: Transfer assistance, ambulation support, exercise
- Safety: Fall prevention, medication reminders, emergency response
- And more...
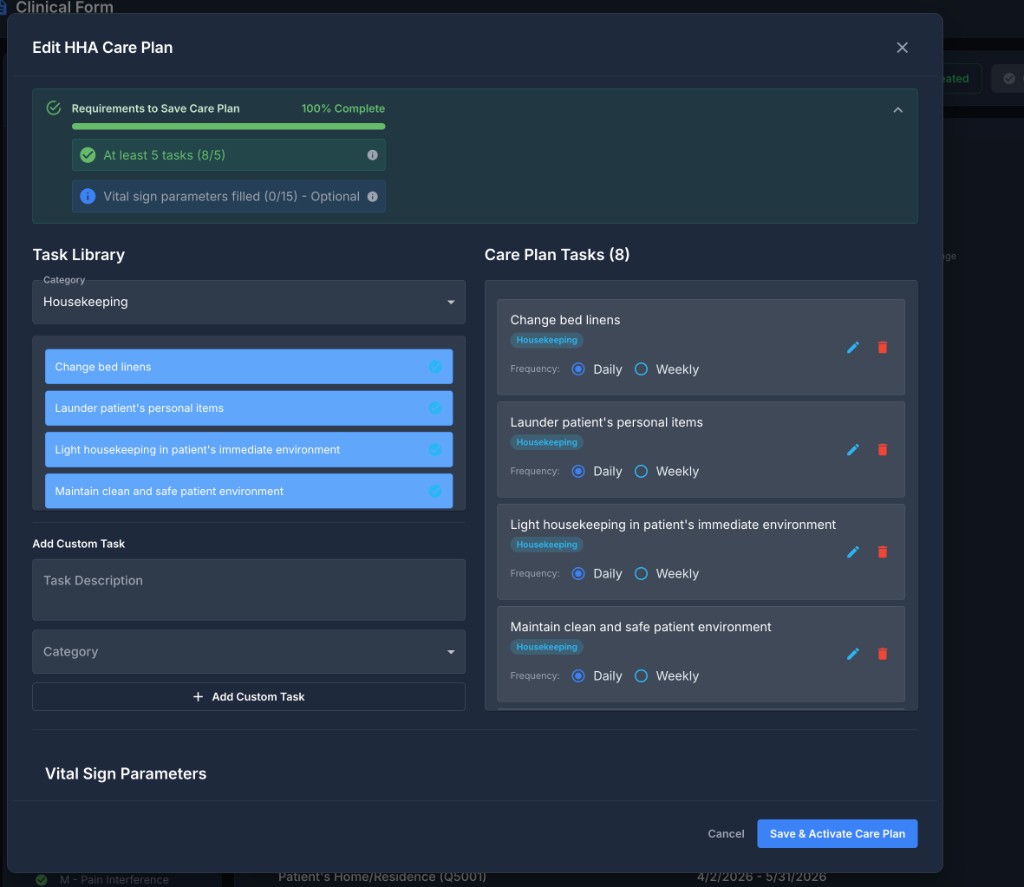
Adding Tasks from the Library
-
Select a Category:
- Use the dropdown at the top of the Task Library
- The list updates to show tasks in that category
-
Add a Task:
- Click the "+" (plus icon) next to any task
- The task moves to "Care Plan Tasks (8)" on the right
- A checkmark replaces the plus icon (task already added)
-
Set Task Frequency:
- Each task shows "Frequency:" with radio buttons
- Choose Daily or Weekly
- Daily is selected by default
-
Review Your Tasks:
- The count updates in real-time: "Care Plan Tasks (8)"
- Each task shows:
- Task description
- Category badge (blue)
- Frequency selection (Daily/Weekly)
- Edit and delete icons
Adding Custom Tasks
If the task you need isn't in the library:
- Scroll to "Add Custom Task" at the bottom of the Task Library
- Enter the Task Description (multiline text field)
- Select a Category from the dropdown
- Click "Add Custom Task"
- The custom task appears with a "Custom" badge (yellow)
Editing and Removing Tasks
To Edit a Task:
- Click the pencil icon next to the task
- The description becomes editable
- Make your changes
- Click the checkmark to save or X to cancel
To Remove a Task:
- Click the trash icon next to the task
- The task is removed immediately (no confirmation)
Minimum Requirement: You must have at least 5 tasks before you can save the care plan. The requirements section shows progress: "At least 5 tasks (8/5)" with a green checkmark when met.
18.5 Setting Vital Sign Parameters (Optional)

Vital sign parameters are optional but highly recommended. They provide HHAs with safety ranges to watch for during visits.
Why Set Vital Sign Parameters?
- Alerts HHAs if a reading falls outside the safe range
- Supports compliance with physician orders
- Documents care standards for the patient
- Helps HHAs know when to escalate concerns
Available Vital Sign Fields
The system provides 7 vital sign categories:
1. Blood Pressure
- Systolic Min (e.g., 100)
- Systolic Max (e.g., 140)
- Diastolic Min (e.g., 60)
- Diastolic Max (e.g., 90)
2. Pulse (bpm)
- Min (e.g., 60)
- Max (e.g., 100)
3. Respiration (/min)
- Min (e.g., 12)
- Max (e.g., 20)
4. Temperature (°F)
- Min (e.g., 97.0)
- Max (e.g., 99.5)
5. O2 Saturation (%)
- Min (Alert if below) (e.g., 92)
- Single field for minimum threshold
6. Blood Glucose (mg/dL)
- Min (e.g., 70)
- Max (e.g., 180)
7. Weight (lbs)
- Gain Per Day (e.g., 2)
- Gain Per Week (e.g., 5)
- Monitors for fluid retention or other concerns
How to Fill Out Vital Sign Parameters
- Scroll down to the "Vital Sign Parameters" section
- You'll see a grid layout with all 7 categories
- Enter values in the fields that are relevant to the patient
- Leave fields blank if not applicable
- The system tracks completion: "Vital sign parameters filled (12/15) - Optional"
Example Scenario:
- Patient has CHF (Congestive Heart Failure)
- Set strict weight gain limits (2 lbs/day, 5 lbs/week)
- Set O2 Saturation min at 92%
- HHA will see an alert if weight increases too quickly or O2 drops below 92%
Remember: These are safety rails shown to HHAs during visits. If you don't set them, HHAs can still record vital signs, but they won't have predefined alerts.
18.6 Additional Sections (Optional)
These sections provide read-only information to HHAs during their visits. They appear on the printed care plan and in the HHA's visit interface.
Safety Precautions
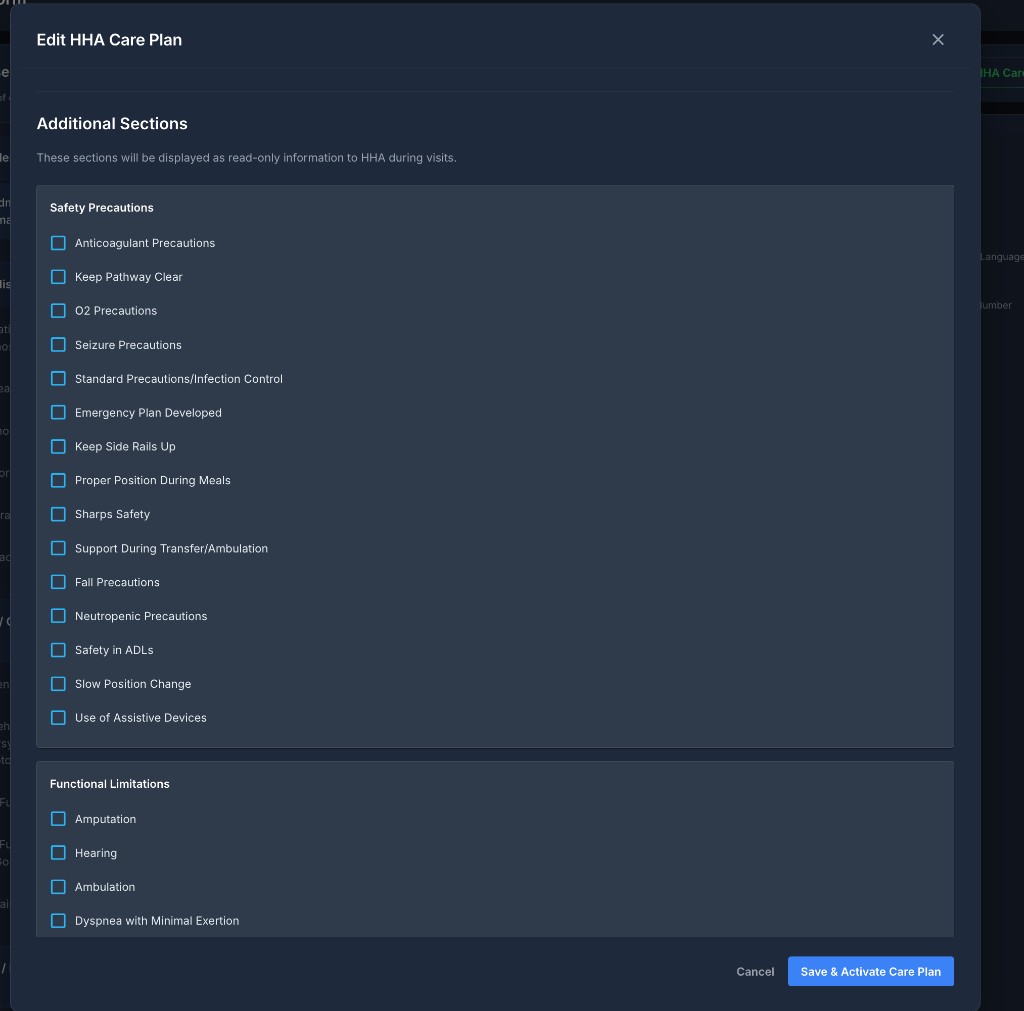
Check all precautions that apply to the patient:
- Anticoagulant Precautions
- Keep Pathway Clear
- O2 Precautions
- Seizure Precautions
- Standard Precautions/Infection Control
- Emergency Plan Developed
- Keep Side Rails Up
- Proper Position During Meals
- Sharps Safety
- Support During Transfer/Ambulation
- Fall Precautions
- Neutropenic Precautions
- Safety in ADLs
- Slow Position Change
- Use of Assistive Devices
Example: For a patient on blood thinners, check "Anticoagulant Precautions" and "Sharps Safety."
Functional Limitations
Identify the patient's physical or sensory limitations:
- Amputation
- Hearing
- Ambulation
- Dyspnea with Minimal Exertion
- Bowel/Bladder Incontinence
- Paralysis
- Speech
- Contracture
- Endurance
- Legally Blind
- Other
Example: Patient with COPD → Check "Dyspnea with Minimal Exertion" and "Endurance."
Activities Permitted
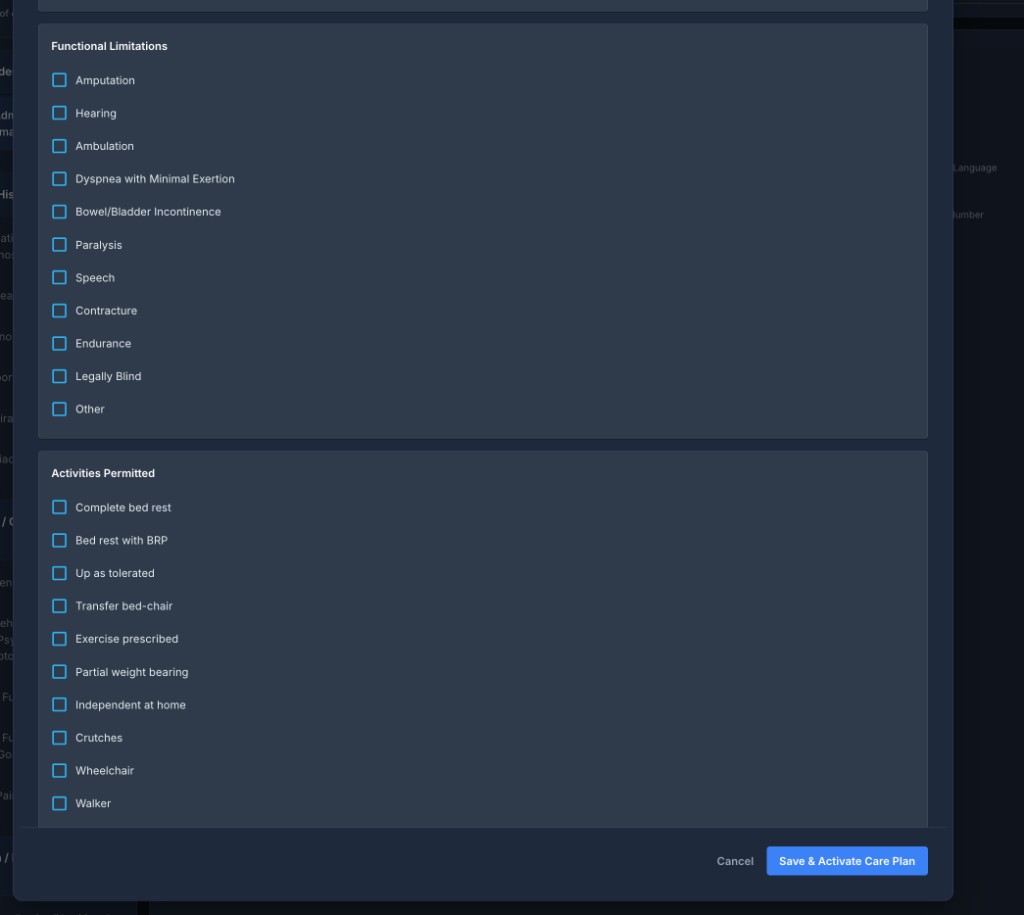
Select what the patient is allowed to do:
- Complete bed rest
- Bed rest with BRP (Bathroom Privileges)
- Up as tolerated
- Transfer bed-chair
- Exercise prescribed
- Partial weight bearing
- Independent at home
- Crutches
- Wheelchair
- Walker
- Cane
- Other
Example: Post-surgery patient → Check "Up as tolerated," "Walker," and "Partial weight bearing."
Comments / Additional Instructions
Use this free-text field for any special instructions that don't fit the checkboxes:
Examples:
- "Patient prefers shower in the morning"
- "Always use gait belt for transfers"
- "Check medication box during each visit"
- "Patient's daughter calls daily at 2 PM for updates"
18.7 Saving and Activating the Care Plan
Final Review
Before saving:
-
Check the Requirements Checklist:
- Must show "100% Complete"
- "At least 5 tasks" must have a green checkmark
- Vital signs are optional (blue info icon)
-
Review the progress bar:
- Should be fully filled (green)
-
Ensure all required fields are complete
Save and Activate
- Click "Save & Activate Care Plan" at the bottom right
- The system:
- Saves all tasks, vital sign parameters, and additional sections
- Sets status to ACTIVE
- Creates a document entry in the Care Order
- Allows HHAs to access the plan during visits
- Success message appears: "HHA Care Plan created and activated successfully"
- The modal closes
- The button text changes to "✓ HHA Care Plan Created" (green)
What Happens Next:
- The care plan is immediately available to HHAs
- It appears in the Care Order Documents tab as "HHA Care Plan" with "Active" status
- You can now complete the OASIS assessment (if that's where you created it)
- HHAs can complete visit notes for this patient
18.8 Editing an Existing Care Plan
When to Edit
You might need to update a care plan when:
- Patient's condition changes
- Physician orders new tasks or vital sign parameters
- HHA reports tasks are no longer needed
- New safety precautions are required
How to Edit
- Click the "✓ HHA Care Plan Created" button (now green)
- The modal opens in Edit Mode
- All existing tasks and settings are pre-filled
- Make your changes:
- Add or remove tasks
- Adjust vital sign parameters
- Update additional sections
- Click "Save & Activate Care Plan"
What Happens When You Edit
The system uses a versioning system:
- The current ACTIVE plan is moved to ARCHIVED status
- A new plan is created with version number incremented (e.g., v1 → v2)
- The new plan becomes ACTIVE
- The previous version is linked for history tracking
Result: HHAs always see the most current version. Past versions are retained for compliance and auditing.
18.9 How HHA Care Plans Appear in Documents
Viewing in the Documents Tab
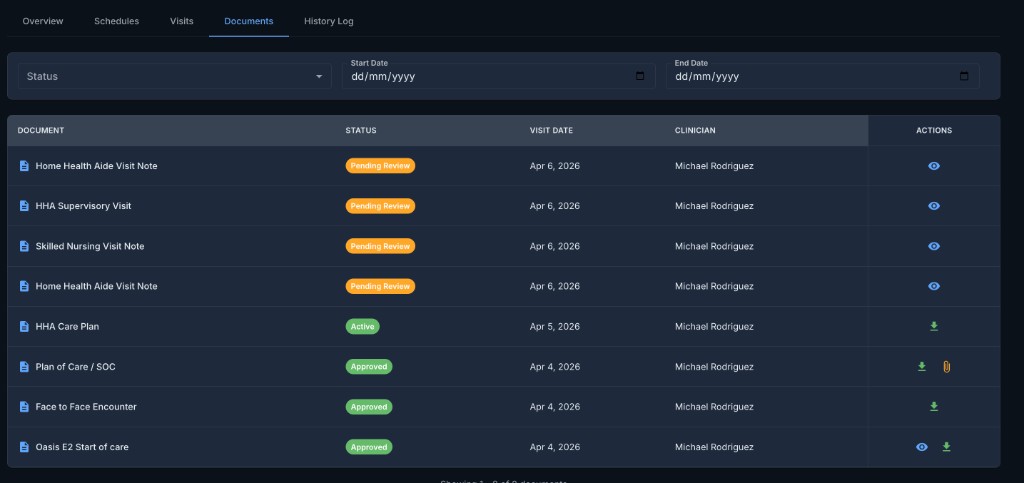
Once created, the HHA Care Plan appears in the Care Order's Documents tab:
Document Entry Shows:
- Document Name: "HHA Care Plan"
- Status: "Active" (green chip)
- Visit Date: Date the care plan was created
- Clinician: Name of the person who created it (e.g., "Michael Rodriguez")
- Actions: View (eye icon) and Download (download icon)
Viewing the Care Plan PDF
- Click the download icon next to "HHA Care Plan"
- The system generates a PDF on the fly
- A PDF viewer modal opens showing:
- Patient demographics
- All tasks organized by category with frequency
- Vital sign parameters (if set)
- Safety precautions (if selected)
- Functional limitations (if selected)
- Activities permitted (if selected)
- Comments (if entered)
- You can download or print the PDF from the viewer
Filtering Documents
You can filter the documents list to find the care plan:
- Use the Status filter → Select "Active"
- The HHA Care Plan will appear if it exists
- Use date filters to narrow down by creation date
18.10 Understanding Care Plan Statuses
The HHA Care Plan has three possible statuses:
1. Active (Green)
- Meaning: This is the current, in-use care plan
- Who Sees It: HHAs see this plan during visits
- In Documents Tab: Shows as "Active" with green chip
- Action Required: None - plan is ready to use
2. Draft (Yellow/Orange)
- Meaning: Plan created by non-RN staff, pending RN approval
- Who Can Create Drafts: LPNs, HHAs, or other non-RN clinicians
- Who Can Approve: Only RNs can approve and activate
- In Documents Tab: Shows as "Draft" with yellow chip
- What Happens:
- Draft plans are NOT available to HHAs during visits
- RN must review and approve before use
- Approval converts Draft → Active
3. Archived
- Meaning: Previous version of the care plan
- When This Happens: When you edit an active plan, the old version is archived
- In Documents Tab: Archived plans do not appear in the documents list
- Access: Historical versions are retained in the database for compliance
Note: In practice, most agencies use RN-level staff to create care plans, so they go directly to "Active" status. The "Draft" workflow is available for agencies that want non-RN staff to propose care plans for RN review.
18.11 Best Practices
Task Selection
- Be Specific: Choose tasks that clearly describe what the HHA should do
- Set Realistic Frequency: Daily for essential tasks, Weekly for less frequent needs
- Use Custom Tasks Sparingly: Most needs are covered by the library
- Review with Patient/Family: Ensure tasks align with patient preferences
Vital Sign Parameters
- Follow Physician Orders: Always align with what the doctor prescribed
- Consider Comorbidities: Set tighter ranges for high-risk patients (CHF, COPD, diabetes)
- Don't Skip Weight Monitoring: Critical for CHF patients
- Document Rationale: Use comments to explain why certain parameters are set
Additional Sections
- Don't Overload: Only check precautions that truly apply
- Keep Comments Concise: HHAs need quick, scannable info
- Update Regularly: Remove precautions that are no longer needed
- Think "What Would I Want to Know?": Put yourself in the HHA's shoes
Timing
- Create During OASIS: Don't wait until after the assessment is complete
- Have Info Ready: Review physician orders and patient needs before starting
- Coordinate with Team: Check with RN case manager if unsure about tasks or parameters
- Update Promptly: When patient conditions change, update the care plan ASAP
18.12 Common Scenarios
Scenario 1: New Start of Care with HHA Services
Situation: You're completing an OASIS SOC. Physician orders 3x/week HHA visits for personal care and homemaking.
Steps:
- Complete the OASIS assessment as usual
- Enter HHA frequency: 3 visits/week for 8 weeks
- Click "Create HHA Care Plan"
- Add tasks:
- Bathing assistance (Daily)
- Dressing assistance (Daily)
- Light housekeeping (Weekly)
- Launder patient's personal items (Weekly)
- Change bed linens (Weekly)
- Set vital sign parameters (BP, Pulse, Respiration, O2 Sat)
- Add safety precautions: "Fall Precautions," "Support During Transfer"
- Save & Activate
- Complete and submit the OASIS assessment
Result: HHA Care Plan is active. HHAs can now complete visit notes.
Scenario 2: Mid-Certification Update
Situation: Patient's condition has improved. Physician reduces HHA visits and removes some tasks.
Steps:
- Navigate to the patient's Care Order
- Go to Documents tab
- Click the "Create HHA Care Plan" button (it now says "✓ HHA Care Plan Created")
- The modal opens with current tasks pre-filled
- Remove tasks no longer needed (e.g., remove "Bathing assistance" if patient is now independent)
- Keep essential tasks (e.g., "Light housekeeping," "Check medication box")
- Update comments: "Patient is now independent with bathing and dressing"
- Save & Activate
Result: A new version (v2) is created and becomes active. The old version is archived.
Scenario 3: Re-Certification with Continuing HHA Services
Situation: Patient's 60-day certification period is ending. You're completing an OASIS Recert. HHA services will continue.
Steps:
- Start the OASIS Recertification form
- Enter HHA frequency for the new period
- Click "✓ HHA Care Plan Created" (green button - plan already exists)
- Review all tasks:
- Are they still appropriate?
- Do frequencies need adjustment?
- Review vital sign parameters:
- Have physician orders changed?
- Does patient need tighter monitoring?
- Update additional sections if needed
- Save & Activate
Result: Care plan is updated for the new certification period.
Scenario 4: HHA Reports a Problem
Situation: HHA calls to say the patient can no longer tolerate daily showers (gets too fatigued).
Steps:
- Open the HHA Care Plan
- Find "Bathing assistance" task
- Click the pencil icon to edit
- Change description: "Bathing assistance - Shower 3x/week (Mon, Wed, Fri), bed bath other days"
- Or adjust frequency to "Weekly" and add a custom task for bed baths
- Add to comments: "Patient prefers showers Mon/Wed/Fri. Bed bath on other days due to fatigue."
- Save & Activate
Result: HHAs now have clear, updated instructions that match patient's current needs.
18.13 Troubleshooting
Problem: Can't Find "Create HHA Care Plan" Button
Possible Causes:
- No HHA Frequency Entered: The button only appears if HHA visits are ordered
- Wrong Form Type: Button appears in OASIS SOC, ROC, Recert, Discharge, and HHA Supervisory Visit forms
- Assessment Already Completed: Button may not appear after the assessment is finalized
Solution:
- Go back to the OASIS form's "Summary of Care" section
- Check the HHA frequency field
- If it's 0 or blank, enter the correct frequency
- Save the section
- The button should now appear
Problem: "Cannot Complete Assessment - HHA Care Plan Required"
Error Message: "HHA services are ordered. You must create the HHA Care Plan before finalizing this assessment."
Cause: You entered HHA frequency > 0 but haven't created the care plan yet.
Solution:
- Click the red "Create HHA Care Plan" button
- Add at least 5 tasks
- Save & Activate the care plan
- The button turns green: "✓ HHA Care Plan Created"
- Now you can complete the assessment
Problem: Can't Save Care Plan - Not Enough Tasks
Error Message: "Please add at least 5 tasks (currently 3)"
Cause: You have fewer than 5 tasks in the care plan.
Solution:
- Add more tasks from the task library
- Or create custom tasks
- The count updates in real-time
- Once you reach 5 tasks, the requirement turns green
- The "Save & Activate Care Plan" button becomes enabled
Problem: Care Plan Not Appearing in Documents Tab
Possible Causes:
- Wrong Status Filter: You filtered by "Approved" but care plans show as "Active"
- Still in Draft Status: If created by non-RN, it's pending approval
- Archived: If you created a new version, old one is archived
Solution:
- Clear all filters or set Status filter to "Active"
- Check if you have the necessary role to see drafts
- If you just edited the plan, the new version replaced the old one (expected behavior)
Problem: HHA Says They Can't See the Care Plan During Visit
Possible Causes:
- Care Plan is Draft: Only Active care plans are available during visits
- Wrong Patient: HHA opened a different patient's visit
- No Active Plan: Care plan was archived or deleted
Solution:
- Check the Documents tab - is the care plan showing "Active" status?
- If it shows "Draft," approve it (if you're an RN)
- Verify the HHA is accessing the correct patient's visit
- If no care plan exists, create one
18.14 Integration with Other Features
HHA Visit Notes
When an HHA completes a visit note:
- Care Plan is Loaded: All tasks from the active care plan appear
- Task Completion: HHA checks off each task as completed
- Vital Signs: HHA records vital signs and sees alerts if outside parameters
- Safety Info: HHA can view safety precautions and functional limitations
- System Blocks Completion: If no active care plan exists, HHA cannot complete the visit
HHA Supervisory Visits
During RN supervisory visits with HHAs:
- Care Plan Review: RN can access and review the current care plan
- Task Assessment: RN verifies HHA is performing tasks correctly
- Plan Updates: RN can update the care plan if needed after supervisory observation
OASIS Assessments
HHA Care Plans are tightly integrated with OASIS forms:
- SOC: Create care plan during initial assessment
- ROC: Update care plan when patient returns to service
- Recert: Review and update care plan for new certification period
- Discharge: Care plan remains in documents for historical record
Billing and Compliance
- Active care plan required for HHA visit claims
- PDF documentation supports audit requirements
- Version history tracks changes over time for compliance
- Physician order alignment ensures care matches prescribed services