Chapter 17: Wound Care Documentation
Overview
Wound Care Documentation is where you assess, track, and document all patient wounds throughout their care. The system provides comprehensive tools for wound assessment, measurement, photo documentation, and treatment tracking.
What You'll Learn:
- How to access the Wound Care Flowsheet
- How to document multiple wounds for a single patient
- How to measure wounds accurately
- How to upload wound photos
- How to document wound treatment
- Where wound documentation appears in the system
Who Should Read This Chapter:
- Skilled Nurses (RN)
- Licensed Practical Nurses (LPN/LVN)
- Wound Care Specialists
- Clinical Managers
- Anyone documenting wound assessments
Prerequisites:
- Patient has been admitted (Chapter 14)
- Patient has an active care order (Chapter 15)
17.1 Understanding Wound Documentation in the System
Two Ways to Document Wounds
The system provides two distinct methods for wound documentation:
Method 1: Wound Worksheet (Patient-Level)
- Purpose: Comprehensive wound assessment flowsheet
- Storage: One active worksheet per patient (patient-level, not visit-specific)
- Access From:
- Patient Profile page
- Inside SN Visit forms (Integumentary section)
- Inside LPN Visit forms (Assessment section)
- Inside OASIS forms (Integumentary Status tab)
- Use Case: Ongoing wound tracking across multiple visits
- Capacity: Up to 5 wounds simultaneously
Method 2: Wound Care Note (Visit-Specific)
- Purpose: Standalone visit documentation for wound care visits
- Storage: Stored with each specific visit
- Access From:
- Wound Care Note visit type (dedicated visit form)
- Use Case: Documenting a dedicated wound care visit
- Capacity: Unlimited wounds (add as many as needed per visit)
Key Difference:
- Wound Worksheet = Patient's current wound status (one version, updated over time)
- Wound Care Note = Documentation of a specific wound care visit (snapshot at that visit)
17.2 Accessing the Wound Care Flowsheet
From Patient Profile Page
- Go to Patients in the left sidebar
- Click on a patient's name to open their profile
- Scroll down to find the "View Wound Worksheet" button
- Click to open the Wound Care Flowsheet modal
From Inside Visit Forms
The "WOUND WORKSHEET" button appears in these forms:
Skilled Nursing (SN) Visit:
- Go to the Integumentary section
- Click the "WOUND WORKSHEET" button at the top
LPN/LVN Visit:
- Go to the Assessment section
- Click the "WOUND WORKSHEET" button
OASIS Forms (SOC, ROC, Recertification, Discharge):
- Go to the Integumentary Status tab
- Click the "View Wound Worksheet" button
17.3 The Wound Care Flowsheet Screen
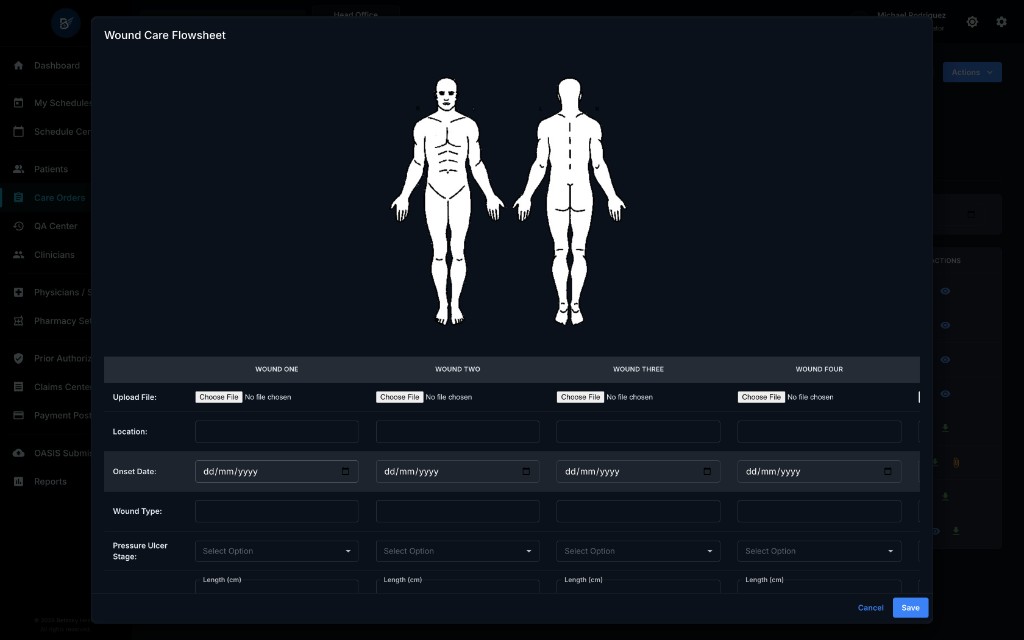
Modal Title: "Wound Care Flowsheet"
Body Diagram (Top Section)
At the top of the screen, you'll see:
- Front view (left side) - body diagram showing front of body
- Back view (right side) - body diagram showing back of body
Purpose: Visual reference to help identify and document wound locations on the body.
17.4 The Wound Assessment Table
The main section displays a table with up to 5 wound columns:
- Wound One
- Wound Two
- Wound Three
- Wound Four
- Wound Five
Each column represents a separate wound on the patient. If a patient has 3 wounds, you'll fill out columns 1, 2, and 3.
Table Rows (What to Document)
The table has 14 rows for documenting each wound's characteristics:
- Upload File
- Location
- Onset Date
- Wound Type
- Pressure Ulcer Stage
- Measurements
- Wound Bed (%)
- Surrounding Tissue
- Drainage
- Drainage Amount
- Odor
- Tunneling
- Undermining
- Device
Let me explain each row in detail.
17.5 Documenting Each Wound Field
Row 1: Upload File
What It Does: Allows you to upload a photo of the wound
How to Use:
- In the wound column, find the Upload File row
- Click "Choose File" button
- Select a wound photo from your device
- The system uploads and attaches it to this specific wound
- Once uploaded, you'll see the filename and a "Delete" button
When to Upload:
- At wound onset (baseline photo)
- Weekly for acute wounds
- Bi-weekly for chronic wounds
- When significant changes occur
- Before discharge
File Format: Images only (JPEG, PNG, etc.)
Row 2: Location
What It Does: Records where on the body the wound is located
How to Use:
- Click in the Location text field for the wound column
- Type the specific body location
Examples:
- "Left Heel"
- "Right Hip"
- "Sacrum"
- "Left Lower Leg - Lateral"
- "Right Elbow"
Best Practice: Be specific. Instead of "leg," write "right lower leg, medial aspect."
Row 3: Onset Date
What It Does: Records when the wound first appeared
How to Use:
- Click in the Onset Date field
- Select the date from the calendar picker
- Format: MM/DD/YYYY
Why It Matters:
- Tracks wound duration
- Helps determine healing progress
- Important for billing and compliance
Row 4: Wound Type
What It Does: Describes the type/cause of the wound
How to Use:
- Click in the Wound Type text field
- Type the wound type
Common Wound Types:
- Pressure Ulcer
- Surgical Incision
- Diabetic Ulcer
- Venous Stasis Ulcer
- Arterial Ulcer
- Traumatic Wound
- Burn
- Skin Tear
- Abrasion
Row 5: Pressure Ulcer Stage
What It Does: Classifies the depth/severity of pressure ulcers
How to Use:
- Click the Pressure Ulcer Stage dropdown
- Select the appropriate stage
Options:
- I - Intact skin with non-blanchable redness
- II - Partial thickness loss (blister, shallow open ulcer)
- III - Full thickness tissue loss (fat visible, no bone/tendon/muscle exposed)
- IV - Full thickness tissue loss with exposed bone, tendon, or muscle
- Unstageable - Full thickness loss, base obscured by slough or eschar
When to Use: Only for pressure ulcers. Leave blank for other wound types.
Row 6: Measurements
What It Does: Records the physical dimensions of the wound in centimeters
How to Use: Each wound column has 3 measurement fields:
-
Length (cm) - Longest dimension (head to toe)
- Enter number (e.g., "3.5")
-
Width (cm) - Widest dimension (side to side)
- Enter number (e.g., "2.0")
-
Depth (cm) - How deep the wound is
- Enter number (e.g., "0.8")
- Use a sterile cotton-tipped applicator to measure depth
Measurement Technique:
- Always measure in the same position
- Use a disposable ruler
- Measure length head-to-toe, width side-to-side
- Round to nearest 0.1 cm
Why It Matters:
- Tracks healing or deterioration
- Length × Width = approximate surface area
- Depth indicates tissue involvement
Row 7: Wound Bed (%)
What It Does: Describes the tissue composition visible in the wound bed
How to Use: Each wound column has 3 percentage fields:
- Granulation % - Healthy pink/red tissue
- Slough % - Yellow/tan devitalized tissue
- Eschar % - Black/brown dead tissue
IMPORTANT: The three percentages must total 100%
Examples:
- Healing wound: 80% Granulation, 15% Slough, 5% Eschar
- Infected wound: 30% Granulation, 60% Slough, 10% Eschar
- Necrotic wound: 10% Granulation, 20% Slough, 70% Eschar
What Each Means:
- Granulation: Good! This is healing tissue with new blood vessels
- Slough: Needs debridement - dead tissue that's separating
- Eschar: Needs debridement - hard, dry dead tissue (stable heel eschar may be left intact)
Row 8: Surrounding Tissue
What It Does: Describes the condition of the skin around the wound
How to Use:
- Click the Surrounding Tissue dropdown
- Select the option that best describes the tissue
Options:
- Redness - Inflamed, may indicate infection
- Pink - Normal healing color
- Dry - Lacks moisture
- Pale - Possible poor circulation
- Moist - Appropriate moisture balance
- Excoriated - Damaged from moisture/friction
- Calloused - Thickened, hardened skin
- Normal - Healthy surrounding tissue
Row 9: Drainage
What It Does: Describes the type of fluid coming from the wound
How to Use:
- Click the Drainage dropdown
- Select the type
Options:
- Serous - Clear, watery fluid (normal)
- Serosanguineous - Clear with pink tinge (blood-tinged, often normal)
- Purulent - Thick, cloudy, pus (indicates infection)
- None - No drainage present
Clinical Significance:
- Serous/Serosanguineous = Usually normal healing
- Purulent = Infection - notify MD
Row 10: Drainage Amount
What It Does: Quantifies how much drainage is present
How to Use:
- Click the Drainage Amount dropdown
- Select the amount
Options:
- None - No drainage
- Minimal - Small amount (dressing slightly damp)
- Moderate - Medium amount (dressing 25-75% saturated)
- Heavy - Large amount (dressing saturated, may strike through)
Row 11: Odor
What It Does: Records any smell from the wound
How to Use:
- Click in the Odor text field
- Type the description
Common Descriptions:
- "None"
- "Foul" (may indicate infection or necrotic tissue)
- "Musty"
- "Sweet" (may indicate Pseudomonas infection)
Best Practice: Assess odor after cleaning the wound, not before.
Row 12: Tunneling
What It Does: Documents channels that extend from the wound bed under intact skin
How to Use: Each wound column has 2 tunneling fields:
-
Length (cm) - How deep the tunnel goes
- Use a sterile cotton-tipped applicator to measure
- Enter number (e.g., "2.5")
-
Time (o'clock) - Direction of the tunnel
- Use clock face method (patient's head = 12 o'clock)
- Select from dropdown: 1, 2, 3, 4, 5, 6, 7, 8, 9, 10, 11, 12
Example: "3.0 cm at 2 o'clock" means a tunnel 3 cm deep extending toward the patient's right side.
Why It Matters:
- Tunneling can hide infection
- Prevents healing from the inside out
- Requires packing to heal properly
Row 13: Undermining
What It Does: Documents tissue destruction under intact wound edges (erosion under the skin)
How to Use: Each wound column has 3 undermining fields:
-
Length (cm) - How far the undermining extends
- Enter number (e.g., "1.5")
-
From (o'clock) - Starting position
- Select from dropdown: 1-12
-
To (o'clock) - Ending position
- Select from dropdown: 1-12
Example: "1.5 cm from 10 to 2 o'clock" means undermining extends 1.5 cm deep from 10 o'clock position around to 2 o'clock position.
Clock Face Reference:
- Patient's head = 12 o'clock
- Patient's feet = 6 o'clock
- Patient's right side = 3 o'clock
- Patient's left side = 9 o'clock
Row 14: Device
What It Does: Documents any devices applied to the wound (e.g., negative pressure wound therapy)
How to Use: Each wound column has 2 device fields:
-
Type - What device is being used
- Enter text (e.g., "VAC Therapy," "Wound VAC," "Negative Pressure")
-
Setting - Device settings/parameters
- Enter text (e.g., "125 mmHg continuous," "100 mmHg intermittent")
When to Use:
- Only if a wound therapy device is in use
- Leave blank if no device
Common Devices:
- VAC (Vacuum-Assisted Closure)
- Negative Pressure Wound Therapy
- NPWT
- Pulsed Lavage
17.6 Treatment Performed Section
Location: Below the wound assessment table
What It Does: Free-text area to describe the treatment you provided during this visit
How to Use:
- Click in the "Treatment Performed" text box
- Type a detailed description of the wound care provided
What to Include:
- Wound cleaning method (e.g., "Cleansed with normal saline")
- Debridement performed (e.g., "Sharp debridement of loose slough")
- Products applied (e.g., "Applied silver alginate dressing")
- Packing method (e.g., "Loosely packed tunnel with moistened gauze")
- Secondary dressing (e.g., "Covered with ABD pad and secured with tape")
- Skin protection (e.g., "Applied barrier cream to periwound skin")
Example Entry:
Cleansed wound with normal saline. Performed sharp debridement of loose yellow slough from wound bed. Loosely packed wound with saline-moistened gauze. Applied foam dressing and secured with transparent film. Applied barrier cream to surrounding skin to protect from moisture. Patient tolerated procedure well.
17.7 Narrative Section
Location: Below the Treatment Performed section
What It Does: Free-text area for clinical narrative and patient response
How to Use:
- Click in the "Narrative" text box
- Type your clinical notes and patient response
What to Include:
- Patient's response to treatment
- Pain level during/after care
- Patient/caregiver education provided
- Patient/caregiver understanding demonstrated
- Signs of infection (or absence thereof)
- Healing progress observations
- Plan for next visit
Example Entry:
Patient reports pain level 3/10 during dressing change, improved from 5/10 last visit. Wound showing signs of improvement with increased granulation tissue and decreased slough. No signs of infection noted - surrounding tissue pink, drainage serous, no foul odor. Educated patient on importance of offloading pressure and keeping heel elevated. Patient verbalized understanding and demonstrated correct positioning. Continue current treatment plan. Will reassess in 3 days.
17.8 Saving the Wound Worksheet
How to Save:
- After documenting all wounds, click the blue "Save" button at the bottom right
- Success message appears: "Wound worksheet saved successfully" or "Wound worksheet updated successfully"
- Click "Cancel" to close the modal without saving (you'll lose unsaved changes)
Important Notes:
- The system maintains one active wound worksheet per patient
- When you save, it updates the patient's current wound worksheet
- All forms and the patient profile access this same worksheet
- If you close the modal without saving, changes are lost
17.9 Viewing Wound Photos
After Upload:
- The filename appears in the Upload File row
- Click the filename to view the full image
- Click "Delete" to remove the photo if needed
Photo Tips:
- Take photos from the same angle each time
- Include a ruler in the photo for scale
- Ensure good lighting
- Take photos after cleaning the wound
- Document photo date in your system
17.10 Common Wound Care Scenarios
Scenario 1: New Pressure Ulcer on Admission
Steps:
- Open the patient's Wound Worksheet
- Use Wound One column
- Fill in:
- Location: "Sacrum"
- Onset Date: Date discovered
- Wound Type: "Pressure Ulcer"
- Pressure Ulcer Stage: "II" (if partial thickness)
- Measurements: Length, Width, Depth
- Wound Bed: Percentages (e.g., 70% Granulation, 30% Slough, 0% Eschar)
- Surrounding Tissue: "Redness"
- Drainage: "Serous"
- Drainage Amount: "Minimal"
- Odor: "None"
- Upload baseline photo
- Document treatment in Treatment Performed
- Document assessment in Narrative
- Click "Save"
Scenario 2: Patient Has 3 Active Wounds
Steps:
- Use columns Wound One, Wound Two, Wound Three
- Fill out complete assessment for each wound separately
- Example:
- Wound One: Sacral pressure ulcer
- Wound Two: Left heel pressure ulcer
- Wound Three: Right lower leg venous ulcer
- Upload photos for each wound
- Document treatment for all wounds in Treatment Performed
- Click "Save"
Scenario 3: Wound Healed - Removing from Worksheet
What Happens:
- When a wound heals, you typically leave it documented with final measurements showing 0 × 0 × 0 cm
- Update the Wound Bed to show 100% Granulation
- Document "Wound healed, epithelialized" in Treatment Performed
- Take final photo
- For your next visit, you can clear that column and reuse it for a new wound if needed
Best Practice: Document the healed wound in your visit note narrative for that visit before clearing the column.
17.11 Wound Worksheet vs. Visit Forms
When You Update the Wound Worksheet
The Changes Apply To:
- Patient's current wound status
- Any future visit forms that open the worksheet
- The patient profile
The Changes DO NOT Apply To:
- Past completed visits (those have their own snapshots)
- Past OASIS assessments (those are locked once approved)
Example Timeline:
- Monday: You document 3 wounds in the Wound Worksheet during an SN Visit
- Wednesday: You update measurements showing improvement
- Friday: QA approves Monday's visit
- Next Monday: You open the Wound Worksheet again
- You'll see Wednesday's updated measurements (current status)
- If you view Monday's approved visit, it shows Monday's measurements (snapshot)
Key Point: The Wound Worksheet shows the current state. Past visits show historical snapshots.
17.12 Best Practices
Measurement Accuracy
- ✅ Use the same measuring technique each time
- ✅ Measure with patient in same position
- ✅ Use a disposable ruler
- ✅ Round to nearest 0.1 cm
- ❌ Don't estimate - always measure
Documentation Frequency
- Acute wounds: Weekly measurements minimum
- Chronic wounds: Bi-weekly measurements minimum
- Rapidly changing wounds: Every visit
- Stable wounds: Weekly minimum
Photo Documentation
- ✅ Take at admission (baseline)
- ✅ Weekly for first month
- ✅ Bi-weekly thereafter if stable
- ✅ Whenever significant changes occur
- ✅ Before discharge (final photo)
- ❌ Don't take photos before cleaning the wound
Wound Bed Percentages
- ✅ Always total 100%
- ✅ Reassess each visit
- ✅ Use to track healing progress
- Example: Week 1: 40% granulation → Week 2: 60% granulation = Improving!
Clinical Indicators to Report to MD
- ⚠️ Purulent drainage (infection)
- ⚠️ Foul odor (infection or necrosis)
- ⚠️ Increased redness around wound (cellulitis)
- ⚠️ Wound size increasing
- ⚠️ Exposed bone, tendon, or muscle (Stage IV)
- ⚠️ Patient fever with wound present
- ⚠️ Severe pain at wound site
17.13 Troubleshooting
Problem: "Wound bed percentages must total 100%"
Solution: Check your granulation, slough, and eschar percentages. They must add up to exactly 100.
- Example: 70% + 20% + 10% = 100% ✅
- Example: 60% + 30% + 5% = 95% ❌
Problem: Can't upload wound photo
Possible Causes:
- File is too large (try smaller file size)
- File format not supported (use JPEG or PNG)
- No internet connection
Solution:
- Compress the image
- Convert to JPEG or PNG format
- Check your connection and try again
Problem: Don't see my updated wound measurements in last week's visit
Explanation: This is normal! Past completed visits show a snapshot of the wounds at that time. Current measurements appear in:
- Today's visit forms
- The patient's Wound Worksheet (current status)
- Future visits
17.14 Key Takeaways
- ✅ The Wound Worksheet tracks up to 5 wounds simultaneously for one patient
- ✅ The worksheet is patient-level (one active version per patient)
- ✅ Access from patient profile, SN visits, LPN visits, and OASIS forms
- ✅ 14 assessment fields per wound (location, measurements, photos, etc.)
- ✅ Wound bed percentages must total 100%
- ✅ Use clock face method for tunneling and undermining (head = 12 o'clock)
- ✅ Upload photos for visual tracking
- ✅ Document treatment performed and patient response
- ✅ Changes to the worksheet update the current status only
- ✅ Past completed visits retain their historical snapshots