Chapter 22: OASIS Submission to CMS
Overview
After OASIS assessments are approved by QA and (if required) signed by the physician, they must be submitted to the Centers for Medicare & Medicaid Services (CMS) through the OASIS system. This chapter explains how to manage the entire submission lifecycle, from exporting XML files to tracking acceptance or rejection by CMS.
What You'll Learn:
- Understanding the 5 OASIS submission statuses and their meaning
- How to export OASIS assessments as XML files for CMS submission
- How to mark assessments as submitted and track CMS submission IDs
- How to record CMS acceptance or rejection responses
- How to handle rejected submissions and notify clinicians for corrections
- The relationship between OASIS submission status and billing eligibility
22.1 Understanding OASIS Submission Statuses
Every OASIS assessment that has been approved goes through a submission lifecycle with 5 distinct statuses:
Status 1: Ready to Submit
- What It Means: The OASIS assessment has been approved by QA and (if required) signed by the physician. It is now ready to be exported as an XML file and submitted to CMS.
- What Happens at This Stage: The agency's billing team or OASIS coordinator exports the assessment as an XML file and submits it to CMS through the state's OASIS portal or direct submission system.
- Care Order Status: For SOC, Recert, and ROC, the Care Order is still waiting for CMS acceptance before billing can begin.
Status 2: Submitted (& Pending Validation)
- What It Means: The OASIS assessment has been exported and submitted to CMS. The agency is now waiting for CMS to validate the file and respond with acceptance or rejection.
- What Happens at This Stage: CMS runs automated validation checks on the submitted XML file (e.g., correct format, valid item codes, complete data). This typically takes 1-3 business days but can take longer during high-volume periods.
- What You Track: The CMS Submission ID (a unique ID assigned by CMS when you upload the file through their portal) and time since submission (to monitor if CMS is taking too long to respond).
Status 3: Accepted
- What It Means: CMS has validated and accepted the OASIS assessment. The data is now officially recorded in CMS's system and counts toward quality measures, payment calculations, and compliance reporting.
- What Happens at This Stage:
- Billing is enabled: For SOC, Recert, and ROC, the Care Order status automatically changes to "Active," allowing visits from this episode to appear in the Claims Center for billing.
- The assessment is permanently logged in CMS's records.
- The agency can now bill for visits completed during this episode (for SOC/Recert) or after resumption (for ROC).
- When to Move Here: After you receive a CMS Acceptance Report (usually via email or portal download) confirming the submission was successful.
Status 4: Rejected
- What It Means: CMS has rejected the OASIS assessment due to validation errors. The data was not accepted, and the agency must correct the errors and resubmit.
- What Happens at This Stage:
- CMS provides a Rejection Report (or "Validation Report") listing specific errors (e.g., "M0100 date is invalid," "M1800 value out of range," "Missing required item M0230").
- The agency must review the rejection reason, correct the errors in the OASIS form, and resubmit.
- Billing is blocked: The Care Order remains in its current status (e.g., "PENDING_POC_SIGNATURE" or "Active" from a previous episode), but new billing for this episode cannot proceed until CMS accepts the resubmitted assessment.
- When to Move Here: After you receive a CMS Rejection Report from the portal.
Status 5: Pending Correction
- What It Means: The agency has notified the clinical team that the OASIS assessment was rejected by CMS and needs corrections. The clinician or RN supervisor is now responsible for fixing the errors and resubmitting the assessment for QA approval.
- What Happens at This Stage:
- The assigned clinician or case manager receives a notification (email and/or in-app alert) with the rejection reason.
- They edit the OASIS assessment to fix the errors.
- The corrected assessment goes back through QA review and physician signature (if needed).
- Once re-approved, the assessment returns to "Ready to Submit" status for a second submission attempt.
- When to Move Here: After you click "Notify for Correction" in the Rejected tab (or from any other tab if you discover an issue).
22.2 The OASIS Submissions Page
Navigate to OASIS Submissions from the left sidebar to access the main submission management page.
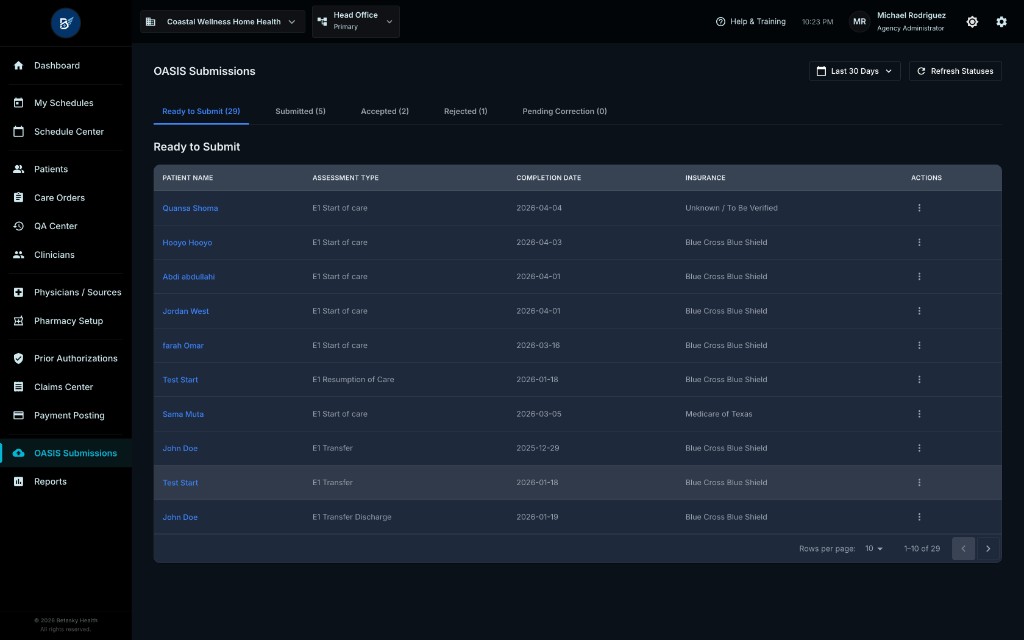
What You See:
-
Page Title: "OASIS Submissions" with a "Last 30 Days" date filter dropdown (allows filtering by date range in future versions) and a "Refresh Statuses" button to manually refresh all tab counts
-
Tab Bar with Status Counts: Five tabs, each showing the current count of assessments in that status:
- Ready to Submit (23): 23 assessments ready for export and submission
- Submitted (5): 5 assessments currently pending CMS validation
- Accepted (3): 3 assessments accepted by CMS
- Rejected (1): 1 assessment rejected by CMS
- Pending Correction (0): 0 assessments awaiting clinician corrections
-
Active Tab Content: The table below shows all assessments for the currently selected tab (in this example, "Ready to Submit")
22.3 Ready to Submit Tab (Export & Submit to CMS)
The Ready to Submit tab shows all OASIS assessments that have been approved and signed (if required) and are now ready for submission to CMS.
Table Columns Explained:
- Patient Name: The patient's full name as a clickable link (clicking opens the patient's profile or care order details)
- Assessment Type: The type of OASIS assessment (e.g., "E1 Start of care," "E1 Resumption of Care," "E1 Recertification," "E1 Transfer," "E1 Transfer Discharge")
- Completion Date: The date the assessment was completed by the clinician (format: YYYY-MM-DD)
- Insurance: The patient's primary payer (e.g., "Blue Cross Blue Shield," "Medicare of Texas," "Unknown / To Be Verified")
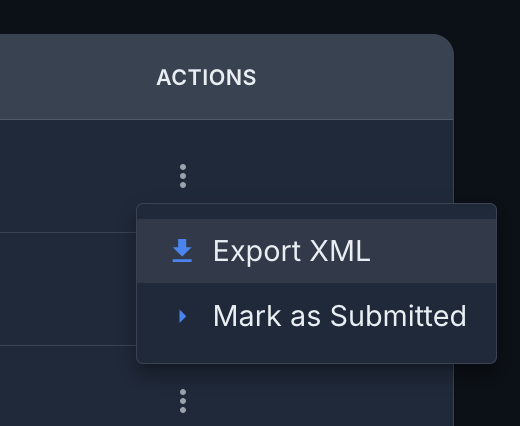
- Actions: A three-dot menu with options for this assessment
How to Submit an Assessment to CMS:
Step 1: Export the OASIS Assessment as XML
- Click the three-dot menu (Actions) for the assessment you want to submit
-
Select "Export XML"
-
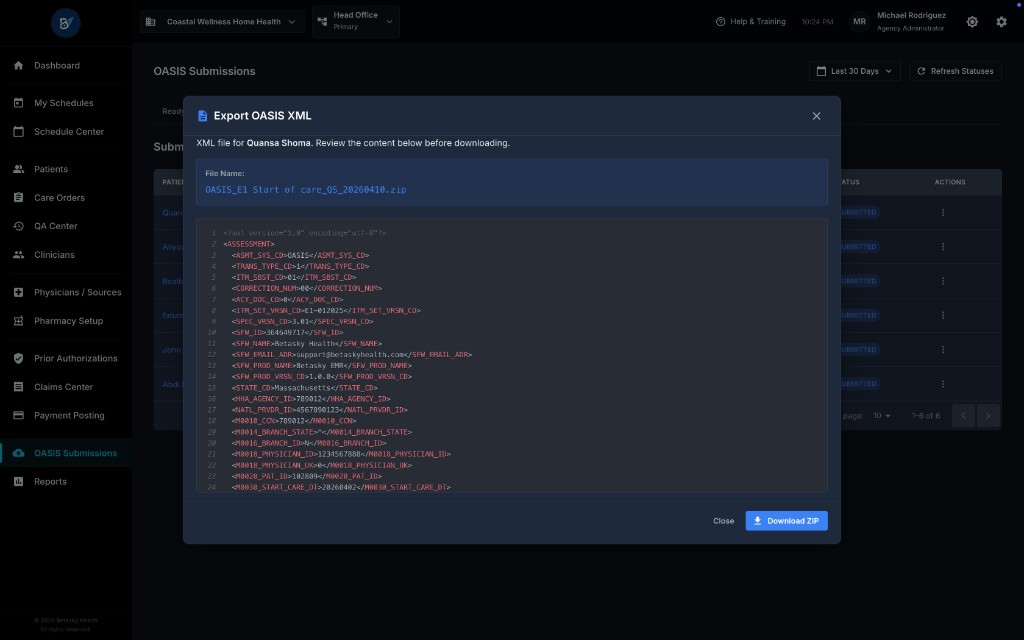
The "Export OASIS XML" modal appears:
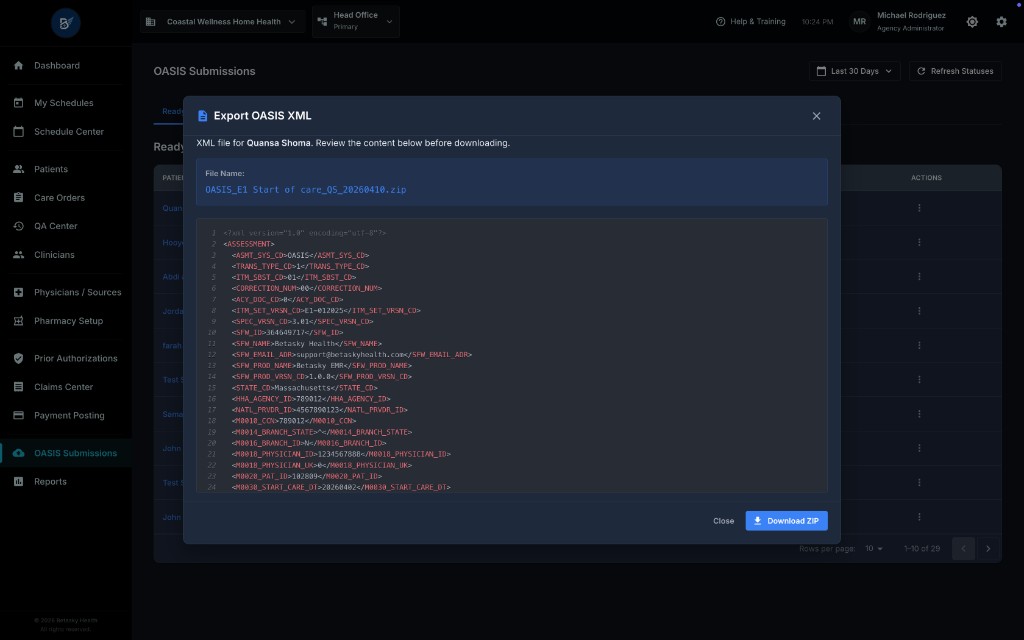
What You See in This Modal:
- Modal Title: "Export OASIS XML"
- Message: "XML file for [Patient Name]. Review the content below before downloading."
- File Name: The auto-generated filename (e.g.,
OASIS_E1_Start_of_care_05_20260410.zip) - XML Preview Window: A large text area showing the actual XML content (first 20-30 lines visible, scrollable)
- You can review the XML to verify it contains the correct patient info, assessment type, and OASIS item codes
- The XML is formatted in CMS-compliant structure with tags like
<ASSESSMENT>,<OASI_INFO_COMPLETE_DT>,<TRANS_TYPE_CD>,<INPATIENT_FACILITY_IND>, etc.
- "Close" Button: Closes the modal without downloading
- "Download ZIP" Button (Blue): Downloads the XML file as a
.ziparchive to your computer
- Click "Download ZIP"
- Your browser downloads the file (typically to your
Downloadsfolder) - The filename format is:
OASIS_[Version]_[AssessmentType]_[Sequence]_[YYYYMMDD].zip - Example:
OASIS_E1_Start_of_care_05_20260410.zip
- Your browser downloads the file (typically to your
Step 2: Submit the XML File to CMS
-
Go to Your State's OASIS Submission Portal (outside this system)
- Each state has its own CMS OASIS submission portal (e.g., Texas uses the "Texas OASIS Portal," California uses "CASPER," etc.)
- Log in with your agency's credentials
- Navigate to the "Submit OASIS" or "Upload OASIS File" section
-
Upload the ZIP File
- Select the downloaded
.zipfile - Submit it through the portal
- CMS assigns a Submission ID (a unique tracking number, e.g., "3232323," "SZdF4xSu0du7N")
- Copy this Submission ID - you'll need it in the next step
- Select the downloaded
Step 3: Mark the Assessment as Submitted in the System
-
Return to the OASIS Submissions > Ready to Submit tab
-
Click the three-dot menu (Actions) for the same assessment
-
Select "Mark as Submitted"
-
The "Confirm Submission" modal appears:
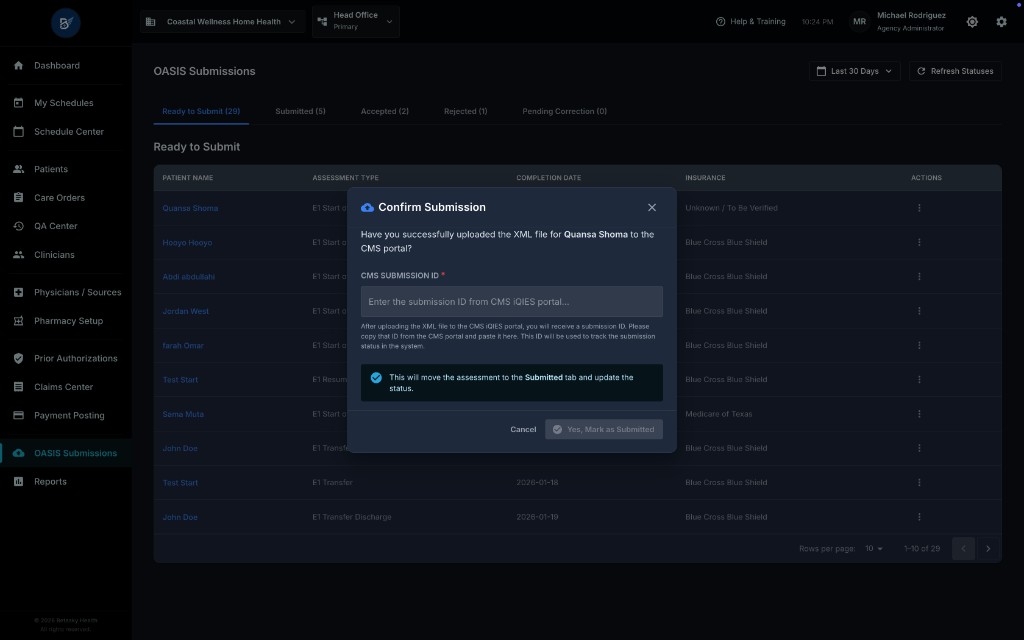
What You See in This Modal:
- Modal Title: "Confirm Submission"
- Message: "Have you successfully uploaded the XML file for [Patient Name] to the CMS portal?"
- CMS Submission ID Field: A text input box labeled "CMS SUBMISSION ID *"
- What to Enter: Paste the Submission ID that CMS assigned when you uploaded the file (e.g., "3232323")
- Why This Matters: This ID allows you to track the submission in CMS's portal and link it back to this assessment in your system
- Helper Text: "After uploading the XML file to the CMS OASIS portal, you will receive a submission ID. Please copy that ID from the CMS portal and paste it here. This ID will be used to track the submission status in your system."
- Checkbox: "This will move the assessment to the Submitted tab and update the status."
- "Cancel" Button: Closes the modal without changing the status
- "Yes, Mark as Submitted" Button (Blue): Confirms the action
- Paste the CMS Submission ID into the field
- Click "Yes, Mark as Submitted"
What Happens Next:
- The assessment moves from the "Ready to Submit" tab to the "Submitted" tab
- The status changes to "SUBMITTED"
- The submitted timestamp is recorded (when you marked it as submitted in this system)
- The CMS Submission ID is saved for reference
- Tab counts update automatically: "Ready to Submit" count decreases by 1, "Submitted" count increases by 1
22.4 Submitted Tab (Pending CMS Validation)
The Submitted tab shows all assessments that have been submitted to CMS and are awaiting validation responses (acceptance or rejection).
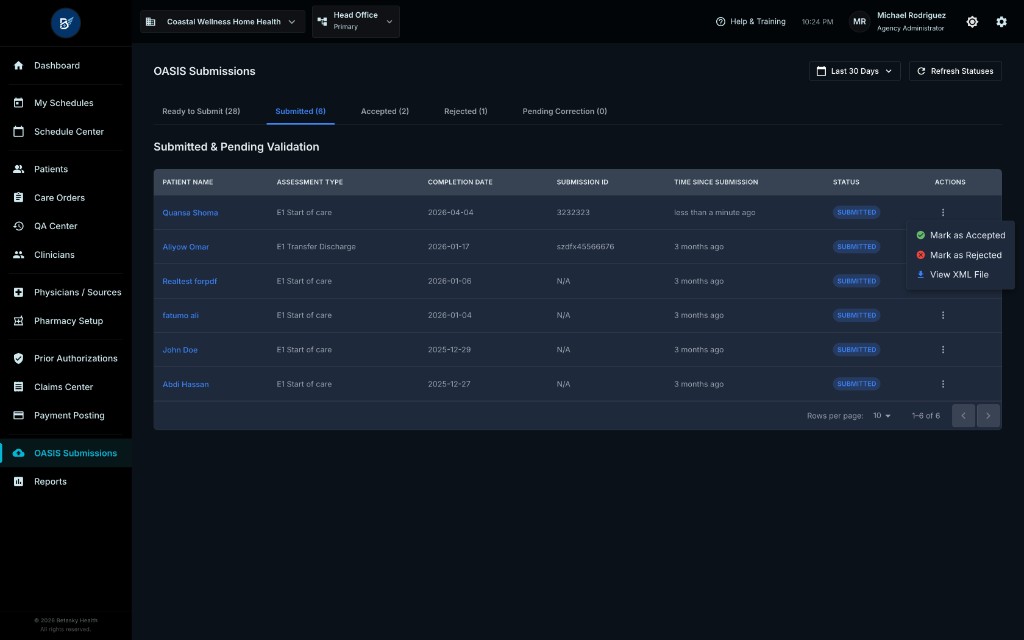
Table Columns Explained:
- Patient Name: The patient's full name
- Assessment Type: The OASIS assessment type (e.g., "E1 Start of care," "E1 Transfer Discharge")
- Completion Date: The date the clinician completed the assessment
- Submission ID: The CMS Submission ID you entered when marking it as submitted (e.g., "3232323," "SZdF4xSu0du7N")
- This is the tracking number CMS assigned
- Use this ID to look up the submission status in the CMS portal
- Time Since Submission: How long ago the assessment was submitted (e.g., "less than a minute ago," "3 months ago")
- Why This Matters: If submissions sit in "Submitted" status for more than 5-7 business days, you should check the CMS portal for a response or contact CMS support
- Status: Shows "SUBMITTED" (blue chip)
- Actions: A dropdown menu with options:
- "Update Status": Manually change the status (to Accepted, Rejected, or back to Ready to Submit if needed)
- "Export": Re-download the XML file if you need to resubmit or review it
What to Do While Assessments Are in This Tab:
1. Monitor for CMS Responses
- Check your CMS portal daily (or enable email notifications if your state portal supports it)
- Look for Acceptance Reports or Rejection Reports for your submitted assessments
- Typical Timeline:
- Most submissions are validated within 1-3 business days
- Some may take up to 5-7 business days during peak periods (e.g., end of month, end of quarter)
- If no response after 7 days, contact your state's OASIS support team
2. Update Status Based on CMS Response
When you receive a CMS response, update the status in this system:
If CMS Accepted the Submission:
- Click the Actions dropdown for the assessment
-
Select "Update Status"
-
Choose "Mark as Accepted"
-
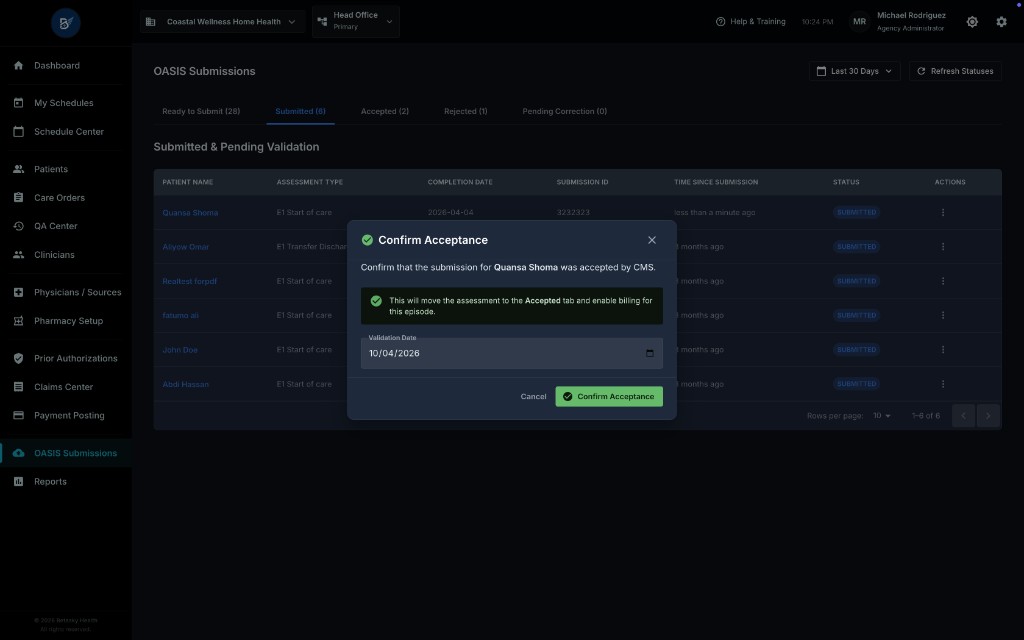
The "Confirm Acceptance" modal appears:
What You See:
- Modal Title: "Confirm Acceptance"
- Message: "Confirm that the submission for [Patient Name] was accepted by CMS."
- Green Info Box: "This will move the assessment to the Accepted tab and enable billing for this episode."
- Validation Date Field: A date picker to enter the date CMS accepted the submission (default: today's date)
- Why This Field Exists: CMS acceptance dates are important for billing cycles and reporting. If CMS accepted it yesterday but you're recording it today, you can backdate it to match the CMS acceptance report.
- "Cancel" Button
- "Confirm Acceptance" Button (Green)
- Enter the acceptance date (or leave it as today if that's correct)
- Click "Confirm Acceptance"
What Happens Next:
- The assessment moves to the "Accepted" tab
- The status changes to "ACCEPTED"
- The acceptance timestamp is recorded
- CRITICAL FOR BILLING: The Care Order status automatically changes to "Active" (if it wasn't already). This enables visits from this episode to be billed in the Claims Center.
- Tab counts update: "Submitted" count decreases by 1, "Accepted" count increases by 1
If CMS Rejected the Submission:
-
Click the Actions dropdown for the assessment
-
Select "Update Status"
-
Choose "Mark as Rejected"
-
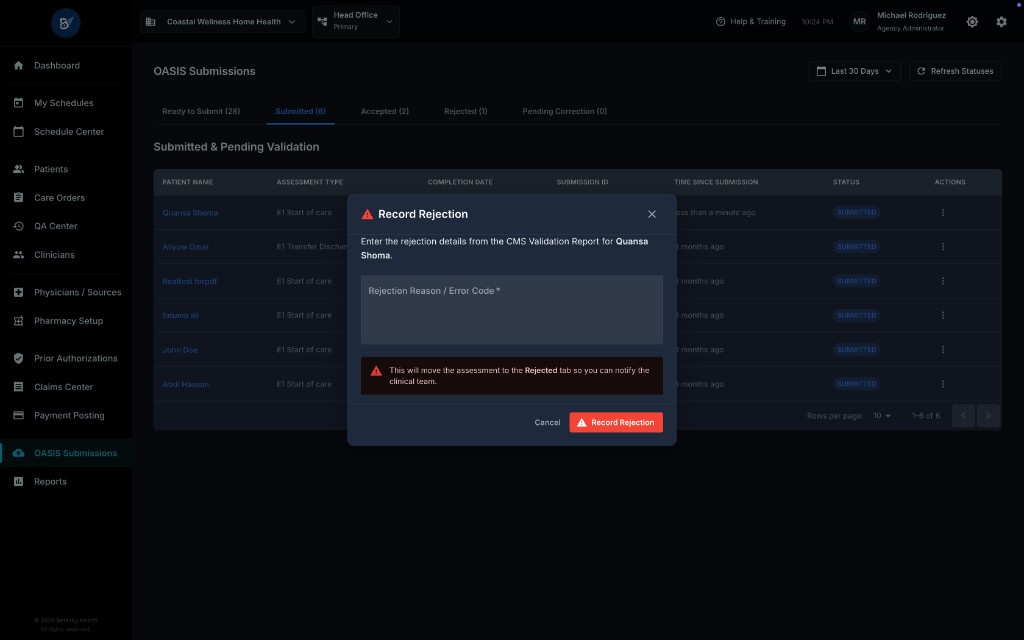
The "Record Rejection" modal appears:
What You See:
- Modal Title: "Record Rejection"
- Message: "Enter the rejection details from the CMS Validation Report for [Patient Name]."
- Rejection Reason / Error Code Field: A large text area to paste or type the rejection reason
- What to Enter: Copy the exact error messages from the CMS Rejection Report
- Example: "CRITICAL [con-invalid-lineside-jod1-non-lineside-lineside-jod2-non-lineside-lineside-jod2-con-lineside-lineside-jod1-con-lineside-lineside-jod2-con-lineside-lineside]"
- Or a more readable format: "M0100 (Assessment Completion Date) is before M0030 (Start of Care Date). Invalid date sequence."
- Red Warning Box: "This will move the assessment to the Rejected tab so you can notify the clinical team for corrections."
- "Cancel" Button
- "Record Rejection" Button (Red)
- Paste or type the rejection reason from the CMS report
- Click "Record Rejection"
What Happens Next:
- The assessment moves to the "Rejected" tab
- The status changes to "REJECTED"
- The rejection timestamp is recorded
- The rejection reason is saved for the clinical team to review
- Tab counts update: "Submitted" count decreases by 1, "Rejected" count increases by 1
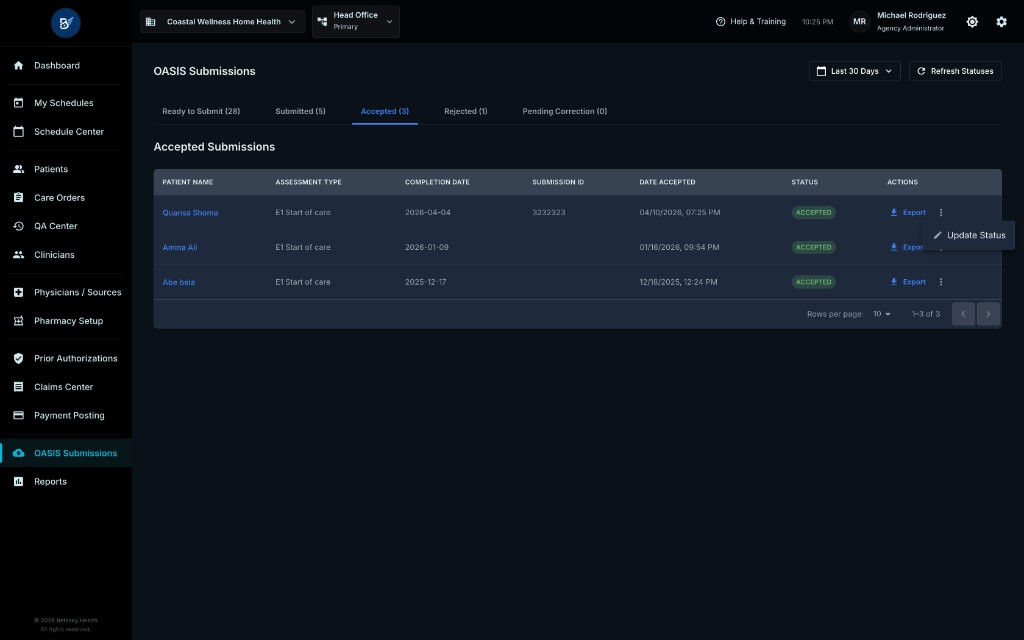
22.5 Accepted Tab (Successfully Submitted to CMS)
The Accepted tab shows all assessments that have been successfully accepted by CMS.
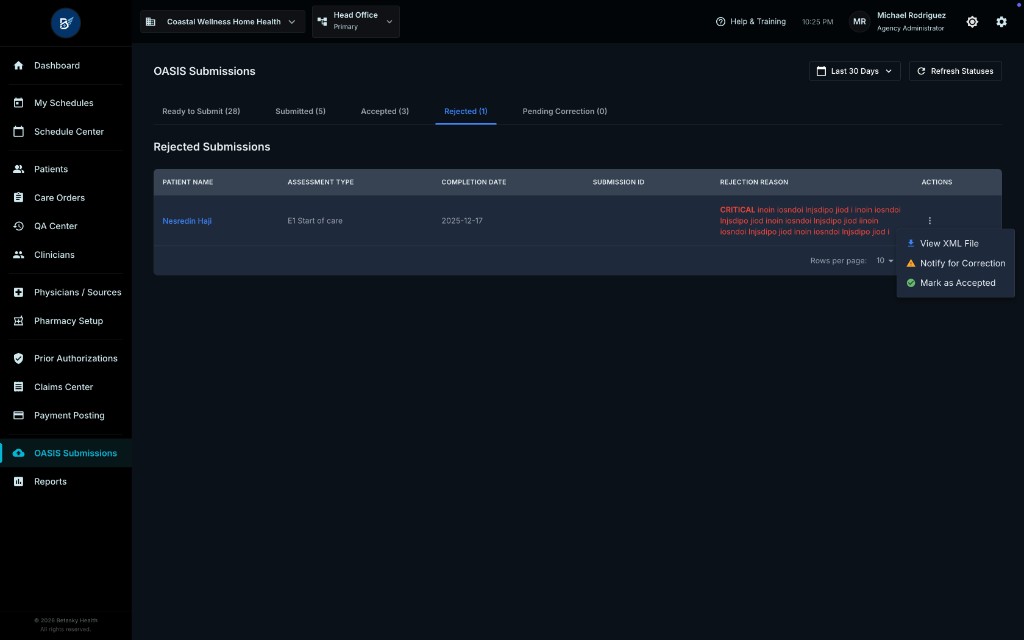
Table Columns Explained:
- Patient Name: The patient's full name
- Assessment Type: The OASIS assessment type
- Completion Date: The date the assessment was completed
- Submission ID: The CMS Submission ID (if recorded)
- Date Accepted: The date and time CMS accepted the submission (format: MM/DD/YYYY, HH:MM AM/PM)
- Example: "04/10/2026, 07:25 PM"
- Status: Shows "ACCEPTED" (green chip)
- Actions: A dropdown with options:
- "Export": Download the XML file again if needed (for records or audits)
- "Update Status" (rarely used): Manually change status if there was a mistake (e.g., move back to Submitted or Rejected)
What This Means for Billing:
Critical Concept: When an OASIS assessment reaches "Accepted" status, the system automatically enables billing for that episode.
For OASIS SOC (Start of Care):
- The Care Order status changes from "PENDING_POC_SIGNATURE" (or whatever it was) to "Active"
- All visits completed under this Care Order can now be billed in the Claims Center
- The patient's episode begins officially from CMS's perspective
For OASIS Recertification:
- The Care Order remains "Active" (it was already active from the previous episode)
- A new 60-day episode is created
- Visits from the new episode can now be billed (using the new episode's dates)
For OASIS ROC (Resumption of Care):
- The Care Order status changes from "ON_HOLD" back to "Active"
- Visits completed after the resumption date can now be billed
For OASIS Transfer, Discharge, Transfer-Discharge, Death:
- These do not require CMS acceptance for billing purposes (the Care Order was already closed or on hold when they were approved)
- Acceptance here is mainly for compliance and reporting to ensure CMS has accurate records
Best Practice:
- Archive or export these records periodically for compliance audits
- CMS may request proof of submission/acceptance during audits - the data in this tab serves as your audit trail
22.6 Rejected Tab (CMS Validation Errors)
The Rejected tab shows all assessments that were rejected by CMS due to validation errors.
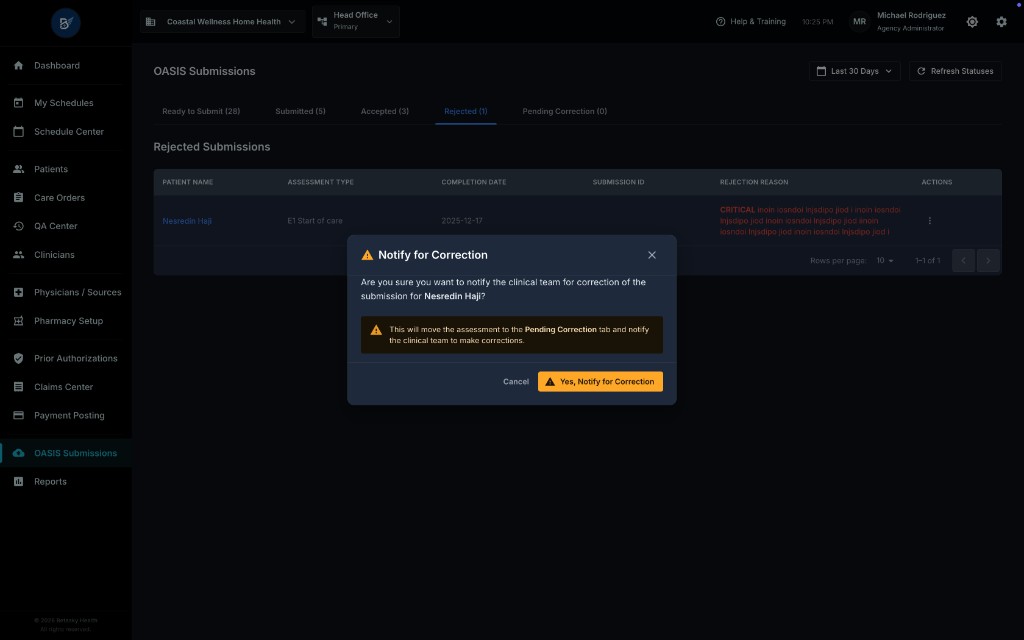
Table Columns Explained:
- Patient Name: The patient's full name
- Assessment Type: The OASIS assessment type
- Completion Date: The date the assessment was completed
- Submission ID: The CMS Submission ID (if recorded)
- Rejection Reason: The exact error message(s) from CMS
- This is displayed in red text for visibility
- Example (from screenshot): "CRITICAL [con-invalid-lineside-jod1-non-lineside-lineside-jod2-non-lineside-lineside-jod2-con-lineside-lineside-jod1-con-lineside-lineside-jod2-con-lineside-lineside-jod1-con-lineside-lineside]"
- This is the raw error code from CMS. In practice, you'll also receive a human-readable report from CMS explaining what these codes mean.
- Actions: A dropdown menu with three key options:
- "View XML File": Opens the exported XML to review the data that was submitted
- "Notify for Correction": Sends the rejection reason to the clinical team so they can fix the errors
- "Mark as Accepted" (rarely used): If CMS accepted it on a second review or you made a manual correction in the portal, you can manually mark it as accepted
How to Handle a Rejected Assessment:
Step 1: Review the Rejection Reason
- Read the Rejection Reason column carefully
- If the error code is cryptic (like the example above), refer to the CMS Validation Report you downloaded from the CMS portal for a detailed explanation
- Common rejection reasons include:
- Date sequence errors: "M0100 (Assessment Completion Date) cannot be before M0030 (Start of Care Date)"
- Invalid values: "M1800 (Grooming) value '5' is out of range. Valid values are 0-3."
- Missing required items: "M0230 (Primary Diagnosis ICD-10 Code) is required but missing."
- Format errors: "M0066 (Date of Birth) format is invalid. Expected YYYYMMDD, received YYYY-MM-DD."
Step 2: Notify the Clinical Team for Correction
-
Click the Actions dropdown for the rejected assessment
-
Select "Notify for Correction"
-
The "Notify for Correction" modal appears:
![Notify for Correction Modal - not provided in screenshots, but inferred from system design]
What You See:
- Modal Title: "Notify for Correction"
- Message: "Are you sure you want to notify the clinical team for correction of the submission for [Patient Name]?"
- Warning Box: "This will move the assessment to the Pending Correction tab and notify the clinical team to make corrections."
- "Cancel" Button
- "Yes, Notify for Correction" Button (Orange)
- Click "Yes, Notify for Correction"
What Happens Next:
- The assessment moves to the "Pending Correction" tab
- The status changes to "PENDING_CORRECTION"
- A notification is sent to the assigned clinician or case manager (email and/or in-app alert)
- The notification includes:
- Patient name
- Assessment type
- Rejection reason (the full error message from CMS)
- Instructions to edit the OASIS form, fix the errors, and resubmit for QA approval
- Tab counts update: "Rejected" count decreases by 1, "Pending Correction" count increases by 1
Step 3: Clinician Fixes the Errors (Workflow Outside This Page)
- The clinician receives the notification
- They navigate to the OASIS form (from My Schedules, Patient Profile, or Care Order Details)
- They edit the OASIS assessment to fix the errors listed in the rejection reason
- They resubmit the assessment (it goes back to "Pending Review" status in the QA Center)
- The QA team re-reviews and re-approves the corrected assessment
- If physician signature is required, the physician signs again (or the existing signature may be reused, depending on agency policy)
- The assessment returns to the "Ready to Submit" tab for a second submission attempt
Step 4: Resubmit to CMS
- Once back in "Ready to Submit," follow the same export and submission process (Steps 1-3 from Section 22.3)
- Monitor the "Submitted" tab for CMS's second response
- Ideally, the corrected assessment will be accepted this time
22.7 Pending Correction Tab (Awaiting Clinician Fixes)
The Pending Correction tab shows all assessments that have been notified to the clinical team for corrections but have not yet been corrected and resubmitted.
Table Columns Explained (typical, not shown in screenshots):
- Patient Name
- Assessment Type
- Completion Date
- Date Notified: When the clinician was notified to make corrections
- Days Pending: How many days the assessment has been waiting for corrections (e.g., "3 days," "14 days")
- Why This Matters: If assessments sit here for more than 7 days, follow up with the clinician to ensure they've seen the notification and are working on the corrections
- Rejection Reason: The error message from CMS (or the reason it needs corrections)
- Notified User: The clinician or case manager who was notified
- Actions:
- "Resend Notification": If the clinician didn't see the first notification, you can resend it
- "Force Status Change" (admin only): Manually move the assessment to a different status (e.g., back to Rejected, or to Ready to Submit if corrections were made outside the normal workflow)
- "View XML File": Review the original submission
What to Do with Assessments in This Tab:
1. Monitor Days Pending
- If Days Pending > 7 days, contact the clinician directly:
- "Did you receive the rejection notification for Patient X's OASIS SOC?"
- "Do you need help understanding the CMS error message?"
- "When can you complete the corrections?"
2. Resend Notification if Needed
- If the clinician says they never got the notification, click Actions > Resend Notification
3. Wait for Clinician to Correct and Resubmit
- Once the clinician corrects the assessment and resubmits it through QA, the assessment will automatically move out of this tab and return to "Ready to Submit" (after QA re-approval)
- The "Pending Correction" count will decrease by 1
22.8 Exporting XML from Any Tab
You can re-export the XML file for any assessment, even after it's been submitted, accepted, or rejected. This is useful for:
- Record-keeping: Saving a copy for your files
- Audits: CMS or state auditors may request proof of submission
- Resubmission: If you need to resubmit a rejected assessment (after corrections), you can export a fresh XML
How to Export from Submitted, Accepted, or Rejected Tabs:
-
Navigate to the tab where the assessment is located (e.g., Submitted, Accepted, Rejected)
-
Click the Actions dropdown for the assessment
-
Select "Export" (or "View XML File" in Rejected tab)
-
The "Export OASIS XML" modal appears (same as in Ready to Submit):
- Review the XML if needed
- Click "Download ZIP" to download the file again
22.9 The Relationship Between OASIS Submission Status and Billing
Critical Concept for Agency Administrators and Billing Coordinators:
The OASIS submission status directly impacts billing eligibility for Medicare home health episodes.
For OASIS SOC (Start of Care):
| OASIS Submission Status | Care Order Status | Can Bill Visits? |
|---|---|---|
| Ready to Submit | PENDING_POC_SIGNATURE | ❌ No |
| Submitted | PENDING_POC_SIGNATURE | ❌ No |
| Accepted | Active | ✅ Yes |
| Rejected | PENDING_POC_SIGNATURE | ❌ No (until resubmitted and accepted) |
| Pending Correction | PENDING_POC_SIGNATURE | ❌ No |
Why This Matters:
- You cannot bill Medicare for SOC visits until CMS accepts the SOC assessment
- Delays in OASIS submission = delays in billing = cash flow issues
- Best Practice: Submit SOC assessments within 5 days of the start of care date to avoid billing delays
For OASIS Recertification:
| OASIS Submission Status | Care Order Status | Can Bill New Episode Visits? |
|---|---|---|
| Ready to Submit | Active (from previous episode) | ❌ No (for new episode) |
| Submitted | Active (from previous episode) | ❌ No (for new episode) |
| Accepted | Active (new 60-day episode created) | ✅ Yes |
| Rejected | Active (from previous episode) | ❌ No (for new episode) |
| Pending Correction | Active (from previous episode) | ❌ No (for new episode) |
Why This Matters:
- You can still bill visits from the previous episode (up to the end of the previous 60-day period)
- But you cannot bill visits from the new episode until the Recert is accepted by CMS
- Best Practice: Submit Recert assessments at least 7-10 days before the previous episode ends to ensure acceptance before the new episode starts
For OASIS ROC (Resumption of Care):
| OASIS Submission Status | Care Order Status | Can Bill Visits? |
|---|---|---|
| Ready to Submit | ON_HOLD | ❌ No |
| Submitted | ON_HOLD | ❌ No |
| Accepted | Active | ✅ Yes (for visits after resumption) |
| Rejected | ON_HOLD | ❌ No |
| Pending Correction | ON_HOLD | ❌ No |
Why This Matters:
- After a patient is hospitalized or transferred (triggering an ON_HOLD status), you cannot bill visits until the ROC is accepted
- Best Practice: Submit ROC assessments immediately after the patient returns to home health services
For OASIS Transfer, Discharge, Transfer-Discharge, Death:
| OASIS Submission Status | Impact on Billing |
|---|---|
| Ready to Submit | No impact - billing for the episode was already closed or blocked |
| Submitted | No impact |
| Accepted | No impact - CMS acceptance is for compliance/reporting only |
| Rejected | Must resubmit for compliance, but doesn't block past billing |
| Pending Correction | Must resubmit for compliance |
Why This Matters:
- These assessments don't enable future billing (since the episode is ending or has ended)
- But they must still be submitted and accepted for CMS compliance and quality reporting
- Rejected Transfer/Discharge/Death assessments won't block billing for past visits, but they will cause compliance issues and may trigger audits if not corrected
22.10 Best Practices for OASIS Submission Management
1. Establish a Submission Schedule
- Daily Submission Routine: Designate a specific time each day (e.g., 10 AM) to export and submit all "Ready to Submit" assessments
- Assign Responsibility: Have a dedicated OASIS Coordinator or Billing Manager responsible for this task
- Don't Let Assessments Sit: Delays in submission = delays in billing = cash flow problems
2. Monitor the "Submitted" Tab Daily
- Check the Time Since Submission column
- If any submission is > 5 business days without a response, log into the CMS portal to check for responses manually
- If > 7 business days, contact your state's OASIS support line
3. Prioritize Rejections
- When an assessment is rejected, notify the clinical team immediately (don't wait days)
- Set a goal: All rejections corrected and resubmitted within 3 business days
- Track rejection reasons to identify patterns (e.g., if the same clinician makes the same error repeatedly, provide targeted training)
4. Use the CMS Submission ID for Tracking
- Always paste the CMS Submission ID when marking an assessment as submitted
- This allows you to quickly look up the submission in the CMS portal if there's a question or delay
- Without the ID, you'll have to search by patient name and date, which is much slower
5. Document Everything
- Keep a log (spreadsheet or notes) of:
- Submission dates
- CMS Submission IDs
- Acceptance/Rejection dates
- Rejection reasons
- This log is invaluable during audits or if CMS disputes a submission
6. Train Clinicians on Common Rejection Reasons
- Review the "Rejected" tab monthly and identify the top 3-5 rejection reasons
- Provide targeted training to clinicians:
- "We've had 10 rejections this month for 'M0100 date before M0030' - remember, the assessment completion date must be on or after the SOC date"
- "We've had 5 rejections for 'M1800 value out of range' - review the allowed values for each functional status item"
7. Set Up Email Alerts (If Your CMS Portal Supports It)
- Many state CMS portals allow you to enable email notifications for submission responses
- If available, enable this so you're notified immediately when CMS accepts or rejects a submission (instead of checking manually each day)
8. Coordinate with Billing Team
- Weekly Meeting: Have a brief weekly sync between the OASIS Coordinator and Billing team
- Discuss:
- How many assessments were accepted this week (billing can now proceed for those episodes)
- How many rejections are outstanding (billing is blocked for those episodes)
- Expected timeline for resubmissions
22.11 Common Scenarios & Troubleshooting
Scenario 1: Assessment Stuck in "Submitted" for 10+ Days
What's Happening:
- You submitted the assessment to CMS 10 days ago, but still no response (no acceptance or rejection)
What to Do:
- Log into your state's CMS OASIS portal
- Look up the submission using the CMS Submission ID or patient name/date
- Check the status in the portal:
- If accepted: Manually mark it as "Accepted" in your system (CMS may have sent a response that you missed)
- If rejected: Download the rejection report and mark it as "Rejected" in your system
- If still pending: Contact your state's OASIS support line (they can investigate if there's a system issue)
Scenario 2: Clinician Says They Fixed the Errors, But Assessment Still in "Pending Correction"
What's Happening:
- The clinician corrected the OASIS form and resubmitted it, but it's still showing in the "Pending Correction" tab
What to Do:
- Check the QA Center - the corrected assessment should be in the QA queue as "Pending Review"
- If it's in QA, approve it (assuming the errors are fixed)
- Once approved and signed (if needed), the assessment will automatically move from "Pending Correction" back to "Ready to Submit"
- If the clinician says they submitted it but it's not in QA:
- The clinician may have saved the form but not completed it (they need to click "Complete Visit" or "Finalize Assessment" to send it to QA)
- Contact the clinician to verify
Scenario 3: CMS Accepted the Assessment, But Care Order Is Still Not "Active"
What's Happening:
- You marked the OASIS SOC as "Accepted," but the Care Order status didn't automatically change to "Active"
What to Do:
- Verify the assessment type: The auto-activation only happens for SOC, Recert, and ROC (not Transfer, Discharge, Death)
- Check the Care Order manually: Navigate to Care Orders > [Patient's Care Order] > Details
- If the status is still "PENDING_POC_SIGNATURE," there may be a system issue
- Manual Override (Admin Only): If needed, an administrator can manually change the Care Order status to "Active" from the Care Order Details page
- Contact IT Support: If the issue persists, report it as a bug
Scenario 4: Accidentally Marked Assessment as "Submitted" Before Actually Submitting to CMS
What's Happening:
- You clicked "Mark as Submitted" too early (before uploading to the CMS portal), and now the assessment is in the "Submitted" tab but hasn't actually been submitted
What to Do:
- Navigate to the Submitted tab
- Find the assessment
- Click Actions > Update Status
- Select "Force Status Change" (if available) or "Mark as Ready to Submit"
- This moves the assessment back to "Ready to Submit"
- Now, follow the proper workflow: Export XML → Submit to CMS → Mark as Submitted (with the real CMS Submission ID)
Scenario 5: CMS Rejection Reason Is Unclear or Cryptic
What's Happening:
- The rejection reason shows a cryptic code like "CRITICAL [con-invalid-lineside-jod1-non-lineside...]" and you don't understand what it means
What to Do:
- Download the CMS Validation Report from the CMS portal - this report usually includes a more detailed explanation of each error code
- Common Rejection Code Translations:
con-invalid-lineside-jodXoften means a consistency rule violation (e.g., two items with conflicting values)format-errormeans a data format issue (e.g., date in wrong format, value out of range)missing-requiredmeans a required item is blank
- Contact CMS Support: If the validation report is still unclear, call your state's OASIS support line and ask them to explain the specific error code
- Notify the clinical team with as much detail as possible: Even if you don't fully understand the error, paste the entire rejection reason into the notification so the clinician can review the OASIS form and identify the issue
Scenario 6: Resubmitted Assessment Was Rejected Again for the Same Reason
What's Happening:
- The clinician corrected the assessment and resubmitted it, but CMS rejected it again for the same error
What to Do:
- Review the correction: Ask the clinician to show you exactly what they changed
- Compare the old and new XML files: Export both versions and compare them side-by-side to verify the change was actually saved
- Common Causes:
- The clinician made the change in the wrong section (e.g., changed M0100 but the error was about M0090)
- The clinician saved the change locally but didn't resubmit the form through QA, so the old version was used
- The error message was misinterpreted (e.g., "M0100 must be on or after M0030" means M0100 ≥ M0030, but the clinician made it M0100 < M0030)
- Provide hands-on training: If the clinician is struggling with the correction, schedule a screen-share session to walk them through it