Chapter 1: Sandbox Signup & Initial Access
Chapter Overview
What You'll Learn:
- What is the Sandbox environment and why it matters
- How to create your agency account using the self-service signup
- Understanding Guided Onboarding vs Self-Service Sandbox
- How to log in for the first time
- Navigating the dashboard and understanding key features
- Accessing Agency Settings and reviewing your profile
- Understanding the difference between Sandbox and Production
Time to Complete: 15-20 minutes
Who Should Read This: Agency Administrators, anyone setting up a new agency account
1.1 Sandbox Environment Overview
What is the Sandbox Environment?
The Sandbox is a safe, isolated testing environment where you can:
- Learn the system without affecting real patient data
- Test workflows and features
- Train your staff
- Experiment with configurations
- Practice documentation before going live
- Automatically populated with demo data to help you explore immediately
💡 TIP: Think of Sandbox as your "practice area" - nothing you do here affects real patients or billing.
Sandbox vs Production
| Feature | Sandbox | Production |
|---|---|---|
| Purpose | Testing & Training | Real Patient Care |
| Patient Data | Demo/Test Data Only | Real PHI |
| OASIS Export | ❌ Disabled | ✅ Enabled |
| OASIS Submission | ❌ Cannot submit to CMS | ✅ Can submit to CMS |
| Billing | ❌ Test claims only | ✅ Real claims |
| CCN Required | ❌ Optional | ✅ Required |
| Cost | 🆓 Free | 💳 Subscription Required |
| Demo Data | ✅ Auto-populated | ❌ N/A |
⚠️ IMPORTANT: You MUST complete sandbox testing before requesting production access. Production requires a valid CCN (CMS Certification Number) and paid subscription.
ℹ️ NOTE: All Sandbox agencies have demo data pre-loaded with sample patients, care orders, visits, and OASIS assessments so you can explore features immediately.
1.2 Getting Started: Two Onboarding Options
When you visit the Betasky Health platform, you have two ways to get started:
Step 1: Navigate to the Get Started Page
Open your web browser and navigate to:
https://app.betaskyhealth.com/
You'll see the "Get Started with Betasky" page:
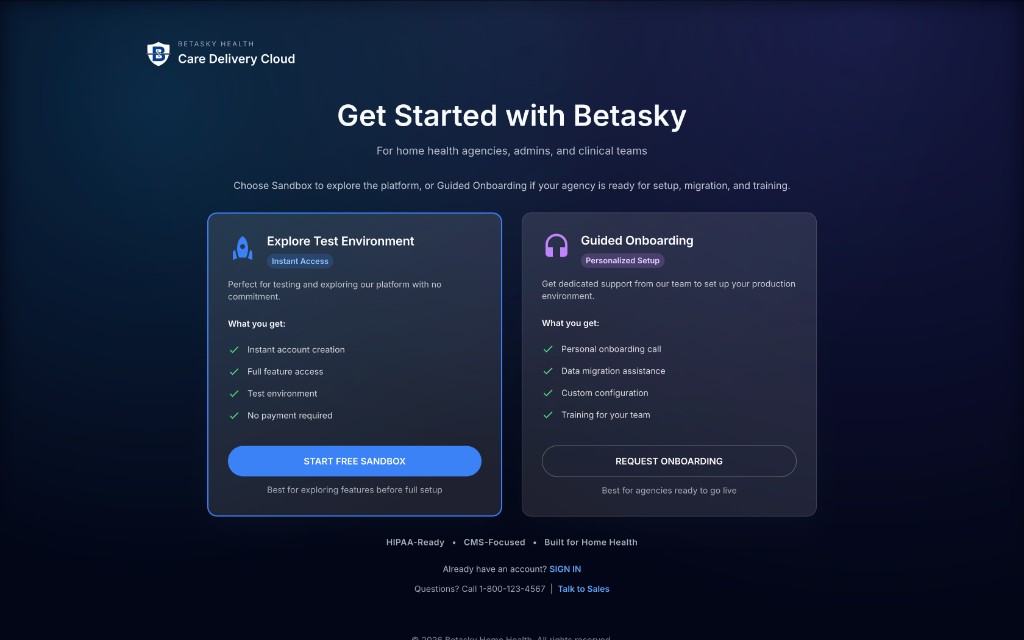
Screenshot 1: Get Started page showing two onboarding options
Understanding Your Two Options
Option 1: Explore Test Environment (Self-Service Sandbox) 🚀 Recommended for Quick Start
This is the instant access option. Perfect for:
- ✅ Testing and exploring the platform with no commitment
- ✅ Full feature access immediately
- ✅ Test environment (Sandbox mode)
- ✅ No payment required
- ✅ Demo data automatically populated
What you get:
- Instant account creation
- Full feature access
- Test environment
- No payment required
Best for: Exploring features before full setup
Option 2: Guided Onboarding (Personalized Setup)
This is the white-glove service option. Perfect for:
- ✅ Agencies ready for production setup
- ✅ Need help with data migration
- ✅ Want personalized configuration
- ✅ Require team training
What you get:
- Personal onboarding call
- Data migration assistance
- Custom configuration
- Training for your team
Best for: Agencies ready to go live
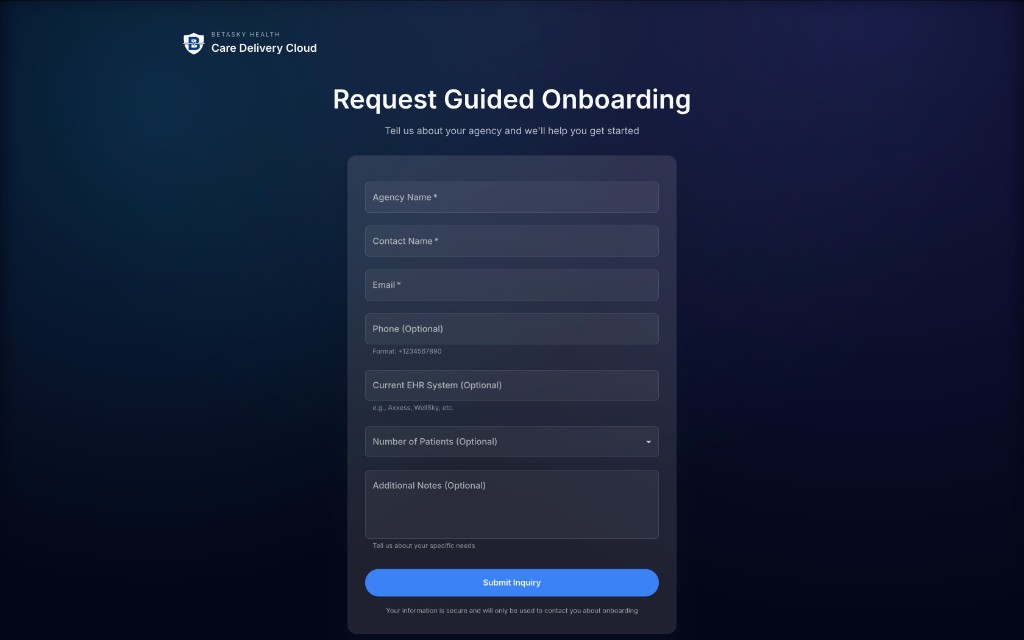
Screenshot 2: Request Guided Onboarding form with agency information fields
💡 TIP: For this manual, we'll focus on Option 1: Self-Service Sandbox since it gives you immediate access to explore the system.
1.3 Creating Your Sandbox Agency Account (Self-Service)
Prerequisites
Before you begin, make sure you have:
- ✅ Agency name (can be anything for testing)
- ✅ Agency address
- ✅ Valid business email address
- ✅ Phone number
- ✅ Modern web browser (Chrome, Firefox, Safari, or Edge)
ℹ️ NOTE: For Sandbox testing, you can use placeholder information. For production, accurate information is required.
Step-by-Step Signup Process
Step 1: Click "START FREE SANDBOX"
From the Get Started page (Screenshot 1), click the blue "START FREE SANDBOX" button under "Explore Test Environment."
You'll be taken to a 5-step signup wizard.
Step 2: Enter Your Agency Name
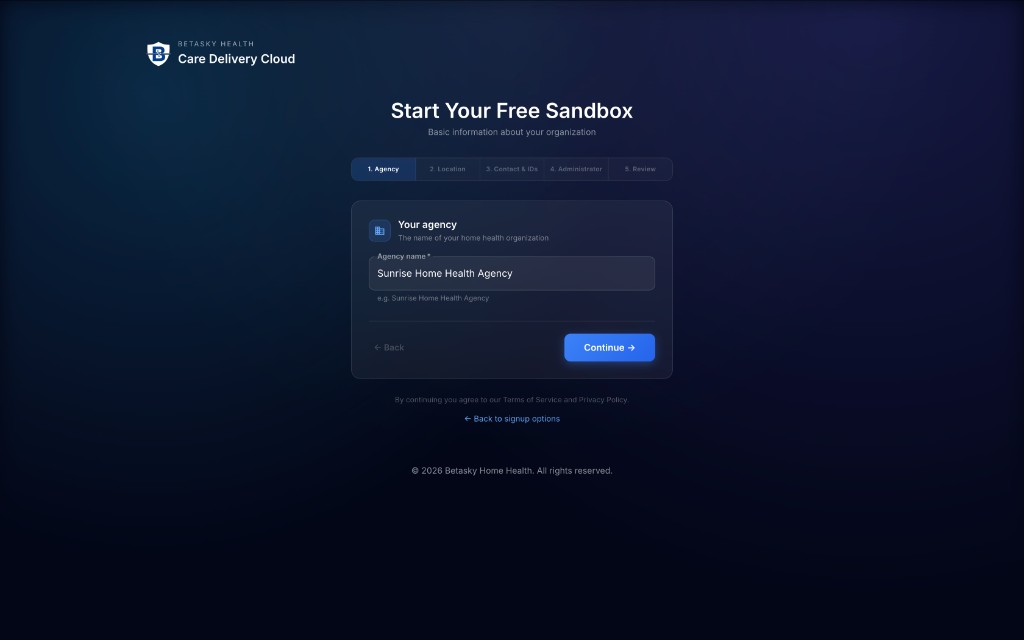
Screenshot 3: Step 1 - Agency name entry
Your agency - The name of your home health organization
-
Agency name* (required)
- Enter your agency's name
- Example: "Sunrise Home Health Agency"
- This will appear throughout the system
-
Click the blue "Continue" button to proceed
💡 TIP: You can use any name for sandbox testing. This can be changed later if needed.
⚙️ PROGRESS INDICATOR: You'll see steps at the top: 1. Agency → 2. Location → 3. Contact & IDs → 4. Administrator → 5. Review
Step 3: Enter Agency Address (Location)
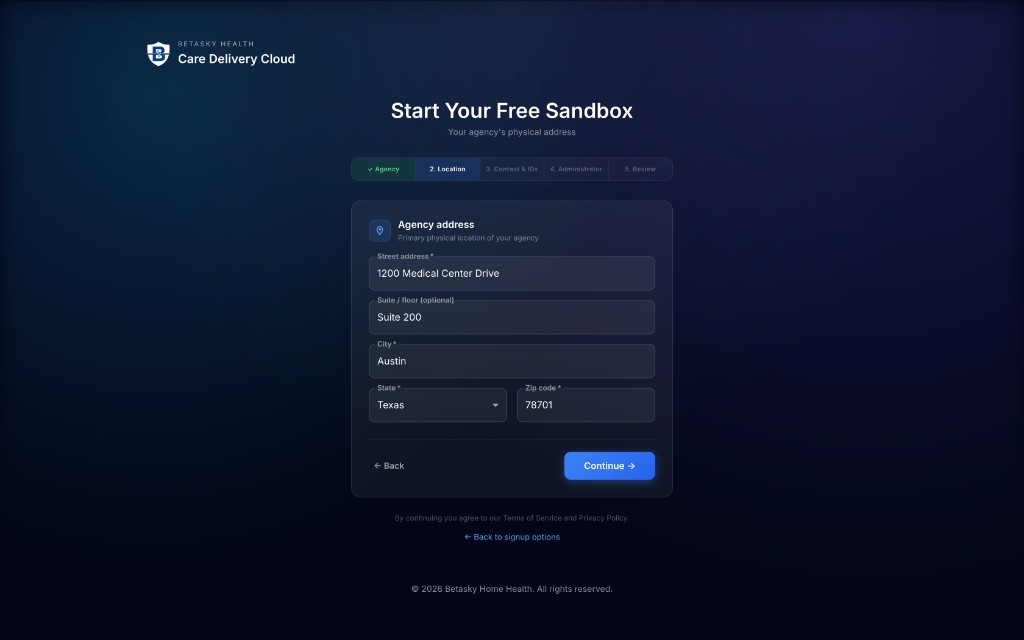
Screenshot 4: Step 2 - Agency physical address
Agency address - Primary physical location of your agency
Fill in the following fields:
-
Street address* (required)
- Example: "1200 Medical Center Drive"
-
Suite / floor (optional)
- Example: "Suite 200"
-
City* (required)
- Example: "Austin"
-
State* (required)
- Dropdown selection
- Example: "Texas"
-
Zip code* (required)
- Example: "78701"
-
Click "Continue"
Step 4: Enter Contact Information and Provider Identifiers
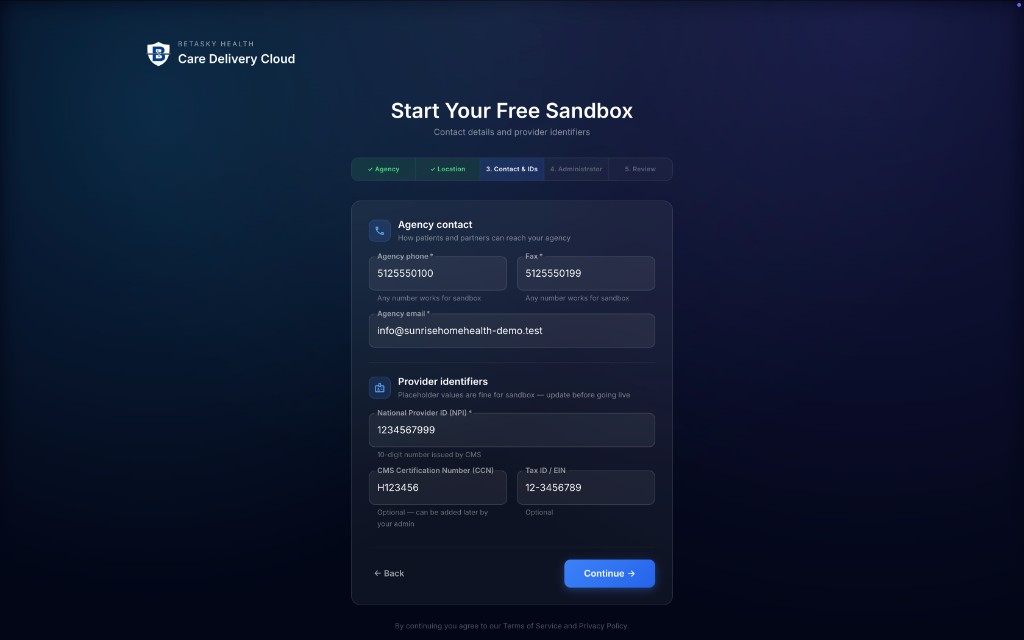
Screenshot 5: Step 3 - Contact details and provider identifiers
This screen has two sections:
Section 1: Agency contact How patients and payers can reach your agency
-
Agency phone* (required)
- Format: (###) ###-####
- Example: "5125550100"
- Note: "Any number works for sandbox"
-
Fax* (required)
- Format: (###) ###-####
- Example: "5125550199"
- Note: "Any number works for sandbox"
-
Agency email* (required)
- Agency general email
- Example: "info@sunrisehomehealth-demo.test"
Section 2: Provider identifiers Placeholder values are fine for sandbox — update before going live
-
National Provider ID (NPI)* (required)
- 10-digit number issued by CMS
- Example: "1234567989"
- ℹ️ NOTE: For sandbox, any 10-digit number works. For production, you need your actual NPI from https://npiregistry.cms.hhs.gov
-
CMS Certification Number (CCN) (optional)
- 6-character code (2 letters + 4 digits)
- Example: "HI23456"
- ⚠️ IMPORTANT: Optional for sandbox. REQUIRED for production and Medicare billing.
- Format: State code (2 letters) + 4 digits (e.g., TX1234, CA5678)
-
Tax ID / EIN (optional)
- Federal Employer Identification Number
- Example: "12-3456789"
-
Click "Continue"
ℹ️ WHAT IS CCN? The CMS Certification Number proves your agency is certified by Medicare to provide home health services. Without CCN, you cannot:
- Go live to production
- Bill Medicare
- Submit OASIS to CMS
You receive your CCN after passing Medicare certification survey. This is optional in sandbox but required for production.
Step 5: Create Administrator Account
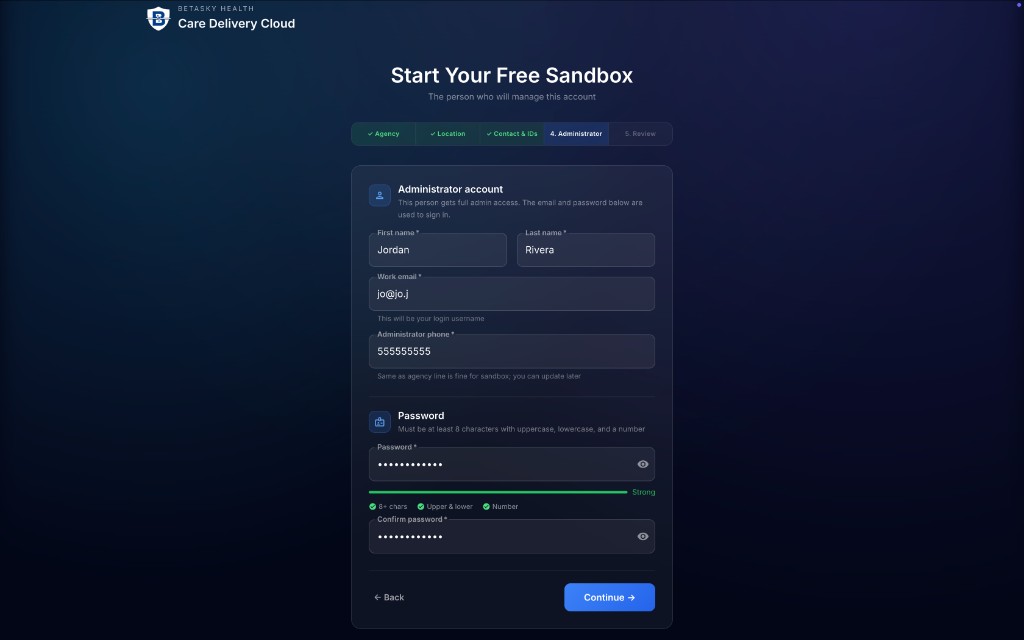
Screenshot 6: Step 4 - Administrator account creation
Administrator account This person gets full access. The email and password below are used to sign in.
Personal Information:
-
First name* (required)
- Your first name
- Example: "Jordan"
-
Last name* (required)
- Your last name
- Example: "Rivera"
-
Work email* (required)
- This will be your login username
- Must be a valid email you can access
- Example: "jo@jo.j"
- ⚠️ IMPORTANT: You'll use this email to log in
-
Administrator phone* (required)
- Your phone number
- Example: "555555555"
- Note: "Same as agency line is fine for sandbox; you can update later"
Password Requirements:
-
Password* (required)
- Must be at least 8 characters
- Must contain:
- ✅ 8+ characters (green checkmark when met)
- ✅ Upper & lower case letters (green checkmark when met)
- ✅ A number (green checkmark when met)
- Example: "············" (shown as dots)
- 👁️ Eye icon: Click to show/hide password
-
Confirm password* (required)
- Re-enter the same password
- Must match exactly
💡 TIP: Use a password manager to generate and store a strong password.
⚠️ SECURITY: Never share your admin credentials. Each staff member should have their own account.
Password strength indicator:
- Green bar: "Strong" password
- All three requirements checked with green ✅ icons
- Click "Continue"
Step 6: Review and Create Account
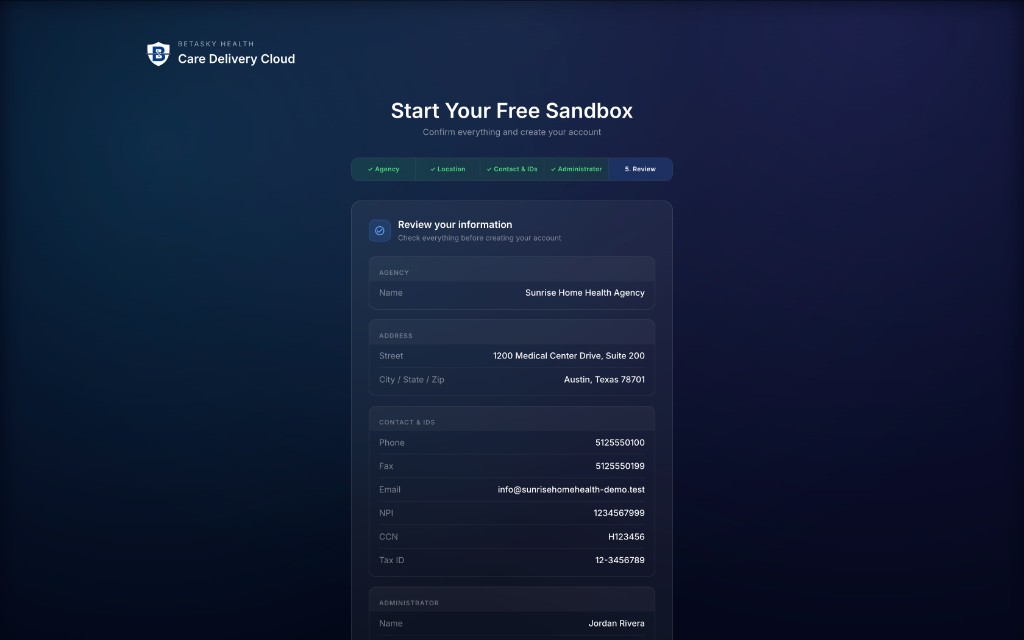
Screenshot 7: Step 5 - Review information and create account
Review your information Check everything before creating your account
This screen shows a summary of all information you entered:
AGENCY
- Name: Sunrise Home Health Agency
ADDRESS
- Street: 1200 Medical Center Drive, Suite 200
- City / State / Zip: Austin, Texas 78701
CONTACT & IDS
- Phone: 5125550100
- Fax: 5125550199
- Email: info@sunrisehomehealth-demo.test
- NPI: 1234567989
- CCN: HI23456
- Tax ID: 12-3456789
ADMINISTRATOR
- Name: Jordan Rivera
- Email: jo@jo.j
- Phone: 555555555
- Password: ········ (hidden)
Important Option:
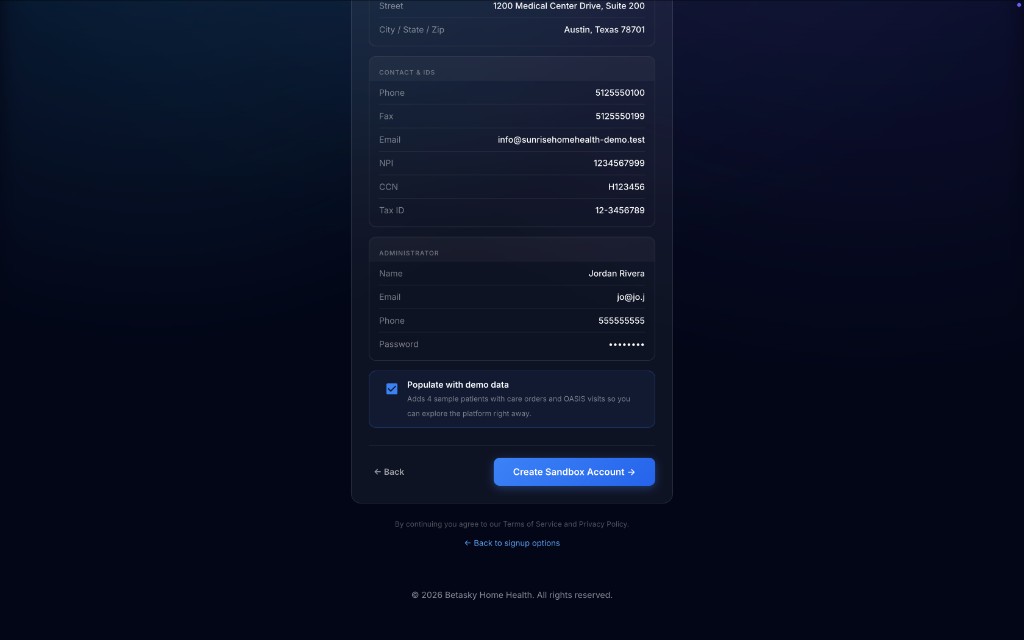
Screenshot 8: Review page (scrolled) showing demo data checkbox
At the bottom, you'll see:
☑️ Populate with demo data Adds 4 sample patients with care orders and OASIS visits so you can explore the platform right away.
✅ RECOMMENDED: Leave this checkbox CHECKED for sandbox testing. This will:
- Add 4 sample patients
- Create sample care orders
- Add sample visits
- Include sample OASIS assessments
- Help you explore features immediately without manual data entry
Final Steps:
- Review all information carefully
- ← Back button: Go back to edit any section
- Ensure "Populate with demo data" is checked ✅
- Click the blue "Create Sandbox Account" button
By continuing you agree to our Terms of Service and Privacy Policy ← Back to signup options (link at bottom)
Step 7: Account Created - Redirecting to Dashboard
After clicking "Create Sandbox Account," the system will:
- ✅ Create your agency
- ✅ Create your administrator account
- ✅ Populate demo data (if checked)
- ✅ Automatically log you in
- ✅ Redirect you to the dashboard
🎉 NO EMAIL VERIFICATION REQUIRED - You're logged in immediately!
1.4 First Login - Dashboard Overview
Welcome to Your Dashboard!
After account creation, you'll be automatically logged into your dashboard:
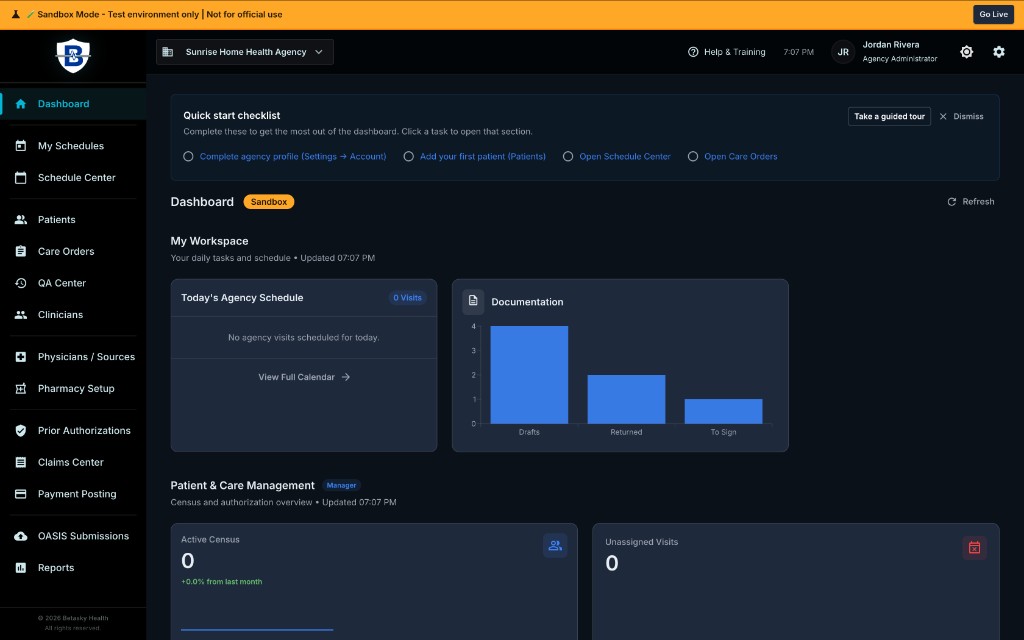
Screenshot 9: Dashboard after first login with Sandbox mode indicator
✅ SUCCESS: You're now logged into your Sandbox agency!
Understanding the Dashboard Layout
Let's explore what you're seeing:
1. Sandbox Mode Banner (Top - Orange Bar)

Screenshot 10: Sandbox Mode banner at the top
⚠️ "Sandbox Mode - Test environment only | Not for official use"
This orange banner appears on every page while you're in Sandbox mode. It reminds you that:
- You're in a test environment
- No data is official
- Claims and OASIS submissions are disabled
"Go Live" button - Click this when you're ready to request production access (covered in the Going Live (Sandbox → Production) chapter)
2. Top Navigation Bar
From left to right:
- 🏠 Betasky Logo - Click to return to dashboard
- 📂 Agency Selector - "Sunrise Home Health Agency" dropdown (for multi-agency users)
- 🎓 Help & Training - Access training resources
- 🕐 Time - Current time (7:02 PM in screenshot)
- 👤 User Info - "JR" avatar, "Jordan Rivera", "Agency Administrator"
- 🔔 Notification Bell (if applicable)
- ⚙️ Settings Gear - Quick settings access
- ⚙️ System Settings - Additional settings
3. Left Sidebar Navigation
Your main menu for accessing all system features:
Currently visible sections:
- 🏠 Dashboard (currently selected - blue highlight)
- 📅 My Schedules
- 📅 Schedule Center
- 👥 Patients
- 📋 Care Orders
- ✓ QA Center
- 👨⚕️ Clinicians
- 🏥 Physicians / Sources
- 💊 Pharmacy Setup
- 📄 Prior Authorizations
- 💰 Claims Center
- 💳 Payment Posting
- 📊 OASIS Submissions
- 📈 Reports
💡 TIP: We'll explore each of these sections in detail in later chapters.
4. Quick Start Checklist
At the top of the dashboard, you'll see:
"Quick start checklist" Complete these to get the most out of the dashboard. Click a task to open that section.
This checklist helps you complete essential setup tasks:
☐ Complete agency profile (Settings → Account) ☐ Add your first patient (Patients) ☐ Open Schedule Center ☐ Open Care Orders
You can:
- ✅ Take a guided tour - Interactive walkthrough of the system
- ✖️ Dismiss - Hide the checklist
💡 TIP: Even if you dismiss this, you can always access these features from the sidebar.
ℹ️ NOTE: Since "Populate with demo data" was checked during signup, you already have sample patients and care orders! This checklist is optional for sandbox exploration.
5. My Workspace
"Your daily tasks and schedule • Updated 07:07 PM"
This section shows your personal workspace:
Today's Agency Schedule
- Shows: "0 Visits"
- Currently: "No agency visits scheduled for today"
- View Full Calendar → button
Documentation
- Bar chart showing:
- Drafts: 4 (blue bar - tallest)
- Returned: 2 (blue bar - medium)
- To Sign: 1 (blue bar - short)
6. Patient & Care Management (Manager Section)
"Census and authorization overview • Updated 07:07 PM"
Active Census
- Shows: 0
- "+0.0% from last month" (green text)
Unassigned Visits
- Shows: 0
💡 NOTE: These numbers will update as you explore and add data, or you can view the pre-populated demo data by navigating to the Patients or Schedule Center sections.
Exploring Demo Data
Since you checked "Populate with demo data" during signup, you have:
- ✅ 4 sample patients
- ✅ Sample care orders
- ✅ Sample OASIS visits
- ✅ Sample assessments
To view demo data:
- Click "Patients" in the left sidebar
- Or click "Open Schedule Center" from the Quick Start Checklist
- Or click "Care Orders" to see episodes of care
We'll explore these in detail in later chapters!
1.5 Accessing User Menu and Settings
Understanding Your User Account Options
Let's explore the user menu in the top-right corner.
Step 1: Click Your User Info
Click on your name or avatar in the top-right corner:
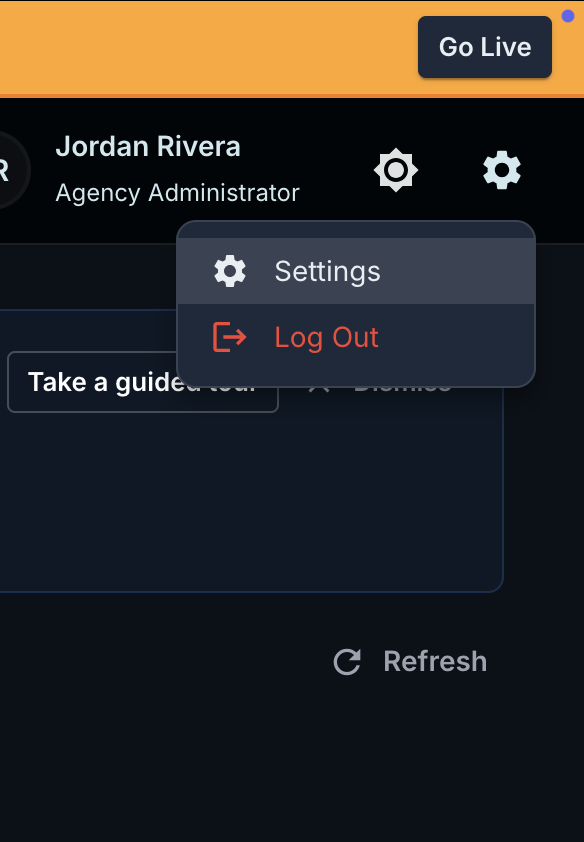
Screenshot 11: User dropdown menu showing Settings and Log Out options
You'll see a dropdown menu with:
Jordan Rivera Agency Administrator
Two options:
- ⚙️ Settings - Access your account and agency settings
- 🚪 Log Out - Sign out of the system (red text)
💡 TIP: Click Settings to access agency information, user management, and system configuration.
1.6 Agency Settings Overview
Accessing Agency Settings
From the user menu (Screenshot 11), click ⚙️ Settings.
You'll be taken to the Agency Settings page:
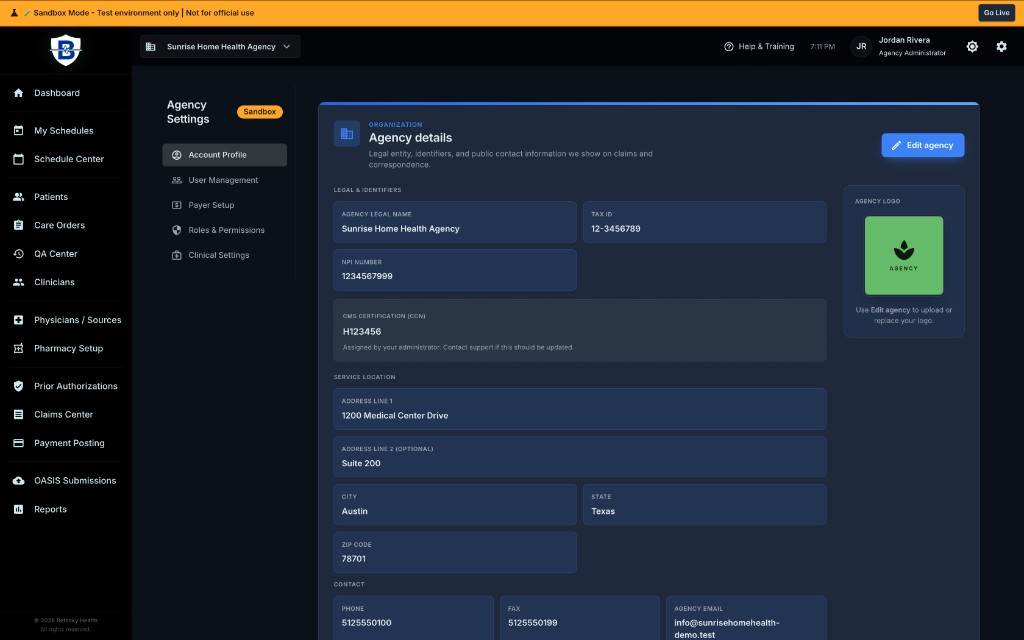
Screenshot 12: Agency Settings page showing agency details and left sidebar menu
Agency Settings Layout
The Agency Settings area has:
Left Sidebar Menu (Settings Navigation)
- ⚙️ Account Profile (currently selected)
- 👥 User Management
- 💳 Payer Setup
- 🔒 Roles & Permissions
- ⚙️ Clinical Settings
We'll focus on Account Profile in this chapter. Other sections are covered in Chapters 4-13.
Reviewing Your Agency Profile
The Account Profile page shows all the information you entered during signup.
You'll see a Sandbox badge (orange) next to the page title, reminding you you're in test mode.
ORGANIZATION Section
Agency details Legal entity, identifiers, and public contact information we show on claims and reports
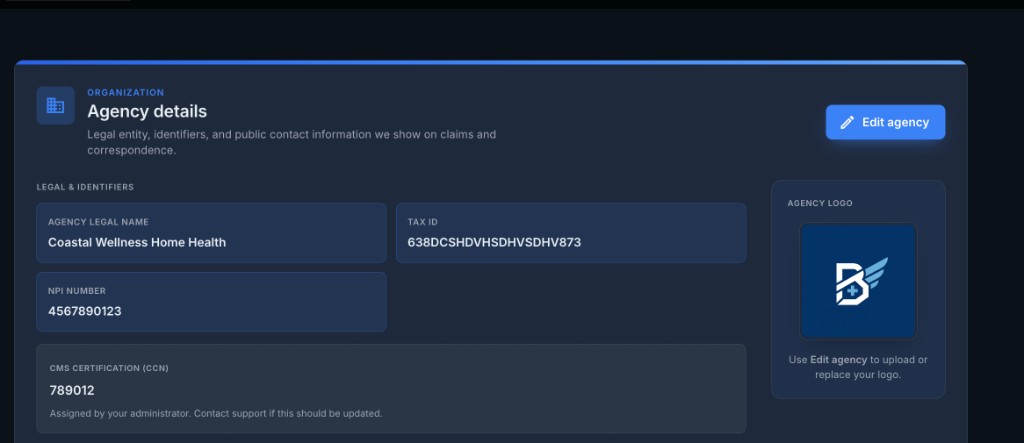
Screenshot 12a: Organization section showing Agency Legal Name, NPI, CCN, Tax ID, and Agency Logo
LEGAL & IDENTIFIERS
Fields displayed:
- AGENCY LEGAL NAME: Sunrise Home Health Agency
- TAX ID: 12-3456789
- NPI NUMBER: 1234567989
- CMS CERTIFICATION (CCN): HI23456
- Note below: "Assigned by your administrator. Contact support if this should be updated"
AGENCY LOGO (Right side)
- Green placeholder icon showing "AGENCY"
- Text: "Use Edit agency to upload or replace your logo."
📝 Edit agency button (blue) - Click to edit these fields
SERVICE LOCATION Section
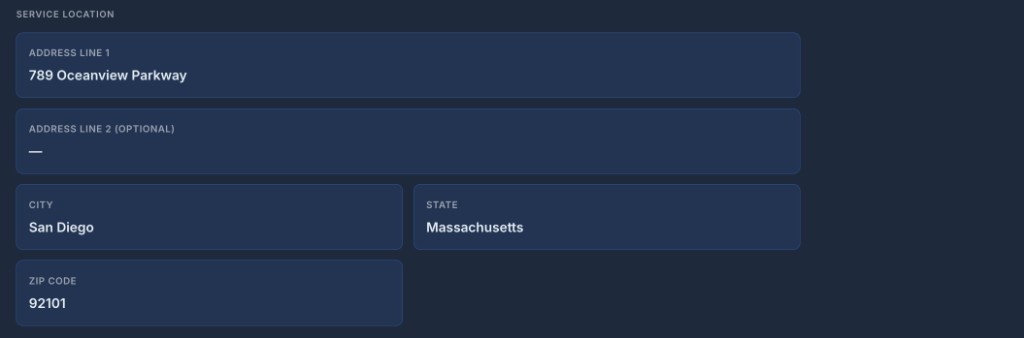
Screenshot 12b: Service Location section showing address fields
ADDRESS LINE 1: 1200 Medical Center Drive
ADDRESS LINE 2 (OPTIONAL): Suite 200
CITY: Austin
STATE: Texas (dropdown)
ZIP CODE: 78701
CONTACT Section (Scroll down to see)

Screenshot 13a: Contact section showing Phone, Fax, and Agency Email
PHONE: 5125550100
FAX: 5125550199
AGENCY EMAIL: info@sunrisehomehealth-demo.test
Security Section (Below Contact)

Screenshot 13b: Security section showing Change password button
🔒 Security Protect your login — use a strong, unique password
Change password button - Click to update your password
Account Section (Bottom)

Screenshot 13c: Account section showing Log out button
👤 Account End your session on this device
🚪 Log out button - Sign out of the system
Editing Agency Information
To update any agency information:
- Scroll to the section you want to edit
- Click the 📝 Edit agency button (blue, top-right)
- Make your changes
- Click Save (button will appear after editing)
💡 TIP: You can update agency information at any time. Changes take effect immediately.
⚠️ IMPORTANT: Some fields like CCN may require admin approval before changes are saved.
1.7 Understanding Sandbox vs Production
Now that you're in the system, let's understand the key differences between where you are (Sandbox) and where you'll eventually go (Production).
Current Status: Sandbox Mode
Every page in Sandbox mode displays the orange banner at the top:
Screenshot 10 (repeated): Sandbox Mode banner
⚠️ Sandbox Mode - Test environment only | Not for official use
Sandbox Environment - What You Have Now
✅ Available Features:
- Full system access for testing
- All core features enabled
- User management
- Patient intake and care orders
- Visit scheduling
- OASIS form completion (but cannot submit to CMS)
- QA review workflows
- Claims generation (test mode only)
- Prior authorization management
- All reports and analytics
- Demo data pre-populated (4 patients, care orders, visits)
❌ Limitations (Sandbox Only):
- Cannot export OASIS XML for CMS submission
- Cannot mark OASIS as "Submitted to CMS"
- Claims are test claims only (not real billing)
- No integration with real clearinghouses
- Data is isolated (test data only)
💡 Best Use Cases for Sandbox:
- Train new staff members
- Test workflows before production use
- Practice documentation
- Set up templates and preferences
- Learn the system thoroughly
- Test new features when released
Production Environment - What Comes Next
When you click the "Go Live" button in the orange banner, you'll see:
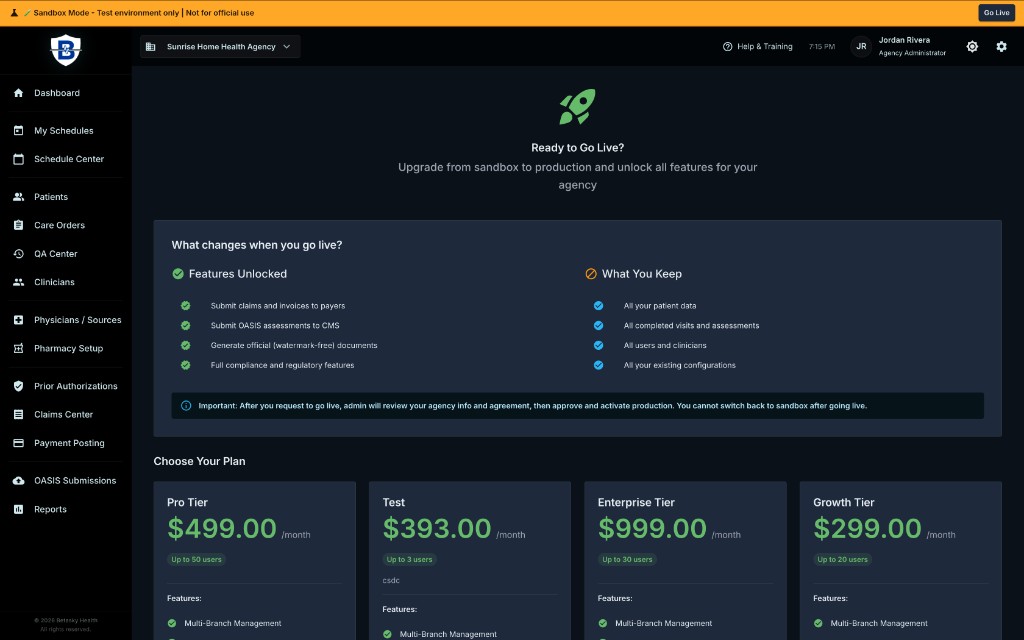
Screenshot 14: Ready to Go Live modal showing features unlocked and plan options
🚀 Ready to Go Live? Upgrade from sandbox to production and unlock all features for your agency
What Changes When You Go Live?
✅ Features Unlocked:
- Submit claims and invoices to payers
- Submit OASIS assessments to CMS
- Generate official watermark-free documents
- Full compliance and regulatory features
🔄 What You Keep:
- All your patient data
- All completed visits and assessments
- All users and clinicians
- All your existing configurations
⚠️ Important: After you request to go live, admins will review your agency info and agreement, then approve and activate production. You cannot switch back to sandbox after going live.
Choosing Your Subscription Plan
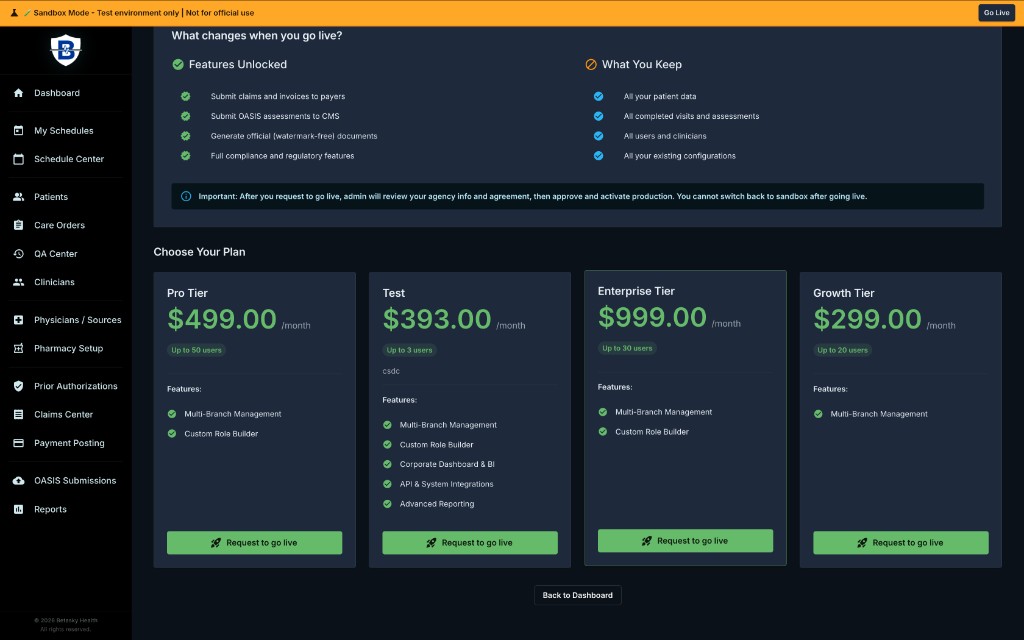
Screenshot 15: Subscription plan options (Pro, Test, Enterprise, Growth Tiers)
Choose Your Plan
Four subscription tiers are available:
-
Pro Tier - $499.00/month
- Up to 50 users
- Features:
- Multi-Branch Management
- Custom Role Builder
-
Test - $393.00/month
- Up to 3 users
- Code: csdc
- Features:
- Multi-Branch Management
- Custom Role Builder
- Corporate Dashboard & BI
- API & System Integrations
- Advanced Reporting
-
Enterprise Tier - $999.00/month
- Up to 30 users
- Features:
- Multi-Branch Management
- Custom Role Builder
-
Growth Tier - $299.00/month
- Up to 20 users
- Features:
- Multi-Branch Management
Each plan includes a 🚀 Request to go live button.
At the bottom: Back to Dashboard button
When Should You Go Live to Production?
Consider requesting production access when:
✅ Agency Requirements Met:
- Medicare certification complete (CCN received)
- State license active
- Insurance/bonding in place
- Policies and procedures documented
✅ System Training Complete:
- Admin trained on all features
- Clinicians trained on visit documentation
- Schedulers trained on calendar management
- Billers trained on claims process
- QA staff trained on review workflows
✅ Testing Complete:
- Practiced full patient admission workflow
- Completed test OASIS assessments
- Scheduled and documented test visits
- Generated test claims
- Reviewed all reports
✅ Data Ready:
- Payers configured
- Fee schedules set up
- Physicians added
- Pharmacies added
- Visit types configured
- Users created with correct roles
💡 TIP: Most agencies spend 2-4 weeks in Sandbox before going live.
Production Requirements
⚠️ Production Requirements:
- ✅ Valid CCN (CMS Certification Number)
- ✅ Medicare certification completed
- ✅ Paid subscription plan selected
- ✅ Go-Live request approved by admins
- ✅ Staff training completed
- ✅ Policies and procedures in place
ℹ️ NOTE: See the Going Live (Sandbox → Production) chapter for complete details on the go-live process.
1.8 Logging Out and Logging Back In
How to Log Out
You have two ways to log out:
Method 1: From User Menu
- Click your name in the top-right corner
- Click 🚪 Log Out (red text)
Method 2: From Agency Settings
- Navigate to Settings → Account Profile
- Scroll to the Account section at the bottom
- Click 🚪 Log out button
Logging Back In
To access your account again:
Step 1: Navigate to Login Page
Go to: https://app.betaskyhealth.com/
You'll see the login page:
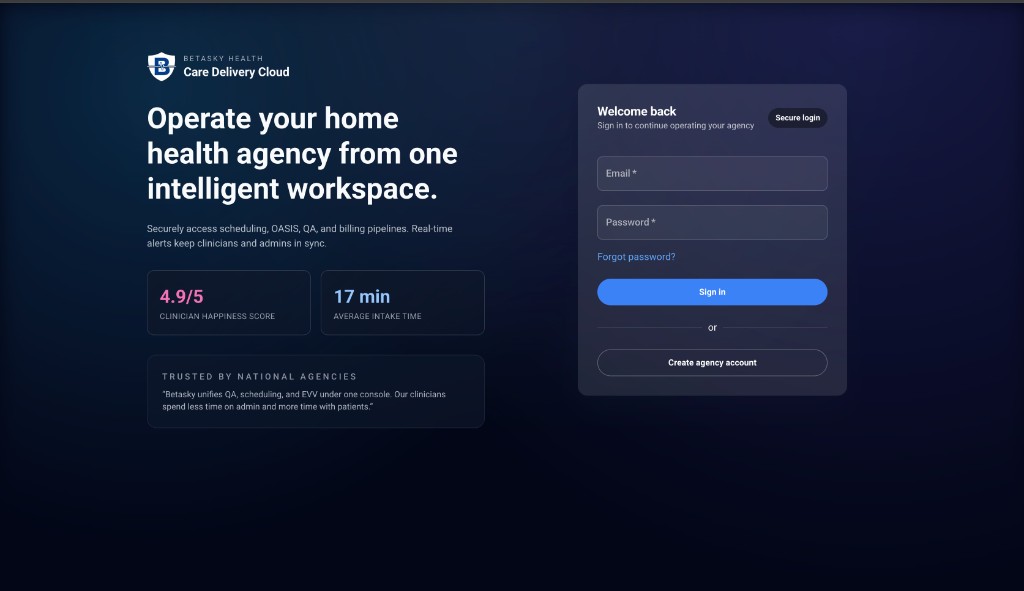
Screenshot 16: Login page
Step 2: Enter Your Credentials
Welcome back Sign in to continue operating your agency
On the right side, you'll see the login form:
-
Email* (required)
- Enter the email you used during signup
- Example: "testbetasky@gmail.com" (shown in screenshot)
-
Password* (required)
- Enter your password
- Shown as dots (········)
Forgot password? link - Click if you need to reset your password
Step 3: Click "Sign In"
Click the blue "Sign in" button.
After successful login, you'll be taken back to the dashboard.
Alternative options on login page:
or
Create agency account button - For new users who haven't signed up yet
Left side of login page shows:
- "Operate your home health agency from one intelligent workspace."
- "Securely access scheduling, OASIS, QA, and billing pipelines. Real-time alerts keep clinicians and admins in sync."
- 4.9/5 CLINICIAN HAPPINESS SCORE
- 17 min AVERAGE INTAKE TIME
- Trusted by national agencies testimonial
⚠️ SECURITY:
- Click the eye icon (👁️) next to the password field to show/hide your password
- Use "Secure login" tab if available for additional security
Forgot Password?
If you forgot your password:
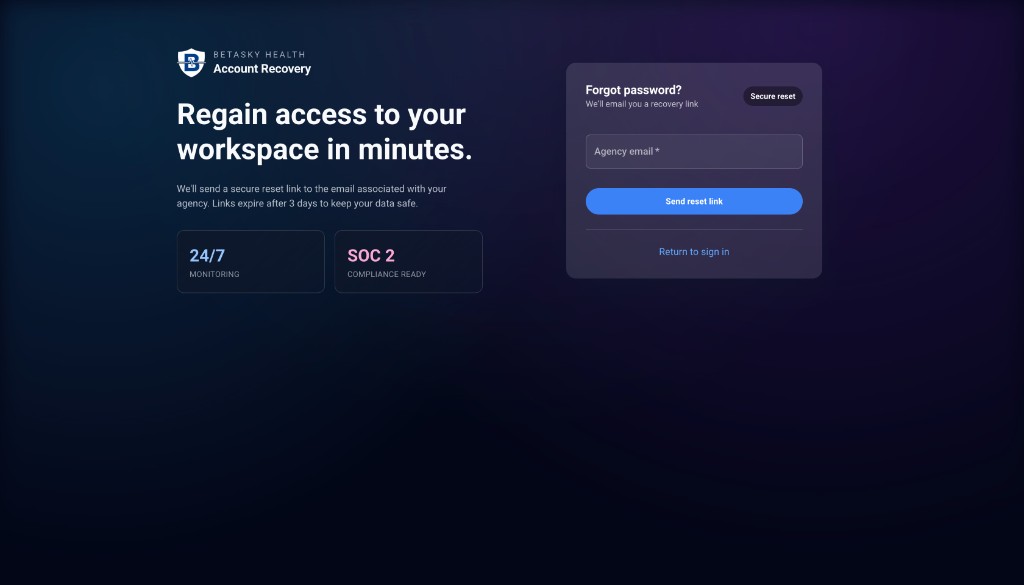
Screenshot 17: Forgot password page
Forgot password? We'll email you a recovery link
- Click "Forgot password?" on the login page
- Enter your Agency email* in the field
- Click the blue "Send reset link" button
The system will:
- Send a secure reset link to your email
- Link expires after 3 days to keep your data safe
- Email contains instructions to create a new password
Additional information shown:
- 24/7 MONITORING
- SOC 2 COMPLIANCE READY
Return to sign in link - Go back to the login page
Login Troubleshooting
⚠️ Common Login Issues:
"Invalid credentials" or "Incorrect email or password"
- ✅ Double-check your email spelling
- ✅ Verify password (try typing it in a text editor first)
- ✅ Check if Caps Lock is on
- ✅ Use "Forgot Password?" to reset
"Account not found"
- ✅ Verify you're using the correct email
- ✅ Check if you completed the signup process
- ✅ Contact support if the issue persists
"Account locked" or "Too many attempts"
- ✅ Wait 15-30 minutes and try again
- ✅ Contact support if issue persists
Browser issues
- ✅ Clear browser cache and cookies
- ✅ Try a different browser (Chrome, Firefox, Safari, Edge)
- ✅ Disable browser extensions temporarily
- ✅ Check internet connection